
Operation Manual


23
Free Hand Mending and Embroidery
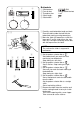
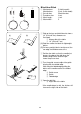
q Stitch pattern: 1 or 3
w Presser foot: None
e Thread tension: 2 to 6
r Stitch length: Any
t Stitch width*: Adjust as necessary
y Darning plate
qwe
rt
y
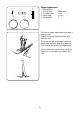
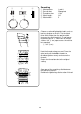
• Mending
Place the darning plate. Remove the foot
holder and presser foot. Center the hole in
the fabric on an embroidery hoop, as
shown.
Lower the presser bar and sew at a slow
speed.
Move the fabric back and forth slowly until
the darning area is covered. Turn the fabric
a 1/4 turn (90°), and sew another layer of
stitching over the first layer.
NOTE:
If fabric is thin or badly damaged, attach a
separate piece of fabric under the hole to
reinforce it.
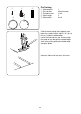
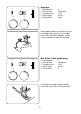
• Embroidery
Put on the darning plate.
Remove the foot holder and foot.
Adjust the stitch width.
Mark the drawing on the fabric with tailor’s
chalk.
Set fabric in the embroidery hoop and put it
under the needle.
Lower the presser bar to engage upper
thread tension. Holding upper thread with
right hand, turn the handwheel toward you.
Pull upper thread to let bobbin thread out of
fabric.
At medium speed, stitch along the marked
line.
After mending or embroidery sewing,
remove the darning plate and put back the
foot holder and foot.