Owner’s Manual OUT DOOR FIRE PIT TABLE ITEM# 55-1220 R R C R US ANS Z21.
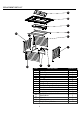
REPLACEMENT PARTS LIST A B C D G H E K J F PART A B C D E F G H I J K L M N O P Q I DESCRIPTION QUANTITY Burner cover 1 Table Top 1 1 Burner Burner Bracket 1 Side Panel 1 1 Side Panel 2 1 Support frame 1 Gas Tank Bracket(side) 1 Gas Tank Support(bottom) 1 Guard bar 1 Door frame 1 4 Bolt(8*50mm, Washer,Spring washer,Nut) 10 Bolt(6*22mm) Washer 1 Screwdriver Wrench 1 Allen wrench 1 Bolt(6*12mm) Washer 2 2
HARDWARE CONTENTS Bolt(8*50mm) Nut(M8) Washer Spring washer Qty. 4 N M L Bolt (6*22mm) Washer Qty. 10 Q O Wrench Qty. 1 Screwdriver Qty.1 P Allen wrench Qty. 1 Bolt (6*12mm) Washer Qty. 2 SAFETY INFORMATION Please read and understand this entire manual before attempting to assemble, operate or install the product. This appliance has been tested to and complies with the ANS Z21.97-2010, Outdoor Decorative Gas Appliances CGA CR 9 7-003 Outdoor Gas Fireplaces .
SAFETY INFORMATION DANGER DANGER EXPLOSION - FIRE HAZARD Keep solid combustibles, such as building materials, paper or cardboard, a safe distance away from the fire pit as recommended by the instructions. Provide adequate clearances around air openings into the combustion chamber. Never use the fire pit in spaces which do or may contain volatile or airborne combustibles, or products such as gasoline, solvents, paint thinner, dust particles or unknown chemicals.
SAFETY INFORMATION WARNING WARNING California Proposition 65 Combustion by-products produced when using this product contain chemicals known to the State of California to cause cancer, birth defects, and other reproductive harm. This product is fueled by propane gas. Propane gas is invisible, odorless, and flammable. An odorant is normally added to help detect leaks and can be described as a "rotten egg”smell. The odorant can fade over time so leaking gas is not always detectable by smell alone.
OPERATION CHECKLIST Operation Checklist For a safe and pleasurable heating experience, perform this checklist before each use. Before Operating: 1. I am familiar with entire owner’s manual and understand all precautions noted. 2. All components are properly assembled, intact, and operable. 3. No alterations have been made. 4. All gas connections are secure and do not leak. 5. Wind velocity is below 10 mph. 6. Unit will operate at reduced efficiency below 40 F/4.44 C 7.
ASSEMBLY INSTRUCTIONS 1.Connect Side panels (E)(F)( G) and (K ) using (M) Bolts (6*22mm)、Was hers (M6), as show in figure 1.Make sure panel (E,F) is installed with the hole on the bottom. the side s 1 E G Hardware Used M Bolt(6*22mm) x8 Washer (M6) x8 K F P 2. Using (Q) Bolts (6*12mm) and Washers (M6) to connec t the Gas Tank Bracket (H) to the unit . 2 H Using (M) Bolts (6*22mm) and Washers (M6) to connec t the Gas Tank Support (I) to the unit.
ASSEMBLY INSTRUCTIONS 3. Put the Burner Bracket(D) on the unit. Fix the Burner (C) onto the Burner Bracket(D). Make sure the switch of the burner is aligned with the Door Frame (K). 3 G C E D F K 4. At tach the 4 - Bolt(8*50mm) (L) to the corners of the Table Top (B).Then align the Bolts with the holes in the Burner Bracket and assembled panels and insert the Bolts through the holes. Secure theTable Top to the Burner Bracket and assembled panels with4 - Washer/Spring Washer/Nuts (L).
ASSEMBLY INSTRUCTIONS 5 Put the Burner Cover (A) on the burner, when the Fire Pit is NOT in use or after use. 5 6. Connect hose and regulator to cylinder. The propane gas and cylind er are sold separately. Use a standard 20 lb. propane cylinder only. Use this heater onl y with a propane vapor with drawal supply system. See chapter 5 of the standard for storage and han dling of liquefied petroleum gas, ANSI/NFPA 58. Your local library or fire department should have this b ook.
ASSEMBLY INSTRUCTIONS Adent ed, rusted or damaged propane cylinder may be hazardous and should be checked by your cylinder supplier. Never use a p ropane cylinder with a damaged valve connection. The propane cylinder must be constructed and marked in accor dance with the specifications for LP gas cylinder s of the U.S. Department of Transportation (DOT) or the standard f or cylinders, spheres and tubes for transportation of dangerous goods and commission, CAN/CSA-B339.
OPERATION INSTRUCTIONS Leak Check WARNING Perform all leak tests outdoors. Extinguish all open flames. NEVER leak test when smoking. Do not use the fire pit until all connections have been leak tested and do not leak. Hose / Regulator connection Regulator / Cylinder connection Underside of the burner 1. Make 2-3 oz. of leak check solution (one part liquid dishwashing detergent and three parts water). 2. Apply several drops of solution where hose attaches to regulator. 3.
OPERATION INSTRUCTIONS DANGER WARNING • CARBON MONOXIDE HAZARD • For outdoor use only. Never use inside house, or other unventilated or enclosed areas. This fire pit consumes air (oxygen). Do not use in unventilated or enclosed areas to avoid endangering your life. Very hot while in operation! Never lean over the fireplace while in use. Failure to comply with these instructions may result in serious bodily injury.
OPERATION INSTRUCTIONS WARNING FOR YOUR SAFETY Be careful when attempting to manually ignite this fire pit. Holding in the control knob for more than 10 seconds before igniting the gas will cause a ball of flame upon ignition. When fire pit is ON: Burner will display tongues of blue and yellow flame. These flames should not be yellow or produce thick black smoke, which would indicate an obstruction of airflow through the burners. The flame should be blue with straight yellow tops.
CARE AND MAINTENANCE Gas odor with extreme yellow tipping of flame. Fire pit does NOT reach the desired temperature. Fire pit glow is excessively uneven. Fire pit makes popping noises. Spiders and insects can nest in burner or orifices. This dangerous condition can damage fire pit and render it unsafe for use. Clean burner holes by using a heavy-duty pipe cleaner. Compressed air may help clear away smaller particles. Carbon deposits may create a fire hazard.
TROUBLESHOOTING P R OB L E M P O S S IB L E C A U S E C O R R E C T IV E A C T IO N Propane cylinder is frosted over Wait until the propane cylinder warms up and becomes unfrosted Burner will not stay lit Blockage in orifice Clear blockage Control knob is not in ON position Turn control knob to ON Gas pressure is low Turn cylinder valve OFF and fill the cylinder Outdoor temperature is less than 40ºF and tank is less than 1/4 full Use a full cylinder Control knob fully ON Check burner and orif