
Use and Care Manual


6
OPERATION CHECKLIST
Operation Checklist
For a safe and pleasurable heating experience, perform this checklist before each use.
Before Operating:
1. I am familiar with entire owner’s manual and understand all precautions noted.
2. All components are properly assembled, intact and operable.
3. No alterations have been made.
4. All gas connections are secure and do not leak.
5. Wind velocity is below 10 mph.
6. Unit will operate at reduced efficiency below 40 F
/4.44°C
7. Fire pit is outdoors (outside any enclosure).
8. There is adequate fresh air ventilation.Do not use this appliance if any part has been under water.
Immediately call a qualified service technician to inspect the appliance and to replace any part of
the control system and gas control which has been under water.
9. Fire pit is away from gasoline or other flammable liquids or vapors.
10. Fire pit is away from windows, air intake openings, sprinklers and other water sources.
11. Fire pit is at least 24 in. on rear and at least 24 in. on sides from combustible materials.
12. Fire pit is on a hard and level surface.
13. There are no signs of spider or insect nests.
14. All burner passages are clear.
15. All air circulation passages are clear.
16. Children and adults should be alerted to the hazards of high surface temperatures and should stay
away to avoid burns or clothing ignition.
17. Young children should be carefully supervised when they are in the area of the fire pit.
18. Clothing or other protective material should not be hung from the fire pit, or placed on or near the
fire pit.
19. Any guard or other protective device removed for servicing the fire pit must be replaced prior to
operating the fire pit.
20. Installation and repair should be done by a qualified service person. The fire pit should be inspected
before use and at least annually by a qualified service person.
21. More frequent cleaning may be required as necessary. It is imperative that control compartment,
burner and circulating air passageways of the fire pit be kept clean.
After Operation
1. Gas control is in OFF position.
2. Gas Tank valve is OFF.
3. Disconnect Gas line.
4. After each use, replace cap on tank.
PREPARATION
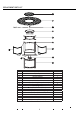
Before beginning assembly of product, make sure all parts are present. Compare parts with
package contents list and hardware contents above. If any part is missing or damaged, do not
attempt to assemble the product. Contact customer service for replacement parts.
Estimated Assembly Time: 60 minutes
Tools Required for Assembly(not included) :
Leak Detection Solution.