
Use and Care Manual


8
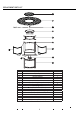
ASSEMBLY INSTRUCTIONS
3
4
C
G
G
3 )(. Place the Burner Bracket D onto the assembled panels
Panel G.
()Move the Burner C so that the burner controls can face
accommodate
(:NOTE There is a HOLE at the top of Panel G to
.)the control knob on the burner
hole
control
in Figure 3.
as shown
Make sure the switch of the burner is alignedwith the (G).
Attach the Connecting rod I to the Burner(C)using()
Latch through the hole at the top of the side
panel (G) .
4..
I
Latch