
Installation Sheet

AXESB-2C INSTALLATION GUIDE:
MAIN BODY INSTALLATION:
STEP 1:
Remove the Left or Right Side
Table from the ALXE cart.
(for the purpose of this guide the
AXESB-2C will be installed on
right side of the cart.)
The side table is supported by 4
Philips screws (10-32) accessible
from the bottom side.
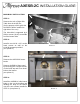
STEP 2:
Install 4 new 10-32 x 1/2” socket
head screws as well as the
11/16ӯ grommet provided.
(see picture 1)
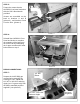
STEP 3:
Remove the AXESB-2C burner
knobs.
Remove AXESB-2C front panel
by loosening the 2 Philips screws
on the inside top and 2 hex-head
bolts at the bottom.
(see picture 2)
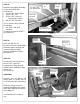
STEP 4:
Install the AXESB-2C side burner
body on the cart by hooking and
latching the body of the burner
onto the cart’s screws installed in
STEP 2. (see picture 3)
Picture 1
Picture 2