
Owner's Manual


26
Check to make sure that the burners and the drip tray are clean and free from obstructions.
Clean if necessary.
NOTE: No part of the grill should ever be lined with aluminum foil as it will interfere with airflow and can cause
a low heat condition in the firebox and a high heat condition inside the control panel.
BURNER BLOWS OUT:
First determine if the problem is being caused by location. If location is subject to high winds, reposition grill to
provide some protection by placing the back of the grill toward the wind.
Check the gas supply and flame characteristic according to the procedure under Low / Insufficient Heat.
Check to ensure that burners are correctly positioned in the grill according to the procedure on page 15.
Correctly installed burners should be seated firmly with no side-to-side movement.
ROTISSERIE WON’T LIGHT:
Follow the same procedure as “grill won’t light”, on page 25, to diagnose problems with the Rotisserie IR
burner. The IR burner flame may be hard to see in bright sunny conditions.
SMOKER BURNER WON’T LIGHT:
Follow the same procedure as “grill won’t light”, on page 25, to diagnose problems with the Smoker burner.
Remove the wood chip tray to better see the smoker burner flame.
When using the smoker with the main grill burners, the smoker burner should be lit first and allowed to preheat
before lighting the grill burners.
GRILL GETS TOO HOT:
IF THE GRILL GETS TOO HOT, TURN IT OFF IMMEDIATELY AND ALLOW IT TO COOL.
Perform a leak test according to the procedure on page 11. If leaks cannot be corrected, call for service before
attempting to use the grill.
LIGHTS DON’T WORK:
Check that power is connected and that the GFCI has not tripped.
LIGHT BULB AND LED REPLACEMENT:
NOTE: Disconnect all power to your Alfresco™ Gourmet grill before any service or light bulb replacement is
performed.
Light bulbs are located on the left and right side of the rear hood above the cooking area. The area around the
light fixtures and the light fixtures themselves become extremely hot during grill operation with or without the
lights being turned on.
BEFORE REPLACING ANY LIGHT BULB, ALLOW SUFFICIENT TIME FOR THE FIXTURES TO COOL
DOWN IF THE LIGHTS OR THE GRILL WAS TURNED ON, OR BOTH.
Light bulbs can reach several hundred degrees when operating, so allow plenty of time for them to cool down.
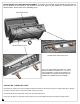
There are two types of lights on your ALXE grill. Note: Figure #10, requires replacing all LED as an Assembly.
Figure # 10
LED ASSEMBLY 12VDC
Part # (CONSULT FACTORY)
Figure # 9
G940120-G9 BASE
40W-120 VAC
Part# 210-0317