Contents CoPilot Overview .............................................................. 1 Safety Warning ................................................................... 1 Getting Started ................................................................. 2 Getting Started - Hardware. .......................................... 2 Getting Started - Get Connected ................................ 2 Uninstalling a Previous Version ...................................... 3 Installing CoPilot ....................
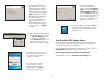
CoPilot Overview A Safety Warning Your CoPilot Live| Pocket PC Includes: Always keep your hands on the steering wheel and eyes on the road when driving! Install/Data Discs Quick Start Guide GPS Receiver Guide GPS Receiver (not in software-only packages) In-Vehicle Power Adapter (not in software-only packages) Vent Mount (not in software-only packages) Do not use this product in any way that interferes with safe and attentive operation of a vehicle.
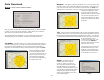
Getting Started - Hardware Getting Started - Get Connected (For complete instructions, see the GPS Receiver Guide that came with the product, or tap Tutorial in the Welcome screen on your Pocket PC.) In order to successfully transfer data from your desktop to your Pocket PC, you must have Microsoft ActiveSync 3.1 (or later) installed. This software is necessary to connect the two machines and is provided by your Pocket PC manufacturer.
Uninstalling a Previous Version Installing CoPilot If you have been using an earlier version of Pocket CoPilot, you must uninstall the application and its data before installing CoPilot. If you’re uninstalling CoPilot from a Pocket device and installing the same version on another device, you must deactivate the software on the first device before installing it again — see p. 6. NOTE: You must uninstall any previous version of CoPilot from your desktop/laptop and Pocket PC before proceeding (see above).
8. As the desktop installation proceeds, you will be given the choice to install the CoPilot map data to your hard drive. This is the recommended option and requires 700 MB of available space. If you choose None, you will need to insert the CoPilot Data Disc each time you download data to your Pocket PC or use CoPilot for trip planning on your desktop. 4.
Adding a Data Region Region Selection If you have purchased an additional data region after your initial purchase of CoPilot, you will need to modify the original (“Base”) installation and activate the new region. If you purchased an additional data region, when downloading map data to your Pocket PC you will need to make sure the proper region is active. To do this, on your desktop in Planning mode click the Map menu > Region > and check the desired region.
Deactivation and Licence Update Software Activation The CoPilot desktop software contains street-level maps for all of Europe, and CoPilot is offered with different licences that allow you to use some or all NOTE: CoPilot won’t open on your Pocket PC unless map data has previously been downloaded from CoPilot on the desktop. To launch CoPilot, first turn on your Pocket PC, attach the GPS receiver, and insert your QuickStart card (if provided).
Data Download to Your Pocket PC 3. To download to a Storage Card through a Card Reader: (In this example, again all options are available.) Pick the drive letter associated with your Storage Card Reader, then click Next to go to the Data Selection window. See CoPilot QuickStart below for a description of software included in downloads. See p. 12 for Options. NOTE: You can also download to a Storage Card through a PCMCIA adapter.
Data Download Map Area - This method of selecting data allows you to choose an area of data by drawing a box on the Data Download Wizard's map screen. In the Wizard, you enter a city name near which you would like to select data, then click Next. The map will zoom to that location. Then you create a box around the desired area by clicking and dragging your mouse across the map. The street-level data within that box will be selected.
Data Download Step 3: Select Your Data Use any of the three methods covered on the following pages (City Radius, Map Area, or Trip) to select one or more regions and then download your data. 4. Name the selection, then click Next. City Radius 1. Click the City Radius icon. 5. You will return to the Data Selection menu where you can select another data area if you like, using any method.
Map Area 1. Click the Map Area icon. 4. Name the selection, then click Next. 5. You will return to the Data Selection menu where you can select another data area if you like, using any method. When you are finished selecting data areas, click the Download icon to go to the final screen where you can build your download. 2. Enter a City, Country or Postal Code (address optional) within the area that you would like to download. Click Next. 3.
Trip 3a. Highlight a selection, click Select, then Add Stop. When all your stops have been entered, click Select Data. 1. Click the Trip icon. 4. By default a 20 mile radius around all stops and a width of 4 miles along the corridor which connects them will be highlighted. Note: CoPilot’s available memory calculations subtract 15 MB from the available memory on your storage card (If you are using one) to account for support files. 2. You now have three options for entering stops on your trip.
Data Download POI Download Options Step 4: Download the Data When you download a data region, you’ll get all roads within that region (but not roads outside the region). Also included with each download are regional points of interest (POI) such as gas stations, hotels, restaurants, visitor attractions, etc. When you’re ready to execute a download, the Wizard will display a list of Available Area(s) for download on the left side of the window.
Importing Custom Places CoPilot’s Custom Place Import Wizard enables you to import addresses from your Outlook Contacts database, an Excel file, or text file. (If you are using another type of database or contact manager, you can export your contacts/ locations to an Excel or text file before importing them into CoPilot.) These points are then added to CoPilot’s POI database in a category and type of your choice (the default category is “Custom”).
Editing Custom Places in the Database After custom places have been added to the database, they can be edited at any time. Select Manage Custom Places from the Tools menu, then highlight the custom place you wish to edit, click Edit, and make your changes. Click Apply when finished. NOTE: By default, addresses entered as Custom Places are assigned to the Custom POI category. You can change this assignment at any time by selecting another Category from the drop-down pick list as you edit. 7.
Using Your Pocket PC for Guidance 6. The Select Stop screen provides you with several different ways to enter a destination (described on the following pages): In CoPilot's Guidance Mode you will receive turn-by-turn route guidance information as you travel. For your safety the Driver Safety Screen will hide maps when your speed exceeds 16 k.p.h. to avoid distractions.
Start Driving! After entering one or more destinations, start driving and enjoy CoPilot’s spoken instructions, continuously updated maps and ETA’s, and automatic route recalculation capabilities. A text-only Driver Safety Screen will replace the Map Screen when your speed exceeds 16 km.p.h. Next Turn Instruction Next Turn Directional Arrow 3. Enter a house number if you like (it’s optional), then start typing a Street name. When a match appears on the list below, tap it, then tap Next. 4.
Entering a Home Address Favourites In the Select Stop screen, tap the Home button. The first time you use this button, you will be prompted to enter your home address. In the Select Stop screen, tap the Favourite button. A scrollable list will appear, providing quick access to the last 50 destinations that were entered. Enter your home address the same way you enter a new address (described on p. 15). The next time you tap Home, your home will be entered as a destination.
Contact Integration CoPilot allows you to link directly to Pocket Outlook to retrieve address information. With just a few of quick taps of the stylus, you can enter a contact’s home and/or work address as your destination. 5. The Contact address will be added to your trip itinerary as a stop. 1. Tap the Contact button in the Select Stop screen. 2. Type the first letters of your Contact’s first or last name. 3.
Finding Points of Interest In the Select Stop screen, tap the POI button to search for and/or enter a point of interest as a destination. 1. In the first POI screen you have the option to choose a Category and Type of POI from the drop-down pick lists. To narrow your search and cut down on the time it takes, you can also type the first few letters of a place you have in mind. Tap Next to continue. 4. When the search process is complete, a scrollable list of matches will appear.
Postcode Intersection To enter the intersection of two roads, tap the Intersection button in the Select Stop screen. Intersections are entered just like addresses (see p. 15-16), except that instead of a house number you enter a “First Street” and “Second Street”. In the Select Stop screen, tap the Postcode button. Enter an address the same way you enter a new address, but starting with a postal code. The address will be added to your stop list.
Saved Trip Latitude/Longitude 1. Highlight a trip (.trp file) in the list of saved trips, then tap Next. 1. Choose a format from the first drop-down pick list. Lat/longs can be entered in Decimal Degrees, Decimal Minutes, or degrees/ minutes/seconds (DMS). Tap More... then tap Saved Trip in the Select Stop screen to enter a trip that was built on your desktop and transferred to your Pocket PC. (See Trip Transfer, p. 12 for more about saved trips.) Tap More...
Driver Safety/Map/Itinerary Screens NOTE: It is not safe to attempt to alter settings on your Pocket PC while you are driving. Either have a passenger make changes, or pull over to a safe area. At the bottom of the Map Screen are the estimated time of arrival (ETA) at your next destination and distance to that destination, and one customizable data line (see p. 23). Tap Menu > View to select how you want the guidance screen to display.
Navigating Through CoPilot Screens Map Modes To switch views, tap Menu > View and choose a view from the drop-down menu. CoPilot gives you a choice of several different display modes for the Map Screen: Driver Safety Screen - Text only, switches to the map below 16 k.p.h. 3D Perspective Where Am I - Map screen, frames a close-up view of your current position. CoPilot’s two-dimensional default display mode can be changed to a three-dimensional perspective based off an isometric camera angle.
Trip Editing and Waypoints Picking Stops From the Map To get to the Going To screen from the guidance screens at any time, tap Menu > Trip > Edit. From here you can edit the current trip, add additional stops, or start a new trip. CoPilot enables you to pick a stop off the map when you don’t know the exact address of your destination. In any mode, tap and hold on your target location on the map. (A short tap displays street names if you’re not sure where you are pointing.
Detour Feature Selective Routing CoPilot’s Detour Feature allows you to preview an alternate route before deciding whether or not to take it. Perfect for situations in which traffic has suddenly slowed ahead of you, the Detour Feature will generate an alternate route and tell you exactly how much distance the new route will add to your trip. You can then make an informed decision about whether you’re better off driving through the delay or taking the new route.
Settings Menu Advanced Routing Options: Tap Menu > Options > Settings to change settings that affect CoPilot routing and functionality. Tap Advanced. Use the advanced routing options to completely change how CoPilot calculates routes. Avoid/Favor: There are five levels of Avoid/Favor for each road type. Note that a road type that is heavily avoided will not be completely excluded — CoPIlot will still use that road type if there is no other efficient alternative.
Map POIs Data areas that are currently downloaded to your mobile device are shown at the bottom of this screen. Tap Enabled to enable POI Alerts. CoPilot will then alert you with voice prompts to the presence of points of interest as you approach them. You can use the drop-down pick list to set how far away you’ll be when you receive the alerts. In the list of POI categories, select which types of POIs should be reported. Options in the Map tab are: Mile — Use miles as the unit of distance.
The GPS Menu GPS Status Tap Menu > Options > GPS to display the GPS menu. To view your satellite activity at any time, first tap the GPS Status option. Here you will receive information on speed, lat/long position, heading, and time and date. Setup GPS — Tap Setup GPS to connect CoPilot to your GPS receiver through an automatic scan or by setting the COM Port and Baud Rate manually.
Reset GPS Track Playback If CoPilot is having trouble acquiring a GPS fix, try tapping Reset GPS. You will be asked to enter a city within 100 miles of your current location: 1. Tap Next. 2. Type a country abbreviation. 3. Tap Next again. 4. In the next screen, enter a city or postal code. 5. Tap Finish. 1. CoPilot automatically creates .gps track files as you drive, and stores them at the end of each trip. To open a GPS track, Select Open Track to open a Windows folder of your stored .gps files.
Reference: Screens & Toolbars in Guidance Mode on Your Pocket PC Turn Receiving On/Off The following is a summary guide to the screens and toolbars you will see on your Pocket PC as you operate CoPilot in Guidance Mode. Tap Turn Receiving Off once if you want to turn GPS receiving off. Tap again to turn it back on. When receiving is off, CoPilot will be unable to provide driving instructions. Welcome Screen The Welcome screen appears when you first open CoPilot.
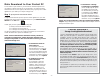
Determining Current Position Select Stop Screen When you see this screen, CoPilot is in the process of determining where you are. This can take a few seconds. The picture under the text will indicate how close you are to acquiring a fix. In this screen you add stops to your trip.
Map Screen Trip Buttons Tap the Menu button and then tap Trip to invoke these trip editing eatures: Next turn directional arrow. Edit... — The Edit button takes you back to the Going To screen where you can edit your trip (see p. 45). Distance to next turn. Route ahead highlighted in green, upcoming turn marked with yellow arrow. Add Stop... — The Add Stop button takes you to the Select Stop screen (see p. xx).
Trip Planning on Your Pocket PC You can use CoPilot on your Pocket PC for trip planning whether or not the GPS receiver is connected and receiving data. Planning Mode allows you to run a trip on your Pocket PC even when you're not in your car. You'll get driving directions and maps that you can use for reference before your trip begins. 5. To see driving directions, tap Menu > View > Itinerary. 1. First turn on your Pocket PC and launch CoPilot (tap Start > Programs > CoPilot).
Trip Planning on Your Desktop You can use CoPilot's desktop functions to map out routes and print maps and driving directions before getting on the road. Desktop trip planning is an additional feature of CoPilot that is in no way connected to using your Pocket PC for route guidance. Run Trip On the following pages you will find brief descriptions of CoPilot’s desktop trip planning capabilities.
Save Trip Print Save Trip button or Save Trip.../Save Trip As... in the File menu. Print button or Print... in the File menu. Opens a standard Windows dialog where you can name your trip and save it to your hard drive either before or after running it in the Trip Planner. Takes you to the standard Windows Print options for printing the active window that contains your map or driving directions. Activate the map or directions by clicking on it or selecting it in the Window menu. Select Print TravPak...
Zoom In More Detail Zoom In button or Zoom In in the Map menu. More Detail button or Detail > Show More in the Map menu. Each time you click this button, your view will be zoomed in by one increment. The zoom level is shown in the title bar of the map window. Click once to increase the level of detail you see on the map by one increment without changing the zoom level. Zoom Out Less Detail Less Detail button or Detail > Show Less in the Map menu. Zoom Out button or Zoom Out in the Map menu.
Zoom To Region Pick Stops Zoom to Region button or Zoom Region in the Map menu. This function allows you to zoom your map view to a specific area. Choices in the sub-menu will depend on which CoPilot data region(s) were purchased. To turn on Pick Stop mode, click the Pick Stops button or right-click on the map and select Pick Stops. Then click on any point on the map to enter it as a stop. The map view must be zoomed in to level 11 or 12.
Reference: CoPilot on Your Desktop Landmark Reporting The following is a guide to the main screens you will see as you use CoPilot on your desktop/laptop computer for trip planning. Map Window Menus and toolbar buttons to access all of CoPilot's desktop features. Click on a tab to frame any stop on your route. Select Landmark Reporting from the drop-down Trip menu. Map of area around your destination. Zoom in and move your cursor over a street to view its name.
Trip Planner Window (Contacts) Trip Planner Window (Points of Interest) Enter a person’s first or last name and hit . CoPilot will search your Contacts database for matches. Click Points of Interest tab. Enter a city or postal code in which you would like to search, a radius within which to search, choose a category and type from the drop-down menu, and click the binoculars to search. You can also enter a name to narrow down the search in the POIs that start with box.
Fuel Cost Calculator Routing Options Click the Options button in the Trip Planner window to access CoPilot routing options. To calculate an estimate of your fuel costs for a trip, select Fuel Cost Calculator from the Trip menu before you run your route. Fill in the average cost per gallon of fuel that you expect to pay, and the distance per gallon you can expect to get in your vehicle. Click OK, then run your trip.
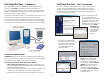
CoPilot Live Communications On the following pages you'll see how you can communicate with someone on the road from within CoPilot (the Live Mode sections) and what it's like to be the driver using CoPilot when someone else is communicating with you (the Driving with Live sections). To set up your Pocket PC for tracking/messaging from within CoPilot or on the web, see Driving with Live - Pocket PC Setup, p. 43-44.
Live Mode - Automatic Vehicle Location (AVL) Click your cursor in the space just below the Standard Response Buttons, and begin typing. The Standard Response Buttons are included in every message and are described in detail in Driving with Live - Receive/Respond To Messages (p. 45). You have complete control over the Customizable Response Buttons: 1) Choose to display 1-4 buttons by clicking the corresponding number at the bottom of the screen.
When the driver responds to your trip itinerary update, the response is displayed in the Message Center: Live Mode - Send Trip Itinerary Updates To send a Trip Itinerary Update to the driver, click the New Trip button on the toolbar and create a trip itinerary in the Trip Planner window just as you would in Planning Mode (see p. 34).
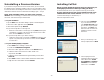
Pocket PC Setup for Live Web Tracking 2. Tap the Messenger tab and check Enable Messaging to turn messaging on so that messages can be sent and received. If you would like access to CoPilot’s Live Network on the Web so that your friends, family, and co-workers can message and track you from anywhere in the world, you’ll need to set up your Pocket PC for web tracking.
Driving with Live - Receive Trip Itinerary Updates Driving with Live - Receive/Respond To Messages When you are the driver and a message is sent to you, CoPilot displays it on top of all other windows. CoPilot's text-to-speech engine will speak the text of the message out loud when the message is received.
About GPS Technology ability to track your location. Like your car radio, GPS tracking can also be affected by weather conditions if severe. CoPilot will continue tracking as soon as adequate signals are available. Despite these limitations, you can expect CoPilot to provide you with useable and accurate information most of the time. CoPilot will alert you if accurate information is unavailable. The Global Positioning System (GPS), developed by the U.S.
3. From the top toolbar select Help > E-mail Data Corrections 4. Complete the form and click Send From within CoPilot on your Pocket PC, you can also select Settings in the Options menu, then tap the Guidance tab and be sure that Amplify Speech Volume is checked.
Software Registration Return Policy Registered users are entitled to technical support, discounts on new versions of CoPilot, new product information, and software enhancements. NOTE: Software activation does NOT register your software, they are two separate processes. ALK's 30-Day Money Back Guarantee and Return Policy We know you'll love our products.
CoPilot ® End-User License Agreement Electronic reproduction and transmission of output to remote locations is not permitted. ALK retains all rights not expressly granted. Nothing in this License Agreement constitutes a waiver of ALK's rights under the U.S. copyright laws or other applicable copyright laws or any other federal or state law. NOTE: On the following pages there are three separate license agreements for users of North American, European, and Australian Data.
tion or addition to this warranty. Some states do not allow the exclusion or limitation of implied warranties or limitation of liability for incidental or consequential damages, so the above limitation or exclusion may not apply to you. Fonix have signed. The software in this packet ("Software") and its media and documentation (collectively, the "Product") are protected by copyright and other intellectual property laws and international treaties.
limited to such 30 day period provided that limitation is permitted by applicable law. ALK® Technologies, Inc. LICENCE AGREEMENT CoPilot | Pocket PC 6 with EUROPEAN DATA LICENSES: 1 User End-User Remedies: If the Software does not conform to the "Limited Warranty" above, ALK's entire liability and your sole and exclusive remedy will be, at ALK's option, either to (i) correct the error, or (ii) help you work around the error, or (iii) accept a return and issue a refund through your retailer.
TERMS AND CONDITIONS Disclaimer of Liability: ALK AND ITS LICENSORS (INCLUDING THEIR LICENSORS AND SUPPLIERS) SHALL NOT BE LIABLE TO YOU: IN RESPECT OF ANY CLAIM, DEMAND OR ACTION, IRRESPECTIVE OF THE NATURE OF THE CAUSE OF THE CLAIM, DEMAND OR ACTION ALLEGING ANY LOSS, INJURY OR DAMAGES, DIRECT OR INDIRECT, WHICH MAY RESULT FROM THE USE OR POSSESSION OF THE INFORMATION; OR FOR ANY LOSS OF PROFIT, REVENUE, CONTRACTS OR SAVINGS, OR ANY OTHER DIRECT, INDIRECT, INCIDENTAL, SPECIAL OR CONSEQUENTIAL DAMAGES ARI
the Government is subject to restrictions as set forth in subparagraph (c)(1)(ii) of The Rights in Technical Data and Computer Software clause at DFARS 252.2277013 or subparagraphs (c)(1) and (2) of the Commercial Computer SoftwareRestricted Rights at 48 CFR 52.227-19, as applicable. Contractor/manufacturer is Fonix Corporation at 1225 Eagle Gate Tower, 60 East South Temple St., Salt Lake City, Utah 84111.
TO THE QUALITY, PERFORMANCE, MERCHANTABILITY, OR FITNESS FOR A PARTICULAR PURPOSE. IN NO EVENT WILL ALK BE LIABLE FOR DIRECT DAMAGES IN EXCESS OF THE Licence FEE OR ANY INDIRECT, SPECIAL, INCIDENTAL, OR CONSEQUENTIAL DAMAGES ARISING OUT OF THE USE OR INABILITY TO USE THE SOFTWARE OR DOCUMENTATION, EVEN IF ADVISED OF THE POSSIBILITY OF SUCH DAMAGES. IN NO CASE SHALL ALK'S LIABILITY EXCEED THE AMOUNT OF THE Licence FEE.
documentation (collectively, the "Product") are protected by copyright and other intellectual property laws and international treaties. You have no title to, or ownership of, the Product, other than its physical media. Fonix reserves all rights not specifically granted in this Agreement. GENERAL: If any term of this Agreement is found void or unenforceable, all other terms shall remain in full force and effect. This Agreement shall be governed by the internal laws of Utah.
Subject to this clause 4, the Licensor, its employees, agents and contractors will not be liable (whether in contract, tort or otherwise) to you or any other person for any loss, costs, damage or injury of any kind whatsoever (including incidental or consequential loss) wholly or partly arising out of or in connection with the use of or inability to use the Whereis Data. 5. TERMINATION The Licensor may terminate the Licence immediately if you are in breach of any provision of this agreement.