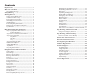
Contents Requirements ......................................................... 1 Welcome to CoPilot! ..............................................1 About GPS Technology .................................................... 1 Safety Warning ................................................................... 2 Getting Started ................................................................. 2 Setting Up Your GPS Receiver........................................ 2 In-Vehicle Hardware Setup ....................
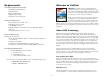
Requirements Welcome to CoPilot! Your CoPilot Live|Pocket PC Includes: Imagine…a CoPilot at your side that always knows where you are, where you’re going, and exactly how to get there. Now confidently drive anywhere while CoPilot, using the latest, most accurate GPS technology, shows you all the correct turns to take to reach your destination.
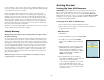
Getting Started location is within 15 - 30 feet of your exact position. If CoPilot initially places you on the wrong road (this happens only rarely), keep driving and CoPilot will automatically correct itself and find your proper position. Setting Up Your GPS Receiver WARNING: Never leave GPS receiver in closed vehicle that exceeds 140o F. Once you have installed CoPilot on your device, you will need to set up the GPS receiver.
Setting Up a Bluetooth GPS Receiver: 2. Proper Charging Techniques (IMPORTANT) The first time that you use CoPilot, you will need to turn on Bluetooth on your device. From the Start screen on your device, tap the Bluetooth button in the bottom right corner and turn on Bluetooth. Then: The Bluetooth GPS only needs to be charge for a maximum of 1 hour or until the Battery LED is off.
Connecting Your Pocket PC Uninstalling a Previous Version NOTE: If a Quickstart installation memory card was included with your purchase of CoPilot, you do not need to do this. If you have a previous version of CoPilot installed, uninstalling before you install a newer version is optional. In order to successfully transfer data from your desktop to your Pocket PC, you must have Microsoft ActiveSync 3.1 (or later) installed.
Installing CoPilot NOTE: After the CoPilot Pocket PC installation, your Pocket PC will automatically be soft reset. It is recommended that you exit any open applications and save any open files before starting the Copilot installation. Installing From CD’s: Your desktop/laptop and Pocket PC should both be turned on. The cradle/cable for your mobile device must be connected to your desktop through either a USB or Serial port. Your Pocket PC should be connected to your desktop via ActiveSync (see p. 4).
Product Key Entry and Activation The first time you launch CoPilot on your Pocket PC you will be prompted for your product key. You can find this key behind the scratch-off panel on the supplied product key card. Scratch off the panel and input the product key carefully. Press Done. f. Enter the activation code into the Pocket PC when prompted and tap “Next”. g. Once complete, you will see the message ‘license activated successfully’. Select Finish.
Map Download to Your Pocket PC 3. To download to a Storage Card through a Card Reader: (In this example, again all options are available.) Pick the drive letter associated with your Storage Card Reader, then click Next to go to the Data Selection window. See CoPilot QuickStart below for a description of software included in downloads. See p. 12 for Options. NOTE: You can also download to a Storage Card through a PCMCIA adapter.
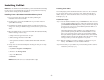
Data Download Map Area - This method of selecting data allows you to choose an area of data by drawing a box on the Data Download Wizard's map screen. In the Wizard, you enter a city name near which you would like to select data, then click Next. The map will zoom to that location. Then you create a box around the desired area by clicking and dragging your mouse across the map. The street-level data within that box will be selected.
Data Download Step 3: Select Your Data Use any of the three methods covered on the following pages (City Radius, Map Area, or Trip) to select one or more regions and then download your data. 4. Name the selection, then click Next. City Radius 1. Click the City Radius icon. 5. You will return to the Data Selection menu where you can select another data area if you like, using any method.
Map Area 1. Click the Map Area icon. 4. Name the selection, then click Next. 5. You will return to the Data Selection menu where you can select another data area if you like, using any method. When you are finished selecting data areas, click the Download icon to go to the final screen where you can build your download. 2. Enter a City, State or ZIP Code (address optional) within the area that you would like to download. Click Next. 3.
Trip 3a. Highlight a selection, click Select, then Add Stop. When all your stops have been entered, click Select Data. 1. Click the Trip icon. 4. By default a 20 mile radius around all stops and a width of 4 miles along the corridor which connects them will be highlighted. Note: CoPilot’s available memory calculations subtract a certain amount from the available memory on your storage card (if you are using one) to account for support files. 2. You now have three options for entering stops on your trip.
Data Download POI Download Options Step 4: Download the Data When you download a data region, you’ll get all roads within that region. Also included with each download are regional points of interest (POI) such as gas stations, hotels, restaurants, visitor attractions, etc. When you’re ready to execute a download, the Wizard will display a list of Available Area(s) for download on the left side of the window.
Importing Custom Places CoPilot’s Custom Place Import Wizard enables you to import addresses from your Outlook Contacts database, an Excel file, or text file. (If you are using another type of database or contact manager, you can export your contacts/ locations to an Excel or text file before importing them into CoPilot.) These points are then added to CoPilot’s POI database in a category and type of your choice (the default category is “Custom”).
Editing Custom Places in the Database After custom places have been added to the database, they can be edited at any time. Select Manage Custom Places from the Tools menu, then highlight the custom place you wish to edit, click Edit, and make your changes. Click Apply when finished. NOTE: By default, addresses entered as Custom Places are assigned to the Custom POI category. You can change this assignment at any time by selecting another Category from the drop-down pick list as you edit. 7.
Using Your Pocket PC for Guidance In CoPilot's Guidance Mode you will receive turn-by-turn route guidance information as you travel. For your safety the Driver Safety Screen will hide maps when your speed exceeds 10 m.p.h. to avoid distractions. 6. The Select Stop screen provides you with several different ways to enter a destination (described on the following pages): For IN-VEHICLE HARDWARE SETUP: See Hardware Setup, p. 3. 1.
Start Driving! After entering one or more destinations, start driving and enjoy CoPilot’s spoken instructions, continuously updated maps and ETA’s, and automatic route recalculation capabilities. A text-only Driver Safety Screen will replace the Map Screen when your speed exceeds 10 m.p.h. Next Turn Instruction Next Turn Directional Arrow 3. Enter a house number if you like (it’s optional), then start typing a Street name. When a match appears on the list below, tap it, then tap Next. 4.
Entering a Home Address Favorites In the Select Stop screen, tap the Home button. The first time you use this button, you will be prompted to enter your home address. In the Select Stop screen, tap the Favorite button. A scrollable list will appear, providing quick access to the last 50 destinations that were entered. Enter your home address the same way you enter a new address (described on p. 15). The next time you tap Home, your home will be entered as a destination.
Contact Integration CoPilot allows you to link directly to Outlook to retrieve address information. With just a few of quick taps of the stylus, you can enter a contact’s home and/or work address as your destination. 5. The Contact address will be added to your trip itinerary as a stop. 1. Tap the Contact button in the Select Stop screen. 2. Type the first letters of your Contact’s first or last name. 3.
Finding Points of Interest In the Select Stop screen, tap the POI button to search for and/or enter a point of interest as a destination. 1. In the first POI screen you have the option to choose a Category and Type of POI from the drop-down pick lists. To narrow your search and cut down on the time it takes, you can also type the first few letters of a place you have in mind. Tap Next to continue. 4. When the search process is complete, a scrollable list of matches will appear.
Pick on Map Intersection To enter the intersection of two roads, tap the Intersection button in the Select Stop screen. Intersections are entered just like addresses (see p. 15-16), except that instead of a house number you enter a “First Street” and “Second Street”. To pick a stop off the map, first tap the Pick on Map button in the Select Stop screen. Zoom the map to a starting area by entering an Address, Favorite, Contact, POI, or select Here if you have a GPS signal.
Saved Trip Latitude/Longitude 1. Highlight a trip (.trp file) in the list of saved trips, then tap Next. 1. Choose a format from the first drop-down pick list. Lat/longs can be entered in Decimal Degrees, Decimal Minutes, or degrees/ minutes/seconds (DMS). Tap Latitude/ Longitude in the Select Stop screen to enter a lat/long point. 3. Tap Next to add the lat/long you entered as a stop on your trip itinerary. Tap More...
Driver Safety/Map/Itinerary Screens NOTE: It is not safe to attempt to alter settings on your Pocket PC while you are driving. Either have a passenger make changes, or pull over to a safe area. At the bottom of the Map Screen are the estimated time of arrival (ETA) at your next destination and distance to that destination, and one customizable data line (see p. 23). Tap Menu > View to select how you want the guidance screen to display.
Navigating Through CoPilot Screens Map Modes To switch views, tap Menu > View and choose a view from the drop-down menu. CoPilot gives you a choice of several different display modes for the Map Screen: Driver Safety Screen - Text only, switches to the map below 10 m.p.h. 3D Perspective Where Am I - Map screen, frames a close-up view of your current position. CoPilot’s two-dimensional default display mode can be changed to a three-dimensional perspective based off an isometric camera angle.
Trip Editing and Waypoints Picking Stops From the Map To get to the Going To screen from the guidance screens at any time, tap Menu > Trip > Edit. From here you can edit the current trip, add additional stops, or start a new trip. CoPilot enables you to pick a stop off the map when you don’t know the exact address of your destination. In any mode, tap and hold on your target location on the map. (A short tap displays street names if you’re not sure where you are pointing.
Detour Feature Avoiding Roads CoPilot’s Detour Feature allows you to preview an alternate route before deciding whether or not to take it. Perfect for situations in which traffic has suddenly slowed ahead of you, the Detour Feature will generate an alternate route and tell you exactly how much distance the new route will add to your trip. You can then make an informed decision about whether you’re better off driving through the delay or taking the new route.
Settings Advanced Routing Options: Tap Menu > Trip > Settings to change settings that affect CoPilot routing and functionality. 1) Tap Advanced. Use the advanced routing options to completely change how CoPilot calculates routes. Advanced options include some Basic options along with avoid/ favor preferences and average speed settings for each road type CoPilot uses to for route calculations. 2) Tap New to create a Profile. 3) Enter a name for this profile. 4) Select a Vehicle Type and Routing Type.
10) Tap OK. Your new profile is now saved. Map 11) Check Confirm Profile when Routing if you want to be prompted to select a profile before each trip. Data areas that are currently downloaded to your mobile device are shown at the bottom of this screen. 12) Choose a profile from the Road Preference Profile pick list and tap OK. This is the profile CoPilot will now use to calculate routes. Map options are: Units — Select Mile or KM as the unit of distance.
CoPilot Modes Favorites CoPilot has three modes of operation on the Pocket PC. Tap Menu > Mode to select Guidance, Walking, or Planning Mode. Tap Favorites to open your List of Favorite Addresses. Guidance Mode To change the assignment of your work or home address, highlight your choice on the list and then tap either Work or Home. In Guidance Mode, you enter one or more destinations, then tap the Start Driving button to start driving and receive guidance.
The GPS Menu GPS Status Tap Menu > Options > GPS to display the GPS menu. To view your satellite activity at any time, first tap the GPS Status option. Here you will receive information on speed, lat/long position, heading, and time and date. Setup GPS — Tap Setup GPS to connect CoPilot to your GPS receiver through an automatic scan or by setting the COM Port and Baud Rate manually.
Reference: Screens & Buttons in Guidance Mode on Your Pocket PC Track Playback The following is a summary guide to the screens and buttons you will see on your Pocket PC as you operate CoPilot in Guidance Mode. Home Screen The Home screen appears when you first open CoPilot. If you don’t want to see it at startup, uncheck Show this screen at startup. This screen can be accessed from the Menu at any time. Home screen options are: 1. CoPilot automatically 2. To access a track, tap creates .
Determining Current Position Select Stop Screen When you see this screen, CoPilot is in the process of determining where you are. This can take a few seconds. The picture under the text will indicate how close you are to acquiring a fix. NOTE: The first time you use CoPilot, it can take 15-20 minutes to acquire a fix, or more if you are not in a stationary position. In this screen you add stops to your trip.
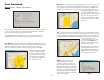
Map Screen Trip Buttons Tap the Menu button and then tap Trip to invoke these trip editing eatures: Next turn directional arrow. Edit... — The Edit button takes you back to the Going To screen where you can edit your trip. Distance to next turn. Route ahead highlighted in green, upcoming turn marked with yellow arrow. Add Stop... — The Add Stop button takes you to the Select Stop screen.
Trip Planning on Your Pocket PC You can use CoPilot on your Pocket PC for trip planning whether or not the GPS receiver is connected and receiving data. Planning Mode allows you to run a trip on your Pocket PC even when you're not in your car. You'll get driving directions and maps that you can use for reference before your trip begins. 5. To see driving directions, tap Menu > View > Itinerary. 1. First turn on your Pocket PC and launch CoPilot (tap Start > Programs > CoPilot).
Trip Planning on Your Desktop You can use CoPilot's desktop functions to map out routes and print maps and driving directions before getting on the road. Desktop trip planning is an additional feature of CoPilot that is in no way connected to using your Pocket PC for route guidance. Run Trip On the following pages you will find brief descriptions of CoPilot’s desktop trip planning capabilities.
Save Trip Print Save Trip button or Save Trip.../Save Trip As... in the File menu. Print button or Print... in the File menu. Opens a standard Windows dialog where you can name your trip and save it to your hard drive either before or after running it in the Trip Planner. Takes you to the standard Windows Print options for printing the active window that contains your map or driving directions. Activate the map or directions by clicking on it or selecting it in the Window menu. Select Print TravPak...
Zoom In More Detail Zoom In button or Zoom In in the Map menu. More Detail button or Detail > Show More in the Map menu. Each time you click this button, your view will be zoomed in by one increment. The zoom level is shown in the title bar of the map window. Click once to increase the level of detail you see on the map by one increment without changing the zoom level. Zoom Out Less Detail Less Detail button or Detail > Show Less in the Map menu. Zoom Out button or Zoom Out in the Map menu.
Zoom To Region Pick Stops Zoom to Region button or Zoom Region in the Map menu. This function allows you to zoom your map view to a specific area. Choices in the sub-menu will depend on which CoPilot data region(s) were purchased. To turn on Pick Stop mode, click the Pick Stops button or right-click on the map and select Pick Stops. Then click on any point on the map to enter it as a stop. The map view must be zoomed in to level 11 or 12.
Reference: CoPilot on Your Desktop Landmark Reporting The following is a guide to the main screens you will see as you use CoPilot on your desktop/laptop computer for trip planning. Map Window Menus and toolbar buttons to access all of CoPilot's desktop features. Click on a tab to frame any stop on your route. Select Landmark Reporting from the drop-down Trip menu. Map of area around your destination. Zoom in and move your cursor over a street to view its name.
Trip Planner Window (Contacts) Trip Planner Window (Points of Interest) Enter a person’s first or last name and hit . CoPilot will search your Contacts database for matches. Click Points of Interest tab. Enter a City, State or ZIP code in which you would like to search, a radius within which to search, choose a category and type from the drop-down menu, and click the binoculars to search. You can also enter a name to narrow down the search in the POIs that start with box.
Routing Options Fuel Cost Calculator Click the Options button in the Trip Planner window to access CoPilot routing options. To calculate an estimate of your fuel costs for a trip, select Fuel Cost Calculator from the Trip menu before you run your route. Fill in the average cost per gallon of fuel that you expect to pay, and the distance per gallon you can expect to get in your vehicle. Click OK, then run your trip.
CoPilot Live Communications CoPilot Live allows you to maintain two-way communication with drivers who are using CoPilot and to actually see where they are currently located. You can do this from the CoPilot Live web page. 2. Choose an Account Name and Password that you will use to login to the CoPilot Live network. Using this CoPilot Live functionality requires the following: 4. Click “Submit” to create your account. 3. Fill in the rest of the required information.
Real-Time Traffic Information In addition to providing users with pre-trip planning and GPS route guidance capabilities, CoPilot uses wireless communications to automatically send real-time information to drivers, notifying them of traffic incidents (accidents, traffic jams, etc.) along the route ahead and potential alternate routes. As soon as you enter a destination, CoPilot will provide dynamic driving directions and regularly updated traffic incident reports.
Traffic Report Content Creating/Using Your Own Voice CoPilot Live alerts you when a traffic incident is detected on your route ahead. If traffic is being checked automatically, the alert indicator appears along with incident icons on the map that show the type and severity of the incident (see p. 42). An alert sound accompanies the incident display. Incidents are ignored or avoided based on your option settings (see p. 42).
Software Registration NextStop PoiAhead Rdestination.wav RightTurn Roundabout1 Roundabout10 Roundabout2 Roundabout3 Roundabout4 Roundabout5 Roundabout5 Roundabout7 Roundabout8 Roundabout9 SafetyCam SharpLeft SharpRight Spcam.
Troubleshooting Using Help Files Why can't I get a satellite reading the first time I use CoPilot? CoPilot provides extensive Help Files, available on your desktop/laptop and your Pocket PC, to guide you through the program as you use it. The first time the GPS receiver is used it may take approximately 5 minutes to acquire a fix (but may take as long as 15 minutes). You can minimize this time by remaining stationary and positioning the GPS receiver so that it has a clear view of the southern sky.
License Upgrade If your map data is loaded onto your device memory, your tracks are Your CoPilot desktop software contains street-level maps that cover all of the United States, Canada, and Europe. CoPilot offers different licenses that allow you to access European and/or Canadian maps on your mobile device. Licenses are available for the following: stored in the My Documents > gpstracks folder on your device. 1. Copy all GPS tracks to your desktop 2. Send them as an email attachment to data@alk.
ON YOUR POCKET PC: Return Policy IMPORTANT: You must install CoPilot to your Pocket PC using your Base Product Key AND you must have data downloaded to your Pocket PC before using your Expansion Product Key. ALK's 30-Day Money Back Guarantee and Return Policy We know you'll love our products. If, however, you are not satisfied with any CoPilot product you purchase directly from ALK, you may return it within 30 days for a refund of the price paid (excludes shipping and handling). 1.
CoPilot ® End-User License Agreement Electronic reproduction and transmission of output to remote locations is not permitted. ALK retains all rights not expressly granted. Nothing in this License Agreement constitutes a waiver of ALK's rights under the U.S. copyright laws or other applicable copyright laws or any other federal or state law. NOTE: On the following pages there are three separate license agreements for users of North American, European, and Australian Data.
tion or addition to this warranty. Some states do not allow the exclusion or limitation of implied warranties or limitation of liability for incidental or consequential damages, so the above limitation or exclusion may not apply to you. Fonix have signed. The software in this packet ("Software") and its media and documentation (collectively, the "Product") are protected by copyright and other intellectual property laws and international treaties.
limited to such 30 day period provided that limitation is permitted by applicable law. ALK® Technologies, Inc. License AGREEMENT CoPilot | Pocket PC 6 with EUROPEAN DATA LICENSES: 1 User End-User Remedies: If the Software does not conform to the "Limited Warranty" above, ALK's entire liability and your sole and exclusive remedy will be, at ALK's option, either to (i) correct the error, or (ii) help you work around the error, or (iii) accept a return and issue a refund through your retailer.
TERMS AND CONDITIONS INJURY OR DAMAGES, DIRECT OR INDIRECT, WHICH MAY RESULT FROM THE USE OR POSSESSION OF THE INFORMATION; OR FOR ANY LOSS OF PROFIT, REVENUE, CONTRACTS OR SAVINGS, OR ANY OTHER DIRECT, INDIRECT, INCIDENTAL, SPECIAL OR CONSEQUENTIAL DAMAGES ARISING OUT OF YOUR USE OF OR INABILITY TO USE THIS INFORMATION, ANY DEFECT IN THE INFORMATION, OR THE BREACH OF THESE TERMS OR CONDITIONS, WHETHER IN AN ACTION IN CONTRACT OR TORT OR BASED ON A WARRANTY, EVEN IF ALK OR ITS LICENSORS HAVE BEEN ADVISED O
USE AND RESTRICTIONS: You may operate the Software on only one computer. However, if you have purchased a network or multiple-user license, you may load and use as many single-use copies and/or support as many concurrent users, in the aggregate, as are authorized by such license. You may make only one copy of the Software, retaining the Fonix CD or other media for storage and back-up purposes. The Software does not include updates, maintenance, or support, which may be separately available.
You are not permitted to use the Software for motor-carrier tariff or routing purposes. Electronic reproduction and transmission of output to remote locations are not permitted. THE WARRANTY AND REMEDIES SET FORTH ABOVE ARE EXCLUSIVE AND IN LIEU OF ALL OTHERS, ORAL OR WRITTEN, EXPRESS OR IMPLIED. No ALK dealer, distributor, agent, or employee is authorized to make any modification or addition to this warranty.
work, or create derivative works based on any part of the Software. You may not reverse engineer, decompile, or disassemble the Software. 2. RIGHTS OF USE You may only use the Whereis Data for your own personal use. You may only install and use the Whereis Data on one device at any one time. You must not copy, reverse engineer, adapt, modify, distribute, publish in any form or permit any other person to use or deal with the whole or any part of the Whereis Data.
6. GENERAL You may not assign or sub-license your rights under this License. This agreement constitutes the entire agreement between the parties. Any previous agreements, understandings and negotiations cease to have any effect. A provision of, or a right created under, this agreement may not be waived except in writing signed by the Licensor. This agreement is governed by the laws in force in the State of Victoria, Australia.