Standalone (built-in PC), fully automated CD/DVD Duplication System User Manual 5542 Brisa Street, Suite F ? Livermore, CA 94550 Tel: 925-447-8484 ? Fax: 925-447-8811 ? www.all-pro-sol.
Zeus Series / Automated Standalone CD/DVD Duplication System / User Manual Table Of Contents Quick Start ..................................................................................................................... 1 Getting Started … … … … … … … … … … … … … … … … … … … … … … … … … … … … … … ..1 Mounting the Tower … … … … ...… … … … … … … … … … … … … … … … … … … … … … … ...2 Mounting the Printer … … … … ...… … … … … … … … … … … … … … … … … … … … … … … ..2 Operating Environment......................
Zeus Series / Automated Standalone CD/DVD Duplication System / User Manual Quick Start Getting started Carefully remove your system from it’s shipping box and verify that all parts are present. If there are missing or damaged parts contact All Pro Solutions or an authorized distributor immediately to correct any miss-packed or missing parts.
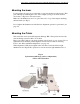
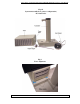
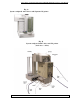
Zeus Series / Automated Standalone CD/DVD Duplication System / User Manual Mounting the tower For all systems, the tower is provided with a tower plate mounted on the bottom. This plate will help in stabilizing the tower on the adapter (see Fig.1a for AU4 and AU7 autoloaders or Fig.1b for AU9 autoloaders). Make sure all thumbscrews are loose, place the tower on top of the adapter matching the blue marks (see Fig.2). Do not tighten the thumbscrews until the drive alignment operation is performed.
Zeus Series / Automated Standalone CD/DVD Duplication System / User Manual Fig. 1b System unassembled (no printer configuration) AU9 autoloader Fig.
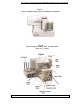
Zeus Series / Automated Standalone CD/DVD Duplication System / User Manual Fig.3 System assembled (no printer configuration) Apollo-7 (AU7 autoloader) 630 disc capacity Apollo-9 (AU9 autoloader) 900 disc capacity Operating Environment Your CD/DVD System should be used in a climate-controlled environment free of dirt, dust, excess humidity, excessive heat or electro-magnetic interference. Allow at least four (4) inches of clearance around the sides and back of the system for ventilation.
Zeus Series / Automated Standalone CD/DVD Duplication System / User Manual Connecting power Plug one power cable into the tower system, one into the autoloader and another one into the printer.
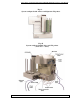
Zeus Series / Automated Standalone CD/DVD Duplication System / User Manual Fig. 4a System configured with 2 drives and Signature Z6 printer Fig.
Zeus Series / Automated Standalone CD/DVD Duplication System / User Manual Fig. 4c System configured with 4 drives and Signature Z6 printer Fig.
Zeus Series / Automated Standalone CD/DVD Duplication System / User Manual Fig. 4e System configured with 7 drives and Signature Z6 printer Fig.
Zeus Series / Automated Standalone CD/DVD Duplication System / User Manual Fig. 5a System configured with 2 drives and Rimage Prism Plus printer Fig.
Zeus Series / Automated Standalone CD/DVD Duplication System / User Manual Fig. 5c System configured with 4 drives and Rimage Prism Plus printer Fig.
Zeus Series / Automated Standalone CD/DVD Duplication System / User Manual Fig. 5e System configured with 7 drives and Rimage printer Fig.
Zeus Series / Automated Standalone CD/DVD Duplication System / User Manual Fig. 6a System configured with 2 drives and Pro III printer Fig.
Zeus Series / Automated Standalone CD/DVD Duplication System / User Manual Fig. 6c System configured with 4 drives and Pro III printer Fig.
Zeus Series / Automated Standalone CD/DVD Duplication System / User Manual Fig. 6e System configured with 7 drives and Pro III printer Fig.
Zeus Series / Automated Standalone CD/DVD Duplication System / User Manual Fig. 7a System configured with 2 drives and HP printer Fig.
Zeus Series / Automated Standalone CD/DVD Duplication System / User Manual Fig. 7c System configured with 4drives and HP printer Fig.
Zeus Series / Automated Standalone CD/DVD Duplication System / User Manual Fig. 7e System configured with 7 drives and HP printer Fig.
Zeus Series / Automated Standalone CD/DVD Duplication System / User Manual Fig. 8a System configured with 2 drives and Teac P55 printer Fig.
Zeus Series / Automated Standalone CD/DVD Duplication System / User Manual Fig. 8c System configured with 4 drives and Teac P55 printer Fig.
Zeus Series / Automated Standalone CD/DVD Duplication System / User Manual Fig. 8e System configured with 7 drives and HP printer Fig.
Zeus Series / Automated Standalone CD/DVD Duplication System / User Manual Drive and Printer alignment Make sure the autoloader is turned off. Click on Start, then Programs, then Accessories, then Communications and then Hyper Terminal. Choose a name for the connection. In the Connect to window select Connect using: Direct to COM1/COM2. In the COM1/COM2 Properties, make sure you have the following settings: Bits per second: 9600 Data Bits: 8 Parity: None Stop bits: 1 Flow control: None Click OK.
Zeus Series / Automated Standalone CD/DVD Duplication System / User Manual Operation Your system comes with all software (required for your configuration) already installed. Before using the software, you have to assign all the autoloader drives. Please do the following: Click Programs, then DiscJuggler and double click on Drive Assigner. Select all the autoloader drives, click “Update” and then OK. Now you’re ready to use your fully automated system.