
Instructions / Assembly


Questions?/¿Preguntas? 1-800-334-6871 ConsumerProducts@cooperlighting.com
1
Instruction Manual/Instrucciones
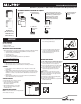
PACKAGING CONTENTS/CONTENIDO DEL PAQUETE
1. Turn off the power at the main fuse/breaker box.
2. Attach mounting bracket (B) to junction box with
two screws (C) provided (Fig. 2).
3. Screw the threaded mounting rod (D) into the
center of the mounting bracket (B) until the
threads are showing on the back side of the
mounting bracket (B) (Fig. 3).
WIRING YOUR FIXTURE
1. Turn off the power at the main fuse/breaker box.
2. Connect the black fixture wire to the black supply
wire (hot) using wire connector (E) (Fig. 4).
3. Connect the white fixture wire to the white supply
wire (neutral) using wire connector (E) (Fig. 4).
4. Connect the copper ground fixture wire to an
appropriate supply ground or a grounded
junction box.
NOTE: Be careful to connect the wires correctly.
Make sure no bare strands of wire extend from the
wire connector (E) provided or other approved wire
connectors (not provided).
5. Attach fixture to the threaded mounting rod (D).
6. Secure with cap nut (F) (Fig. 5).
7. Add silicone caulk around fixture to help maintain a
weather-resistant seal.
CALIFORNIA TITLE 24
IITEMS REQUIRED
(Purchase separately)
• Phillips screwdriver
• Weatherproof silicone caulk
IMPORTANT SAFETY INSTRUCTIONS
When using product, basic precautions should always be followed, including the following:
• Heed all warnings, including below warnings AND those included on product.
• Save these instructions and warnings.
• For outdoor use only.
• cULus LISTED for wet location.
• Your fixture is prewired and preassembled for easy installation.
• Read and follow these instructions.
• Risk of re/electric shock. If not qualied, consult an electrician.
• Disconnect power at fuse or circuit breaker before installing or servicing.
CAUTION
• Connect xture to a 120 volt, 60 Hz power source. Any other connection voids
the warranty.
• Fixture should be installed by persons with experience in household wiring or by a
qualied electrician. The electrical system, and the method of electrically connecting
the xture to it, must be in accordance with the National Electrical Code and local
building codes.
• Fixture designed for wall mount to a recessed junction box only. Install fixture to
junction box marked for use in wet locations.
FOR BEST RESULTS
• Install patio light 7-10 feet above the ground.
• Do not mount fixture close to reflective
surfaces such as windows, white walls,
white surfaces and water.
• When installing two xtures on one switch,
make sure the switch is rated for at least
a 1 A inductive load.
MOUNTING YOUR FIXTURE
NOTE: Do not mount within 2 feet of a highly reflective
exterior inside corner (Fig. 1).
FE0650LPC
(Bronze/Bronce)
FE0650LPCW
(White/Blanco)
A. Light fixture
Accesorio
ENGLISH
C. (2) #6 and (2) #8 junction box screws
(use the size that fits your junction box)
(2) Tornillos #6 y (2) tornillos #8 para
montaje de la caja de conexión
(utilice el tamaño que mejor se
adecue a su caja de conexión)
E. (3) Wire nuts
(3) Conectores
de cable
WARNING
B. Mounting bracket
Soporte de montaje
D. Threaded mounting rod
Varilla roscada para
montaje
F. Cap nut
Tuerca tapa
2 ft.
2 ft.
2 ft.
1
5
Junction box
D
F
A
4
Junction box
D
E
E
A
2
Junction box
C
C B
3
Junction box
D
B