
Instructions / Assembly


1
Questions?/ ¿Preguntas? 1-800-334-6871 ConsumerProducts@eaton.com
Instruction Manual / Instrucciones
• NOT suitable for ground mount installation.
• Fixture should be installed by persons with experience in household wiring or by a
qualified electrician. The electrical system, and the method of electrically connecting
the fixture to it, must be in accordance with the National Electrical Code and local
building codes.
• Do not allow sensor head to touch light housing – maintain at least
1 in. space between fixture and sensor.
• Keep away from flammable objects. Do not position fixture within 2 in.
of any combustible materials.
• For proper operation and protection against damage, the motion sensor head
adjustment knobs must be facing the ground.
SAVE THESE INSTRUCTIONS.
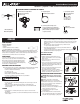
FOR BEST RESULTS
• Install the motion sensor/transmitter 8-12 feet
above the ground. (Motion sensor is less sensitive
above 12 feet.)
• Locate motion sensor so motion moves across
detection zone (Fig. 1).
• Locate sensor away from heat producing sources to
prevent false triggering. Also be very careful not to
include objects such as windows, white walls and
water in the detection zone.
• Locate sensor away from moving objects such as
trees, large shrubs and street traffic.
• Do not install more than one motion activated
floodlight on one wall switch or the same circuit since
this may cause interference between fixtures.
MOUNTING AND WIRING YOUR FIXTURE
WARNING: Risk of electric shock. Disconnect
power at fuse or circuit breaker before installing
or servicing.
NOTE: Fixture can be wall or eave mounted.
NOTE: Coverplate mounts to recessed mounted
standard junction boxes (Fig. 2). Junction box must be
at least 1-1/2 inch in depth for proper installation for
recessed mount application.
1. Turn off power at main fuse/breaker box.
2. Match up screw holes on the floodlight coverplate
with the junction box screw holes.
3. Thread fixture wires through coverplate
gasket (B) (Fig. 3).
4. Connect fixture black wire to house black wire
and connect fixture white wire to house white wire
using wire nuts (E) provided (Fig. 3). (No ground
PACKAGING CONTENTS/CONTENIDO DEL PAQUETE
ITEMS REQUIRED
(Purchase separately)
• Phillips screwdriver
• Hammer
• Outdoor weatherproof silicone caulking
• (2) 150 watt (MAX) PAR 38 floodlight bulbs
NOTE: This fixture was designed to work with up to 150 watt maximum PAR halogen flood
bulbs. For improved energy efficiency, lower wattage PAR halogen flood bulbs may be used.
Compact Fluorescent (CFL) bulbs contain electronics which may interfere with the motion
sensing function of your fixture and are not recommended.
HOW IT WORKS
Your motion activated floodlight senses heat images from
objects such as people, large animals and automobile engines.
When motion is detected, the lights will automatically turn
on. Once motion has stopped, the lights will turn off after a
preselected time delay. Your motion activated floodlight may
also be used as a standard floodlight.
IMPORTANT SAFETY INSTRUCTIONS
When using product, basic precautions should always be followed, including the following:
• Heed all warnings, including below warnings AND those included on product.
• Save these instructions and warnings.
• For outdoor use only.
• cULus LISTED for wet location.
• Disassembly of your fixture will void the warranty.
• Your fixture is prewired and preassembled for easy installation.
• Read and follow these instructions.
• To reduce the risk of a burn during relamping, disconnect power supply to the unit
before relamping.
• Always use or replace bulb with the same wattage or lower wattage than
required. Installing a bulb of a higher wattage could create a fire hazard and will
void the warranty.
CAUTION
• Connect fixture to a 120 volt, 60 Hz power source. Any other connection voids
the warranty.
• Mount fixture to a grounded, recessed-mounted standard junction box marked for use
in wet locations.
MS34 (Black)
MS34W (White)
ENGLISH
Up to
50 feet
110 degrees
D. (2) #6 and (2) #8 mounting screws
(use the size that fits your junction box)
(2) Tornillos #6 y (2) tornillos #8 de montaje
(utilice el tamaño que mejor se adecue a
su caja de conexión)
A. Motion detector and light fixture
Detector de movimiento y
artefacto de luz
B. Coverplate gasket
Junta de la placa de cubierta
C. (2) Lampholder gaskets
(2) Juntas obturadoras
del receptáculo
E. (2) Wire nuts
(2) Tuercas para alambre
Wall mount
Eave mount
A
D
A
B
E
E
C
D
C
WARNING
1
Octagonal
Round
1-1/2 in. 1-1/2 in.
2
3