
Specifications


MODEL 5190 TEMPERATURE/RH SENSOR
63
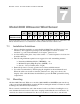
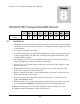
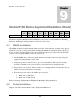
Model 5190 Temperature/RH Sensor
AWOS
A
AWOS
AV
AWOS
I
AWOS
II
AWOS
III
AWOS
IIIP
AWOS
IIIT
AWOS
IIIPT
AWOS
IIIPTZ
Model 5190
Temp/RH
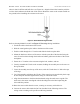
8.1 Installation
1. The MARS should not be installed on the tower and power should not be connected. This
is important to prevent electrical shock and to avoid damage to internal wiring, as well as
to the fan blades.
2. Connect the probe cable to the probe.
3. To simplify routing the probe cable and installing the probe in the vent tube, feed a piece
of string weighted at the end (with a nut, for example) through the horizontal tube and
down through the vent tube.
4. Tie the string to the probe cable and pull the string from the opposite end to guide the
cable up through the vent tube and into the horizontal tube.
5. Form a loose loop of cable at the base of the probe, and secure it with a cable tie so that
the cable forms a U.
6. With the filter end of the probe pointing up, grasp the loop of cable at the base of the
probe and raise the probe up into the vent tube.
7. When you feel the probe make contact with the mount, move it side to side as necessary
until it slides into the mount opening.
8. Slide the probe into the mount until the bottom of the probe is 2–3 inches above the
mouth of the MARS vent tube.
9. While holding the probe in place, tighten the mounting screws just enough to secure the
probe, but do not overtighten. Over-tightening the screws will damage the probe.
10. Pull the remaining slack out of the cable, keeping the cable as straight as possible.
11. Tighten the strain relief until the cable is securely sealed.
Chapter
8