EB120 Advanced Ethanol Boiler Allard Research and Development Copyright © 2008 – Allard Research and Development, LLC.
FOREWORD Thank you for purchasing the Allard Research and Development EB120 – Advanced Ethanol Boiler. Please take the time to read these instructions before you begin as they contain important information about the installation and maintenance requirements, as well as safety instructions. The EB120 is shipped with our intelligent remote control unit (the EB-A Controller), and a custom temperature probe.
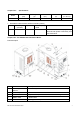
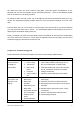
Chapter One : Specifications Model Power (kw) Voltage (V) Phase (N~) Current (A) Dimensions (W×W×H) EB-120 12.0 230/400 1/3 52./17 20"×8.25"×19" 1. Parameters and dimensions of EB-A controller (chart 2) Model Timer Range (minutes) EB-A 15-240 Temperature Dimension(mm) L*W*H Remarks 173 F 5.75"×3.5"× 1" When the time widow displays ”Long” the boiler will operate continuously until it is switched off. Chapter Two: The EB120 Advanced Ethanol Boiler. Parts description No.
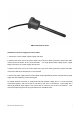
6 Heat element Heat element 7 Proportional Solenoid Automatically controls the cooling water flow 8 Cooling Water Out Output that connects to the Still cooling water input 9 Cooling Water In Connections for the cooling water output 10 Power entry The rout of power wire 11 Control cable entry The tout of control cable 12 Accessorial board Connect and control the heat element 13 terminal Connection for power supply 14 Earth wire plug Connection for earth wire 15 Drain valve Drain
3 Drain Control Operates Drain, and used to set Cooling Water Flow Rate 4 Set Preset Run Time and Distillation Control Temperature 5 △ Increase button 6 ▽ Decrease button 7 C/F & Enter Enter Key.
Beer, Water, and Steam connections a. The water supply pipe and steam pipe should comply with local standards. b. Connect the cooling water inlet of the EB120 to the main water supply using a flexible hose with 3/4-inch fittings. Washing machine connection hoses are perfect for these connections, as they are made to withstand high pressure without bursting. We recommend braided stainless steel washing machine hoses, available at your local building supply store. c.
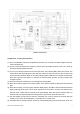
EB120 Temperature Probe Installations of power supply and control cables 1. Confirm the correct voltage of power supply and wires. 2. Remove the knock out for the power cable entry and use a rubber grommet to protect the cable, connect to the conductors to the correct terminals – for single phase power supply use the copper bridge connectors, for 3 phase supply remove them. 3.
EB120 Circuit Board Chapter Four : Testing and operation (1) Once the installation has been completed and checked, turn on power and water supplies and carry out the following test. (2) On the control panel press the on/off key, (the key has a time-lapse function, press it for I second), the time and temp displays the data. (3) Turn on your valve(s) to allow beer to flow to the boiler. The indicator LED is red on the remote. The internal pump will begin filling the boiler with beer.
drain valve opens (drain indicator LED green). (9) You can also drain the boiler manually by pressing the drain key when the system has stopped heating. The drain indicator LED will indicate as red during this operation. (10) Once you have set the temperature required, the boiler will operate on all heating elements until the temperature is 4 degrees below the target temperature.
The water flow control can be fine tuned to help tightly control the specific characteristics of your particular still, and can help regulate varying input water pressures. There are four different presets that can be chosen for use during operation. To change the water flow rate control, turn on the EB120, and press and release the Drain key on the remote. The Temperature Display will flash and show one of four pressure settings; 1PS, 2PS, 3PS, 4PS.
control panel is normal, and indicator LED for heating is on, but there is no steam output 1. Main circuit board 2. Relay circuit board 3. Heating elements * Change main circuit board * Change relay circuit board * Change heat elements Temperature displays “LC” Check: Beer level probe connection Check connection or change beer level probe. Temperature displays “HC” Beer level probe detects a short circuit 1. Check beer level probe connection 2.
kettles from most hardware stores, brew supply stores, and are available online from Allard Research and Development. Follow the instructions supplied with the crystals and allow sufficient time for the solution to dissolve the scale before flushing out the boiler. System faults arising from a failure to descale the unit are not covered by warranty.