INSTRUCTION MANUAL FREESTANDING WINE COOLER MODEL:YHWR172-2 BEFORE USE, PLEASE READ AND FOLLOW ALL SAFETY RULES AND OPERATING INSTRUCTIONS. Allavino has a policy of continuous improvement on its products and reserves the right to change materials and specifications without notice ALLAVINO 8520 Miralani Dr., San Diego, CA 92126 www.allavino.
Table of Contents Diagram and Description ..................................................................................................................................... 3 Safety Tips ..................................................................................................................................... 4 Installation Instructions .....................................................................................................................................
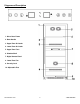
Diagram and Description 1. Glass Door Frame 2. Door Handle 3. Upper Zone Air Intake 4. Lower Zone Air Intake 5. Upper Zone Fans 6. Wooden Shelf 7. Digital Control Panel 8. Lower Zone Fan 9. Security Lock 10. Adjustable Feet www.allavino.
Safety Tips Before using this appliance, it must be properly positioned and installed as described in this manual, so please read carefully. To reduce the risk of fire, electrical shock or injury when using the appliance, follow these basic precautions. Plug into a grounded 3-prong outlet. Do not under any circumstances cut or remove the third ground prong from the power cord supplied, do not use an adapter, and do not use an extension cord.
Installation Instructions BEFORE USE: Remove the exterior and interior packaging. Before connecting the unit to the power source, let it stand upright for approximately 8 hours. This will reduce the possibility of a malfunction in the cooling system from handling during transportation. Clean the interior surface with lukewarm water using a soft cloth. This appliance is designed for freestanding use. Ensure that there is 2” of air space on both sides, and 3” in back.
Anchoring to the Wall 1. On the back of the appliance, attach brackets in the same zones shown using adhesive straps. Mark and drill pilot holes for the screws about 8mm into the appliance. Then use a screwdriver to tighten the screws all the way into the appliance. 2. Position the appliance in the desired location. Locate wall studs behind the appliance and mark the location where the bracket on the back of the appliance lines up with a stud.
Operation Instructions The wine cellar should be placed in an area where the ambient temperature range is between 55-80 degrees Fahrenheit. If the ambient temperature is above or below this range, the performance of the unit may be affected. For example, placing your unit in extreme cold or hot conditions may cause interior temperatures to fluctuate. Your Allavino Wine Cellar includes an operating panel on the front of the unit.
Care and Maintenance Cleaning your wine cellar: Turn off the power, unplug the appliance, and remove all items including all shelves. Wash the inside surfaces with warm water and baking soda solution. The solution should be about 2 tablespoons of baking soda to a quart of water. Wash the shelves with a mild detergent solution. Wring excess water out of the sponge or cloth when cleaning area of the controls, or any electrical parts.
Troubleshooting There are many common issues you may experience with your wine cellar that can be solved very easily, without the need of a service call.
Technical Specifications Bottle Capacity Up to 172 Bottles Dimensions 76.5" H x 23.75" W x 27" D (28.75” w/ handle) Weight 287 lbs. Voltage / Frequency 115v / 60 Hz Running Amps 2.3 A Operating Temperature Upper Zone: 40°F - 56°F Lower Zone: 54°F - 65°F Ambient Temperature 65°F - 80°F www.allavino.
www.allavino.
www.allavino.
www.allavino.
Warranty Information WHAT IS COVERED LIMITED ONE-YEAR WARRANTY: For one year from the date of purchase by the original owner, Allavino will, at its option, repair or replace any part of the unit, which proves to be defective in material or workmanship under normal use. During this period Allavino will provide all parts and labor necessary to correct such defects free of charge, so long as the unit has been installed and operated in accordance with the written instructions in this manual.