
Quick Start Guide


Qu Mixer Getting Started Guide 10 AP10025 iss2
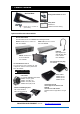
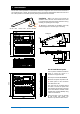
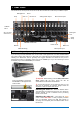
5. Rear Panel
This shows the Qu-16 rear panel. The Qu-24 and Qu-32 are similar but include Group and Matrix outputs.
5.1 Connecting and powering up the mixer
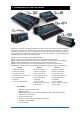
If you are using a remote AudioRack then connect it with a Cat5 digital snake. Use STP (shielded twisted
pair) Cat5e or higher spec cable up to 100m (330’) long. Cable with both foil and braided screens provide
shielding from interference and are generally more rugged. Stranded core cables are less prone to
damage when kinked or repeatedly coiled. Plug into the dSNAKE port. If you are connecting a second
AudioRack plug it into the EXPANDER port of the first.
Important - Before starting, read the Safety Instructions
Sheet packed with the mixer. These can also be
downloaded from the Allen & Heath website.
To avoid loud thumps, do not switch the mixer on or off
while the PA speakers are powered. Always switch the
amplifiers on last, and switch them off first.
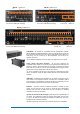
Switching the mixer on – Press the ON/OFF switch.
The mixer takes just a few seconds to boot up. It restores its
previous settings. LR mix is selected and it’s processing
shown on the screen.
Switching the mixer off – First select the Home
screen. Touch Shut Down to safely complete processes
such as parameter storing and USB data transfer or
recording. Once complete, press the ON/OFF switch to turn
the mixer off.
AES digital out
2Trk out
Alt out
LR main out
Lamp
Talkback
Mic in
ST1 and ST2
stereo line in
Analogue Mix outputs
Mic and Line inputs
Network
dSNAKE remote audio
USB B streaming
Kensington
Lock
Cable
clamp
Power On/Off
Mains power input
Mains fuse
Once an AudioRack is recognised,
the dSNAKE icon will appear in the
screen toolbar: