
Quick Start Guide

Qu Mixer Getting Started Guide 15 AP10025 iss2
9.3 Prepare the mixer for your session
Name the channels and masters – Working from your plot
sheet, use the mixer Processing screens to enter names with
up to 6 characters. Touch the name to open the keypad. The
Qu-Pad app can also be used to enter names.
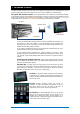
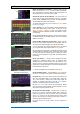
Choose the sources for the channels – You can choose one
of 3 sources for each mono and stereo channel – Local (rear
panel) socket, dSNAKE (remote) socket, or USB (playback).
The reset default is Local inputs patched.
To change channel source go to the input Processing screen
Fn key Source page.
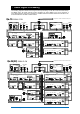
Select dSNAKE if you are connecting a remote AudioRack via
Cat5 cable digital snake. Touch ‘Patch’ to take you to the
Setup /I/O Patch / dSNAKE In screen if you want to remap
AudioRack sockets to different channels. The default is one-to-
one mapping.
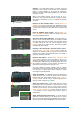
Set the Global USB Source button to choose either Qu-Drive
or USB B streaming as the USB playback source. This setting
affects all channels.
Check the Mix routing and pre/post fade – Mixes 1-10 can
be set pre or post fader, channels can be assigned, and you
can choose the send point within the channel signal path.
You can quickly set up a starting point with all on or off, and all
pre or post for each mix using its master Routing screen.
The reset default is all pre fade, all channels assigned and the
sends post-EQ (not affected by the compressor). This is ideal
for using the mixes as monitor sends. For effects and other
sends you could change this to post fade, post Delay (after all
processing).
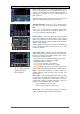
Set up the Groups * – Groups can be configured as audio
subgroups or additional stereo mixes, for example when
working with many in-ear monitors. Use its master Routing
screen to check or change its operating mode. If you are using
subgroups to LR then remember to turn off the assignments of
those channels to the LR mix.
* = Groups and Matrix are not available on the Qu-16.
Set up the Matrix sends * - Use the Matrix Routing screen Fn
key Matrix View page to work with its send levels and routing.
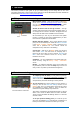
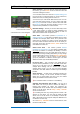
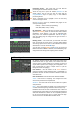
Set up the FX – Go to the FX screen to set up the 4 built-in FX
units. The reset default sets up one reverb and a delay (Qu-
16), or two reverbs, a delay and an ADT effect (other Qu
models). To change these use the Fn key Library page to
select and recall the FX type and preset for each.
Use the Back Panel view to check the FX patching. Effects
such as reverb and delay use Mix->Return patching. You can
also insert an FX into a channel or mix.
Set up Mute and DCA Groups – Use the Routing screen Fn
key Mute/DCA page to access the masters and to name and
assign the groups. You can also access mute group masters
on the Home screen. It can be useful to assign a mute or DCA
group to the FX returns providing a quick way to silence or
reduce the effects between songs.
For quick access the group mutes can be assigned to
SoftKeys.
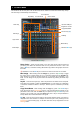
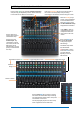
View Front or Back panel
Choose the FX preset
Touch to name
Patch input sockets