
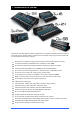
Quick Start Guide

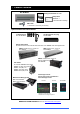
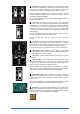

5. Connector Panel
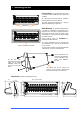
This is the front panel of the mixer. It provides all control and audio connections, USB sockets, headphones
and reset functions. The only connection provided on the rear panel is the mains power input.
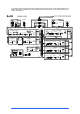
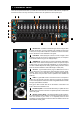
1 Network Port – Qu-SB is controlled using an iPad running the Allen
& Heath Qu-Pad app. Connect a wireless router (wireless access point)
to this port to set up a Wi-Fi network for the iPad to connect to the mixer.
This is described in more detail later in this guide.
2 Footswitch– 3-Pole (TRS) jack socket to connect a single or dual
footswitch controller. Its function is assigned by the user, for example to
mute effects between songs or set delay tap tempo.
3 dSNAKE Port – Use this port to connect a Cat5 cable ‘digital snake’
to work with remote audio and expand the number of input and output
sockets using one of the optional Qu AudioRacks, or connect directly to
the Allen & Heath ME personal mixing system letting musicians control
their own monitors. Maximum Cat5 cable length is 100m (330’).
4 Qu-Drive – Type A USB socket to plug in a USB device such as a
key or hard drive to store and transfer mixer data files (scenes, shows,
libraries), and to record or play back stereo or multitrack audio WAV files
up to 18 tracks. This port is also used to update the mixer firmware via
USB key.
5 USB B – Type B USB socket to connect the mixer to a computer to
stream up to 32 channels of audio to and from a computer, for example
to record and playback multi-channel audio using DAW software. Follows
the high speed USB 2.0 standard.
Refer to the Allen & Heath web site for information on Windows
®
and
Apple
®
Mac drivers available for Qu.
6 Firmware Update – This recessed switch lets you update the mixer
firmware without an iPad connected. The update procedure is described
later in this guide.
7 Network / Factory Reset – This recessed switch has two functions:
To reset the Network port IP address if it has been changed and the mixer
does not connect to your router, or to completely reset all mixer
parameters to factory default and clear all memories. Reset functions are
described later in this guide.
8
9
10
4
5
6
7
1
2
3
15
14
11
12
13