
Quick Start Guide
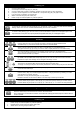

Powering Off
i. Power off any connected amplifiers or powered speakers.
ii. Navigate to the ‘Home’ screen and select ‘Shut Down’
iii. Switch off the unit using the push switch (27).
Workflow
Press
a blue ‘
LR
’
,
‘
Mix
’
or
‘
FX
’
Key to present send
levels
for the selected Mix
on
the 24
Fader Strips
.
Use the Layer Keys (2) to move through the 6 layers of faders and adjust individual levels.
The Master strip (7) controls the master send level of the selected Mix/FX.
Select a strip by pressing the green ‘Sel’ Key on a Fader Strip (2) or the Master Strip (7).
The physical controls (4), (5) and (6) can now be used to adjust parameters for the selected strip.
Go to the ‘Processing’ screen to see an overview of the processing for the selected strip.
Tap on any part of the processing to see a detailed view, then touch a parameter on-screen and use
the touch screen encoder (1) to adjust.
Mute Keys are illuminated when a strip is muted.
By default, PAFL (Pre/After Fade Listen) Keys allow you to route one channel at a time to the PAFL
bus/Phones output. PAFL settings can be changed in the ‘Setup’ screen.
Mix sends set to ‘Post Fade’ follow the LR send levels. To toggle channels between ‘Pre Fade’ and
‘Post Fade’ for the selected Mix, hold the ‘Pre Fade’ Key and use ‘Sel’ Keys.
To assign or un-assign a strip from the currently selected mix, hold the ‘Assign’ Key and use ‘Sel’ Keys.
Pressing and holding the ‘CH to All Mix’ Key will display the send levels for the currently selected strip
across the main fader strips.
Press the ‘FX’ Key to see and adjust FX engines.
Use the ‘Library’ Key (17) to recall FX types and presets - change parameters by selecting on-screen
and using the touch screen encoder.
FX busses 1 to 4 (8) send to FX engines 1 to 4 by default.
FX Return channels can be routed to Mixes in the same way as stereo input channels.
Hold the ‘Copy’ Key and press an ‘In’ Key (4) (5), a ‘Sel’ Key (2) (7),
to copy
parameters
.
Hold the ‘Paste’ Key and press a ‘Sel’ Key (2) (7) to paste the copied processing to another channel.
Hold the ‘Reset’ Key and press an ‘In’ Key (4) (5), a ‘Sel’ Key (2) (7), or on-screen to reset parameters.
Storing and Recalling
A ‘Scene’ is used to store or recall a mix. A ‘Show’ comprises multiple scenes and all settings.
Press the ‘Scenes’ Key to access the list of scenes in the current show.
Use a combination of scene filters and ‘Safes’ to decide which settings/parameters/strips are affected when a
scene is recalled.
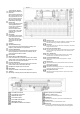
Powering On
i. Connect power lead (27).
ii. Connect input sources using (20), (21) and (22).
iii. Connect outputs (23) and (24) to amplifiers, speakers or line level inputs on other equipment.
iv. If required, connect digital I/O such as AudioRacks or Computers using (25), (28), (29) and (31).
v. If you are using a footswitch, connect this (26).
vi. Switch on the SQ using the push switch (27).
vii. Power on any connected amplifiers or powered speakers.
Setup
To reset all mix, parameter and routing settings go to the ‘Scenes’ screen (1), then press and hold the ‘Reset Mix
Settings’ button. This will ‘zero’ the desk without deleting saved scenes or libraries.
To check or alter patching, go to the ‘I/O’ screen (1) and use the matrix to patch from Local/Digital Inputs to SQ
input channels, and to patch SQ outputs [LR/Mix/Group/Matrix/DirectOut] to Local/Digital Outputs.