
Operation Manual


GL2
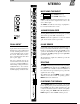
INTERCONNECTIONS
Where possible use balanced connections for the channel INPUTs and GROUP, L-R and MONO outputs to
minimise noise pick-up. Avoid running audio cables near to mains or lighting cables or thyristor dimmer units,
power supplies etc. These may cause audible hum and buzz. The use of low impedance sources significantly reduces
interference pick-up. Check the cables for correct wiring to avoid problems with phase reversal and unreliable
connection. The GL2 follows the convention for XLR pin 2 and jack tip = signal hot (+).
Always use balanced cables when connecting to phantom powered microphones.
MAKE SURE THAT THE +48V SWITCHES ARE OFF (FLUSH WITH PANEL) WHEN THE CHANNEL
INPUT XLRS ARE CONNECTED TO NON-PHANTOM POWERED OR LINE SOURCES.
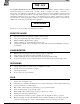
If ground loops cause problems connect the cable screen at one end only as described below. Balanced outputs may
be connected to unbalanced inputs and vice versa by linking the signal cold (-) to 0V ground as follows:
t Balanced output to Balanced input - Connect cable screen at destination only.
t Balanced output to Unbalanced input - Connect screen at source only. Link the -ve output to 0v at the output
connector.
t Unbalanced output to Balanced input - Connect cable screen at destination only. Link the -ve input to 0V
at the input connector.
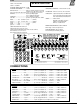
ADJUSTING THE LEVELS
For best performance it is important that the console signal levels are adjusted for “normal operating level”. If too
high the signal peaks will be clipped resulting in a harsh distorted sound, and if too low the signal-to-noise ratio
is reduced resulting in excessive background hiss.
For best results operate the console with the output meters averaging ‘0’ or just below and allowing the occasional
high level passage to rise into the red. This results in a nominal console output level of +4dBu with ample internal
headroom of +23dB to allow for the peaks. It is advisable to use an attenuator pad if you are connecting the outputs
to equipment which does not have input level controls and operates at a much lower level. Simply reducing the fader
settings (and hence meter levels) to compensate may result in excessive background noise and breakthrough due
to the reduced signal-to-noise ratio. The same applies to the console monitor output used to check the console signals
through reference loudspeakers. The monitor amplifier should be matched to the console such that normal control
room listening levels are achieved with the monitor LEV control set around position '5' to '7'. Operating at a lower
position, say '2' or '3', degrades the output signal-to-noise ratio and may result in audible hum and noise.
The console PFL (pre-fade listen) / AFL (after-fade listen) system lets you listen to and check the level of signals
at different points in the signal path without affecting the main outputs. Use the channel PFL switches to set up
the input levels. This overrides the phones/monitor outputs with the pre-fader channel signal (in mono) and displays
its level on the monitor meters. Adjust the channel GAIN controls for an average '0' reading on the meters. Use the
aux, group and L-R AFL switches to check the post master fader mix levels. Adjust the channel faders for optimum
mix level. The normal operating setting of the faders is at the '0' position, allowing 10dB of boost to the top of travel.
The red channel and group, L-R PEAK indicators give instant warning of potential signal overload. These
illuminate 5dB before clipping. Reduce channel gain or fader settings as appropriate. Each Group fader has a meter
ladder showing signal presence (dynamic indication starting at -20dB), 0dB level, and peak (5dB below clipping).
OPTIONS
AUX SENDS: Aux 1-4 and aux 5,6 are switched pre or post fader using panel switches to satisfy most applications
without the need to access internal circuits. Pre-fade is set pre-EQ and post-mute as standard. Contact your service
agent should you require alternative settings. An option is available to balance the aux jack outputs. Note that the
standard aux outputs are low impedance high level line signals which are interference free and do not require
balancing unless extremely long cables are connected in the presence of high level interference and hum fields. The
options should be fitted only by competent technical personnel who have reference to the GL2 service manual.
CONSOLE EXPANDER: The GL2 Sys-link option may be installed such that two GL2 consoles operate as one
in a master/slave arrangement. This is not a user fitted option. Contact your service agent for details.