
User guide

22 GL2400 User Guide
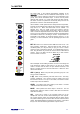
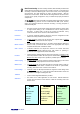
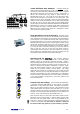
MONITOR, TALKBACK and SIGNAL GENERATOR
Console Monitor
Comprehensive engineer’s headphones and
local monitoring is provided. Select either LR or 2-track return as the
default source using the L-R / 2TRK switch. Pressing PFL or AFL
elsewhere on the console automatically overrides the current monitor
source with the signal from the channel or master selection. The red
PFL/AFL active indicator illuminates and the console meters display
the active signal.
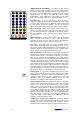
The console monitor meters provide 12 LED indicators to accurately
display the signal level of the selected monitor source. Reduce the
gain or level if the red ‘+16’ peak indicator lights. For optimum
performance the signals should be adjusted to read an average ‘0’
with loudest peaks reaching around ‘+6’.
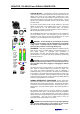
Use the MONITOR level control to adjust the level in the headphones
and local speaker monitor. We recommend you use closed ear
headphones in the range 30 to 600 ohms designed for live sound
monitoring. 100 ohm headphones are a popular choice.
WARNING: To avoid damage to your hearing do not operate
any close-to-ear monitoring such as headphones for long periods
at high volume. Continued exposure to high volume sound can
cause frequency selective or wide range hearing loss.
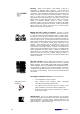
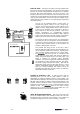
TALKBACK Individually assignable talkback is available to all the
main outputs. Plug in a suitable cable or gooseneck microphone. A
good quality dynamic or condenser vocal microphone is
recommended. Note that +48V phantom power is available at the
XLR as standard. If you prefer, this can be disabled by repositioning
an internal jumper link.
WARNING: Do not connect unbalanced sources or cables to
inputs with phantom power selected. To avoid loud clicks do not
press the TALK switch when plugging or unplugging the talkback
microphone.
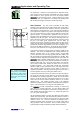
First select the source you wish to talk to. You can select the auxes in
pairs, useful for communicating with the performers on stage. The
four groups are selected simultaneously, ideal for identifying a
multitrack recording. You can also talk to LR, ideal for announcements
to the audience. Once selected, press and hold TALK to route the mic
to the required destination. Adjust the talkback level using the TRIM
control below the TB mic XLR. Pressing TALK automatically dims the
level of the signal generator if it is turned on.
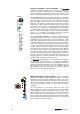
SIGNAL GENERATOR / PINK NOISE Press to select either
pink noise (up position) or a 1kHz sine wave tone as the test source.
Start with the trim control turned fully down. The generator ON switch
is recessed to prevent accidental operation. Press this with a pen or
pointed object. The green indicator lights to warn that the generator is
enabled.
The generator signal is routed to any source selected on the switch
bank above the TALK switch. Use the signal to test the loudspeaker
system and line up connected equipment. Pink noise is useful for
quickly testing the full range frequency operation and phasing/polarity
of loudspeakers. The 1kHz tone is better suited to lining up
equipment with its steady reading on the meters.
WARNING: We recommend you turn off the signal generator
once you have finished using it to test and line up your system.
This will prevent accidental operation during the show.
+16
MONITOR
PFL
TALK
0
GRP
L-R
10
L-R
2TRK
-6
-9
-20
-30
-16
-12
-3
0
+3
+6
+9
OSC/NOISE
TALKBACK
ON
MIN
L
MAX
OO
MIN MAX
2TRK REPLAY
TO LR
R
2TRK
+10
PHONES
SELECT
1-4
AUX
1-2
AUX
3-4
AUX
5-6
PINK
1kHz
MIC
POWER
AFL