AUDIO MIXING CONSOLE USER GUIDE PUBLICATION AP2366
LIMITED ONE YEAR WARRANTY This product has been manufactured in the UK by ALLEN & HEATH and is warranted to be free from defects in materials or workmanship for a period of one year from the date of purchase by the original owner. To ensure the high level of performance and reliability for which this equipment has been designed and manufactured please read this User Guide before use.
INTRODUCTION The GL3000 continues ALLEN & HEATH’s commitment to provide high quality audio mixing consoles engineered to meet the exacting requirements of today’s audio business. It brings you the latest in high performance technology and offers the reassurance of over two decades of console manufacture and customer support. This user guide presents a quick reference to the function, application and installation of the GL3000.
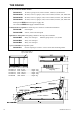
INSTALLING THE POWER SUPPLY UNIT Refer to the SAFETY WARNING on the first page of this User Guide. Power supply type RPS9 is provided with the GL3000 to convert AC mains voltage to the regulated positive and negative DC voltages required to power the console. It also supplies the +48V phantom power voltage for use with certain microphones. The RPS9 may be operated free standing or 19" rack mounted (2U height) up to 2 metres away from the console.
EARTHING THE AUDIO SYSTEM The console chassis is connected to mains earth via the DC power cable. Audio 0V is connected to the chassis and hence mains earth internally. In this way all signal returns and connector shields are connected to mains earth at the console. ) To ensure operator safety do not remove the earth connection from the power supply mains plug. For best performance it is important that the earth system is solid, clean and noise-free.
The ALLEN & HEATH GL3000 represents a breakthrough in price versus performance and functionality. It offers the professional user a new level of versatility to quickly adapt to the exacting demands of live sound engineering today. The GL3000 is developed from the successful GL3 console which first introduced the innovative 'mode switching' that quickly converts the console from Front-of-House to On-stage Monitor operation.
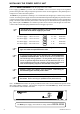
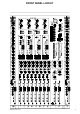
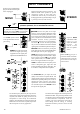
FRONT PANEL LAYOUT GL3000 USER GUIDE ISS.
THE RANGE 16, 24, 32 and 40 channel models. GL3000-816 16 mono, 8 groups, 8 aux, 2 stereo returns, 2 matrix, L,R, Mono sum GL3000-824S 20 mono, 4 stereo, 8 groups, 8 aux, 2 stereo returns, 2 matrix, L,R, Mono sum GL3000-832S 28 mono, 4 stereo, 8 groups, 8 aux, 2 stereo returns, 2 matrix, L,R, Mono sum GL3000-840S 36 mono, 4 stereo, 8 groups, 8 aux, 2 stereo returns, 2 matrix, L,R, Mono sum With separate RPS9 rack mount power supply unit. Can work with RPSD dual supply combiner/monitor.
SPECIFICATION 0 dBu = 0.775 Volts RMS 0 dBV = 1 Volt RMS INTERNAL OPERATING LEVEL: -2 dBu FREQUENCY RESPONSE: 20Hz to 30kHz +0/-1dB INTERNAL HEADROOM: .............. +21dB channels, +23dB mix to output. MAX OUTPUTS: ............... balanced +27dBu 600 ohm max load DISTORTION: ... THD + Noise at +14dBu 1kHz unbalanced +21dBu 2kohm max load Mic in to LR out at +40dB gain ........................... 0.006% Line in to LR out at 0dB gain ............................. 0.006% METERS: ......... L, R .............
INPUT CHANNELS For line sources on XLR simply plug into the XLR with the jack socket unplugged. Plug in a microphone or line level source. Use balanced cables where possible to prevent interference pickup on long cable runs. Unbalanced sources may be connected by linking signal cold to ground (XLR pin 3 to pin 1, jack ring to sleeve) at the connector. MONO ) STEREO Switch off channel +48V when the inputs are connected to nonphantom powered, line or unbalanced sources.
8 AUX SENDS 8 AUX SENDS provide ample feeds for foldback monitors and effects. These are in two groups of four each with a POST/PRE switch to source the sends either pre-fader or post-fader. AUX 1-4 feed balanced XLR outputs capable of driving long cable runs and include INSERT points. These are normally used to provide MONITOR SENDS to the performers and stage crew, although they can of course be used for additional effects.
AUX SENDS EFFECTS MONITORS AUX 1-4 balanced outputs to feed foldback monitors. INSERT graphic EQ to tune out acoustic resonances to minimise feedback. AFL lets you check the output signal after the insert and master level control. MODE SWITCHES Decide your required console configuration and set these recessed switches using a pen tip or similar. Press REVERSE to swap the group fader section with the aux master section.
STEREO RETURNS The L/Mono and R inputs are on individual jack sockets. Sensitivity is for line level signals of -10dBV and more. For a mono source plug into the L input only. PHONES MONITOR Plug in stereo headphones (150 to 600 ohms recommended) under the armrest. Adjust the LEV control for comfortable listening level. The phones and 12 segment bargraph meters normally monitor the post-fade L-R mix. Press 2-TRK to monitor the return from a stereo recorder if connected.
2-TRACK TALKBACK LAMP Plug in a 12V gooseneck lamp to provide illumination of the control panel. This should be a BNC connector type. MATRIX Individual jack sockets are provided for left and right inputs (returns) from and outputs (sends) to a stereo recorder such as a DAT or cassette machine. Balanced XLR input for a gooseneck (or cable) microphone for the operator to talk to the aux sends (foldback monitors).
INTERNAL LINK OPTIONS The console is set to satisfy most applications that should be encountered. However, the following internal link options are offered to provide alternative settings for those applications that may require them. These options involve resoldering of circuit board links and should only be carried out by competent technical personnel. Further information is available in the GL3000 SERVICE MANUAL and from your agent. MONO INPUT 1.