For Firmware Version V1.1 Check www.allen-heath.
Limited One Year Manufacturer’s Warranty This product is warranted to be free from defects in materials or workmanship for period of one year from the date of purchase by the original owner. To ensure a high level of performance and reliability for which this equipment has been designed and manufactured, read this User Guide before operating. In the event of a failure, notify and return the defective unit to the place of purchase.
IMPORTANT - Read these instructions before starting: Safety instructions Before starting, read the Important Safety Instructions printed on the sheets supplied with the equipment. For your own safety and that of the operator, technical crew and performers, follow all instructions and heed all warnings printed on the sheet and on the equipment panels. System operating firmware The function of the Qu mixer is determined by the firmware (operating software) that runs it.
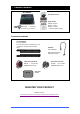
1. Packed contents Qu-16 Mixer User Guide AP9031 Safety Sheets AP3345 – English AP7287 – French AP8513 – Chinese Mains lead • Check this is correct for your territory • Read this before starting Accessories available 19” Rack Ear Kit Part: QU-16-RK19 To mount the Qu-16 in a standard 19” rack or flightcase. These fit over the plastic trims.
2. Contents 1. Packed contents ................................................................................................................................. 4 2. Contents .............................................................................................................................................. 5 3. Introduction ......................................................................................................................................... 7 4. Connection Overview.......
9.2 10. System Hard Reset .................................................................................................................. 43 Specifications .................................................................................................................................... 44 10.1 System Block Diagram ............................................................................................................ 45 10.2 Mechanical Details ..................................................
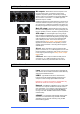
3. Introduction The Qu-16 is a compact, rack mountable digital audio mixer from Allen & Heath. Building on the heritage of the GLD and flagship iLive digital consoles the Qu presents exceptional performance together with an intuitive analogue style user interface with knobs and touch screen, total recall of its settings, full input, output and FX processing, USB multitrack recording capability and remote wireless control using an iPad.
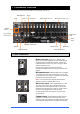
4. Connection Overview The following connections are available on the rear panel of the Qu-16. AES digital out Lamp Alt out 2Trk out LR main out Analogue Mix out 1-10 Mic and Line inputs 1-16 Talkback Mic in ST1 and ST2 stereo line in Kensington Lock Cable clamp dSNAKE remote audio Power On/Off Network USB B streaming Mains fuse Mains power input 4.
4.2 Output Connections Mix outputs – Balanced XLR line level outputs for the mono and stereo mixes, for example to feed monitor amplifiers, fill speaker systems, and external processing devices. These use low impedance, high quality differential driver circuits for connection to +4 or 0dBu equipment. Maximum output is +22dBu. Pin2 = hot Professional equipment provides ‘balanced’ connections for maximum interference rejection over long cable runs.
4.4 Powering up the mixer The Qu has an internal universal voltage power supply unit. This means you can use your mixer in most parts of the world without the need to modify the unit as long the local mains supply is within: Mains Voltage = 100 to 240 V.AC Mains Frequency = 47 to 63Hz Important - Before starting, read the Safety Instructions Sheet packed with the mixer. These can also be downloaded from the Allen & Heath website. Also read the safety notes printed on the rear of the mixer.
5. Connecting dSNAKE Remote Audio The Qu-16 mixer provides local sockets on its rear panel for all audio inputs and outputs. It can also work with remote audio by connecting over a single cable ‘digital snake’ to an Allen & Heath AudioRack, or to the Allen & Heath ME Personal Mixing System. 5.
5.2 Connecting to the ME Personal Mixing System The Allen & Heath ME Personal Mixing System can be used with the Qu-16. This provides customisable personal monitor control for individual musicians and performers on stage. ME-1 personal mixer – A compact personal mixer able to work with up to 40 channels. Features built-in headphones and monitor output. Intuitive and easy to operate, its 16 select keys can be configured to provide as much or as little control as the musician needs.
6. Operational Overview This section provides an overview of the Qu-16 layout and operation to help you get started quickly. Touch Screen SuperStrip TouchChannel Screen select Qu-Drive Fader Flip Engineer’s monitor Copy/Paste/reset Function key Mix assign SoftKeys Layer select Master Strip Fader Strips Mix select Mix key Channel select Sel key 6.1 Fader Strips The Qu-16 has a group of 16 fader strips. These provide access to the input and master channel levels and processing.
Mute key – Press to turn off the channel audio signal. This affects the send to all mixes including LR, effects and stage monitors. The Mute key lights red when the channel is muted. It flashes when it is muted by a Mute Group master. Sel (select) key – Press to access the Channel Processing. Parameters can be adjusted using the SuperStrip controls. The Touch Screen will display the settings and provide additional controls if either the Processing or Routing screen is active.
6.2 Channel Processing The SuperStrip provides familiar, analogue feel, one function per knob control of channel and mix master processing such as equalisers and dynamics. The Touch Screen displays the parameter values and provides additional related controls while in the Processing screen. This processing is accessed using the fader strip Sel keys.
Local (red Gain) dSNAKE (yellow Gain) Channel Preamp source Local (red Gain) – Rear panel Mic/Line sockets feeding the internal Qu mixer preamps. These are padless preamps featuring wide gain range. dSNAKE (yellow Gain) – Remote preamps located in an AR2412 or AR84 AudioRack on stage or other remote location and connected to the Qu dSNAKE port via a Cat5 cable. These preamps include Pad switching.
Linking lets you gang the preamp, processing and routing of an odd/even mono channel pair for stereo operation. All parameters including the preamp, processing and routing are linked. Pan becomes a width control when linked. Some parameters can be removed from the link using the buttons: Preamp – Gain/48V, Polarity Dynamics (Compressor and Gate) - Side Chains Main mix – Fader/Mute, Pan Touch Apply to accept your changes.
Frequency – Each band can sweep its centre point frequency across the full range from 20Hz to 20kHz. This means you can overlap bands and have more precise control over problem frequency areas. Width – Each band has a bell-shaped response. The width of the bell can be varied from a very wide 1.5 octaves affecting many frequencies to a very narrow 1/9th octave affecting a small range of frequencies. Setting LF or HF to widest position changes its response to shelving.
Mix processing The mix masters provide EQ, Compressor, FX Insert capability and output Delay. Insert switches an internal FX in or out if one has been patched into the mix. The button is disabled when the insert is not patched. The FX is inserted at the start of the processing before the EQ. Use the FX / Back panel screen to choose and assign one of the 4 internal FX as an Insert into a mix. Delay up to 170ms can be added to each mix output.
6.4 Channel Routing The Touch Screen presents tabs to access the channel assignments and send levels when its fader strip Sel key is selected and the Touch Screen Routing screen is active. The Channel Block Pan control provides quick access to the related mix pan setting for the channel. The Fn key is used to access the Mute Group masters while in any Routing screen. 6.5 Working with the Routing screens: Press a fader strip Sel key. Press the Touch Screen Routing key.
Channel Mix Sends screen Use this screen to work with the sends and assignments from one channel to all the mixes. Each send can be set Pre or Post fader. It is typical to set monitor sends pre-fade so that the channel fader does not affect the monitor mixes, and to set effects and fill speaker sends post-fade so that their levels do follow the faders. The channel can be assigned (routed) On or Off to each mix. Touch the Level and Pan buttons and use the screen rotary to adjust their settings.
6.6 Mute Groups The Qu features 4 Mute Groups. You can assign channels to a Mute Group so that pressing its master key will instantly mute all assigned channels. For example, mute all drum channels, mute all mics on stage during band changeover, or mute all FX returns between songs. Mute masters are accessed from the Home or any Routing screen, or using the SoftKeys.
6.8 The Master Strip Qu provides a dedicated fader strip for the Mix Masters. It presents the fader and controls for the mix currently selected using the Mix keys alongside. The sends to the selected mix are presented on the 16 faders. They move to show the current settings. This provides a very quick way to access each mix without the need to switch to the Masters layer. Mute key – Press to turn off the mix master audio signal. The Mute key lights red when the audio is muted.
6.9 Working with the sends on faders: Press a Mix key. The master strip presents the mix fader and controls. The 16 channel faders move to present the sends to that mix. Move a channel fader to adjust its send level to the selected mix. Hold the Assign key to view the current channel assignments to the mix. The Sel keys light when the channel is assigned (routed) to the mix. To toggle the assignments on or off, press channel Sel keys while holding Assign.
7. Touch Screen Mixing Functions The Qu features an 800x480 pixel, colour touch screen for quick and intuitive setup and control of the mix. Sel screens TouchChannel Touch to select each processing block Button Other screens Parameter box Function key Edit keys Screen Rotary Screen select keys Button – Touch to select its function or change its state. To avoid accidental operation some functions need be touched for at least 1 second, for example switching 48V phantom power.
7.1 The Sel screens – Processing and Routing Processing Screen – When selected this screen presents the processing such as Preamp, EQ, Gate, Compressor for the channel or master currently selected using its strip Sel key. Touch the top part of the screen to select the processing block you wish to view or adjust, for example Preamp or PEQ. This is known as the TouchChannel. The lower part of the screen changes to provide access to the related parameters and additional related controls.
7.4 Home Screen – Meters This screen provides a convenient view of all channel, mix and FX signal activity. For optimum performance the loudest signals should read into the yellow. If any red Peak meter flashes then reduce the level of that signal to avoid possible distortion. Increase levels if the meter readings are consistently low. 7.5 Home Screen – RTA This screen displays a Real Time Analyser (RTA) which analyses the frequency content of the audio signal currently being monitored using the PAFL keys.
Patch the source to be recorded using the Setup / Audio / Output Patch screen Qu-Drive option menu. The record meter on the USB page displays the current source. The default is LR post-fade. Arm the recording by touching the red circle Record button. Touch the Play button to start the recording. Stereo Playback – You can play back audio files from a USB hard drive plugged into Qu-Drive port: Format = 44.1 or 48kHz, 16 or 24-bit, WAV file Note – Use the USB key or hard drive for the Qu mixer only.
Qu-Drive Multitrack page – This screen presents the controls for multitrack recording to and playback from a USB hard drive plugged the top panel Qu-Drive port. The blue Stop button lights if the USB drive is recognised by the mixer. The controls are disabled if not plugged in or recognised.
7.7 The FX Qu features 4 internal stereo FX (effects) processors. Each can be loaded from a library of different effects types and presets. These are the same as found in the flagship Allen & Heath iLive digital mix system and are based on emulations of popular industry standard effects. The FX screen Press the FX key next to the Touch Screen to open the FX screen. You work with the FX in the same way you would with a traditional outboard rack. Start with an empty rack as shown here.
Symphonic Chorus - A faithful emulation of the 80’s classic chorus effect. Simple to use and frequently requested. The unit has just two controls, Frequency and Depth controlling the rate and delay range of the stereo modulator. The unit produces a rich, lively and wide chorus sound with a suggestion of very mild phasing / flanging. Live engineers commonly use this for thickening vocals and strings and creating a spatial sound from a mono source.
7.8 Working with FX – Adding vocal reverb: Press the FX key to open the FX screen. Touch to select FX1. Press the Fn key to open the Library page. Recall a Reverb into the FX1 slot if one is not already loaded. Open the Back Panel view and check that FX1 is set for Mix>Return with FX1 as its input. Start by turning up a vocal channel fader while the master strip LR mix is selected to hear the signal in the main PA mix. Select the top layer to view the FX Return channel strips.
7.9 Scene Memories Qu provides 100 Scene memories. These store and recall a snapshot of all live Mix parameters. Scenes have many applications. They can be used to store settings for bands during sound check for recall before they take to the stage during the show. Scenes can also be used for cue recall during theatre shows, or to provide a known starting point for different events or users in a multi-purpose venue. The Scenes screen Press the Scenes key next to the Touch Screen to open the Scenes screen.
The Global Filter screen A scene stores all mix parameters. A Recall Filter can be set to protect (block) chosen parameters from being overwritten when the scene is recalled. The Global Filter protects parameters from being overwritten by any of the 100 scenes. A red dot o appears in the tab if one or more items have been blocked. Custom Layer – Protects the strip assignments and settings of the Custom fader layer from being changed when any scene is recalled.
8. Touch Screen Setup Functions Press the Setup key next to the Touch Screen to open the Setup screens. Touch the top tabs to access the different categories of setup function. Touch the tabs below to open up the related options available. Dimmer – Turn the screen rotary while pressing and holding the Setup key to adjust the screen and surface LED brightness. 8.1 Audio Setup -PAFL Choose how you want PAFL to work: Additive mode – Select to listen to more than one channel at a time.
8.3 Audio Setup –Signal Generator Set up and assign the Signal Generator to test loudspeakers and align levels between equipment. Source – Touch to open the list of sources available: Sine – Pure tone with adjustable frequency. Set to 1kHz and use meters to match equipment levels. White Noise – Equal energy per Hz. Pink Noise – Filtered white noise for equal energy per octave. This is a good source to use for testing loudspeaker drivers and phase.
8.5 Audio Setup – dSNAKE Output Patch This screen presents the patching of the dSNAKE remote audio outputs. These outputs have a fixed mapping as shown here. This suits the typical application. The Qu mixer can detect whether an AR2412 or an AR84 AudioRack is connected. No AudioRack plugged into dSNAKE The screen shows a picture of an unconnected dSNAKE socket when no AR rack is detected.
8.6 Control Setup – Custom Strip The Custom layer can have any combination of channel, FX and master strips assigned to its faders. This lets you arrange the faders you are using for your show into one layer. The screen presents an assignment button for each fader. Touch a button and then turn the screen Rotary to scroll through the available strips. Use the Fn key ‘+1’ function to quickly assign strips in order.
8.8 USB Data – Show transfer Qu mixer settings can be stored to a USB device (key or drive) plugged into the Qu-Drive port. Data can be archived to computer and transferred between Qu mixers. Note - Firmware version V1.1 supports Show transfer only. Scenes and Libraries transfer is not yet available. A ‘Show’ stores all the Qu mixer settings and memories. It is stored as a set of files in a numbered folder on the USB device. Shows are not stored in the Qu mixer.
8.9 Network Setup Use this screen set the TCP/IP address for the Network port. It is important that this address is compatible with the addresses of equipment connected to the port, for example a laptop providing MIDI control of mixer parameters, or a wireless router providing remote control using the Qu-Pad iPad app. Typical setting is to enable DHCP as most wireless routers will be set to allocate an IP address to the mixer automatically. 8.
8.12 Utility – Firmware Update The Qu mixer operating firmware can be easily updated using a USB device (key or drive). Make sure the USB device has been previously checked and formatted to work with the Qu mixer. Step1 Download the firmware Visit www.allen-heath.com and download the latest Qu firmware. The file has a .QUU extension and a name that includes the model and version number, for example: Qu16UpdtV1_10_2411.QUU Save the file to your computer.
9. Resetting the Mixer There are two ways to reset the Qu settings: 9.1 Reset Mix Settings – A starting point for mixing This button in the Scenes screen resets the mixer to a known starting point for mixing. It provides a quick way to reset the processing, mixes and patching before a show or after another user has finished with it. All parameters that can be stored in Scene memories are reset to a factory default. Parameters that are not stored in scenes are not affected.
9.2 System Hard Reset A power up reset is available if you need to fully reset the Qu mixer settings and memories. This could be done to clear the system out before sending the mixer to a client, or if you suspect a system problem. To reset mix parameters before starting a show or sound check, use a Scene or the Reset Mix Setting function described earlier in this guide. Note – A hard reset clears all current settings, all Scenes and all User Libraries.
10.
LOCAL Qu-16 User Guide 45 or USB dSNAKE ADC ADC ADC ADC + - + - ADC ADC Gain ADC + - + - + - 48V USB B Stream 24 ch AR84 AR2412 Stream 22 ch Stereo or Multitrack Stereo or Multitrack 18 ch RECORD Outputs Inputs Qu-Drive PLAYBACK CAT5 Global USB source ST3 R ST2 L/M R ST1 L/M Line In Mic In Mic/Line Inputs 1-16 MUTE FADER Trk 17-18 ST1-3 FX ret pre LR pre/post Mix post PAFL ADC Mic/Line Inputs 1-8 + - 48V Mic/Line Inputs 1-16, ST 1-3 -20dB PAD METER DAC
10.2 Mechanical Details The following provides information for mixer installation. The Qu-16 can be operated on a flat surface, mounted in a 19” equipment rack or plinth, or fitted into a flightcase. Ventilation - Make sure that air flow around the ventilation slots at the rear and underside of the mixer is not obstructed. Keep these areas clear when flight casing, installing or operating the mixer. Note – Blocking or obstructing the ventilation slots may cause damage to the mixer through overheating.
Qu-16 User Guide 47 AP9031 iss.
Qu-16 User Guide 48 AP9031 iss.