
Operation Manual


52 ML5000 User Guide
S TALKBACK
Using Talkback
Talkback lets the operator talk to one or more
console outputs, for example to communicate with
performers on stage through their monitor speakers,
cue a recording via the matrix, or make a public
announcement through the main mix.
Plug in the talkback microphone. Select +48V if it
needs phantom power. Start with the TRIM control
turned down. Enable talkback to the required
output by selecting its TB switch. The TALK switch
green LED turns on. Check that the output faders
and levels are set to their normal operating position.
Now press the large TALK TO TB switch and talk
into the microphone. Adjust the TRIM control for
the required volume. The console monitor level is
automatically dimmed to avoid acoustic feedback
and aid intelligibility. To avoid accidentally routing
talkback where it is not wanted you should release
the TB enable switches when finished.
If you do not need to use talkback you can release
all the TB enable switches and use TALK TO TB as
a monitor dim function, for example when using the
intercom, when talking with someone at the
console, or to dim the pink noise signal when
testing speakers.
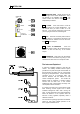
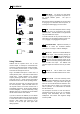
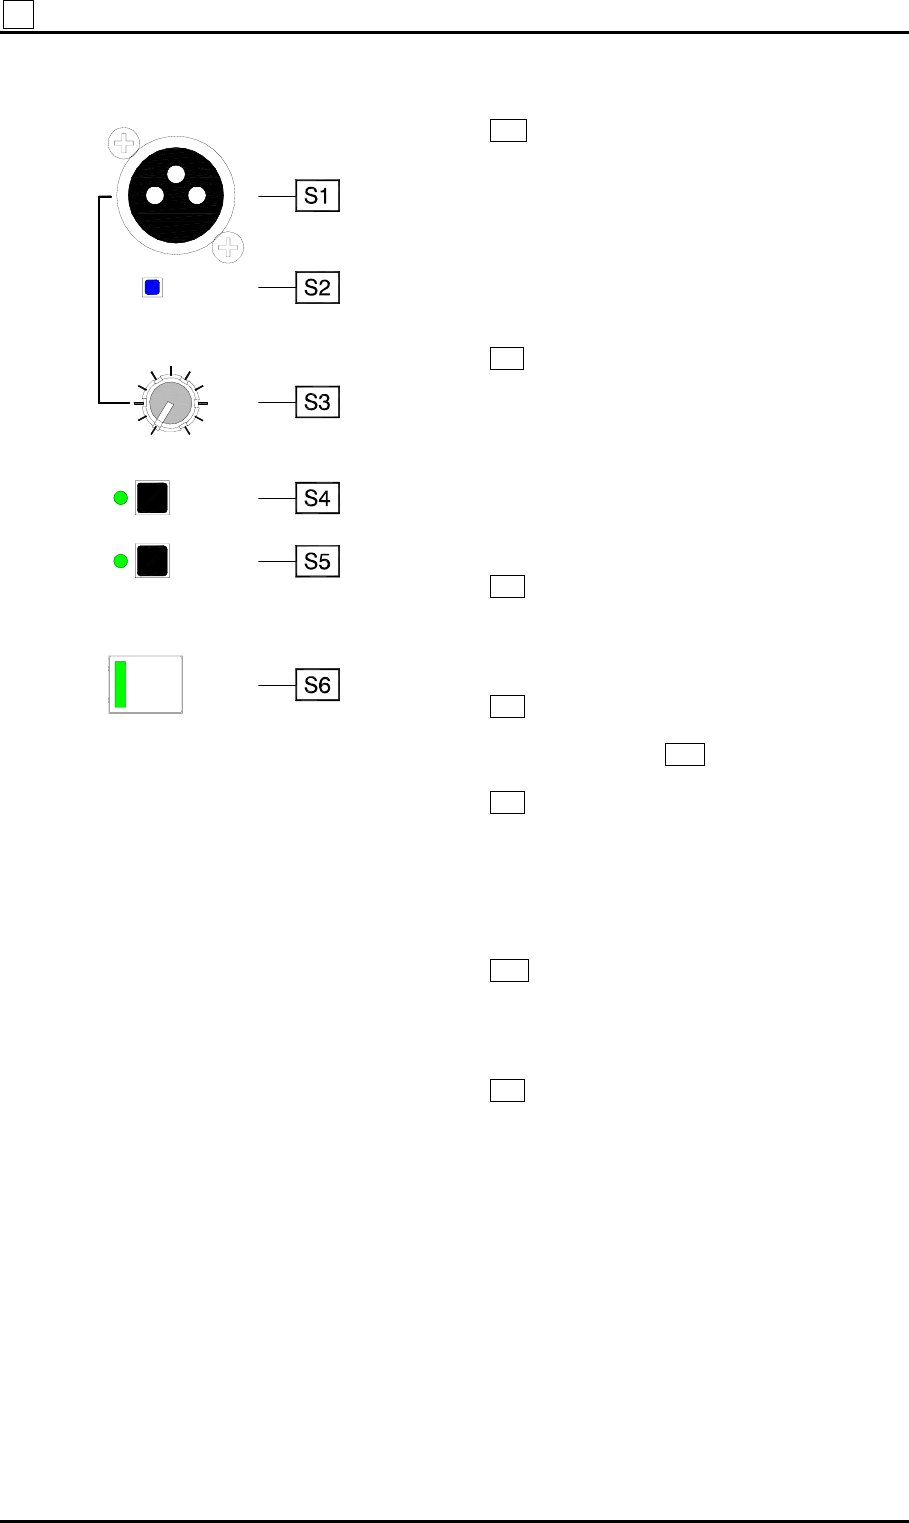
S1 MIC INPUT. Top panel 3-pin XLR female
socket for plugging in gooseneck microphone for
the console talkback system. The input is
balanced.
Note that this socket is duplicated on the rear panel
for plugging in an alternative cable microphone, so
avoiding the cable dragging over the controls.
S2 +48V. Press this underpanel switch to assign
+48V to the XLR for microphones that require
phantom power. This affects both the top panel and
rear panel talkback mic inputs.
To avoid loud clicks do not press the TALK TO TB
switch while you are switching phantom power on or
off, or plugging or unplugging the microphone.
S3 TALKBACK TRIM. Adjusts the sensitivity of
the input to match the connected talkback
microphone. The range is +5dB to +50dB gain.
S4 TB TO LR. Press this to enable talkback to
the main LR output. When selected, pressing the
TALK TO TB switch S6 routes the talkback mic
signal, or pressing the OSC/NOISE TO TB switch
Q3 routes the osc/noise generator signal to the
output. When not selected, pressing these switches
does not affect the output. The talkback and
osc/noise signals are routed into the mix pre master
level.
S5 TB TO C. This is similar to the switch
described above but enables talkback to the main C
output.
S6 TALK TO TB. Press this momentary switch
to talk to all output destinations which have their TB
switches selected. The green switch LED lights
when one or more TB switches are selected to warn
that the signal will be routed to an output when
TALK is pressed. If no TB switches are selected
the LED remains off.
The microphone is turned on when the switch is
pressed and turned off as soon as it is released.
Pressing TALK automatically dims the console
headphones, local monitor and engineers wedge
monitor by 20dB.
TB TO LR
TB TO C
maxmin
TALK
TO TB
+48V
MIC
TRIM
also on rear
TALKBACK