
User guide

10 PA-CP User Guide
Installing the Console
The PA Series is portable and designed for stand alone operation. The smaller PA12-CP model can
also be 19” rack mounted by replacing the trims with the rack ears provided. Either way, ensure
adequate ventilation around the unit and heed all warnings regarding mains power safety and earthing.
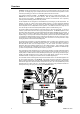
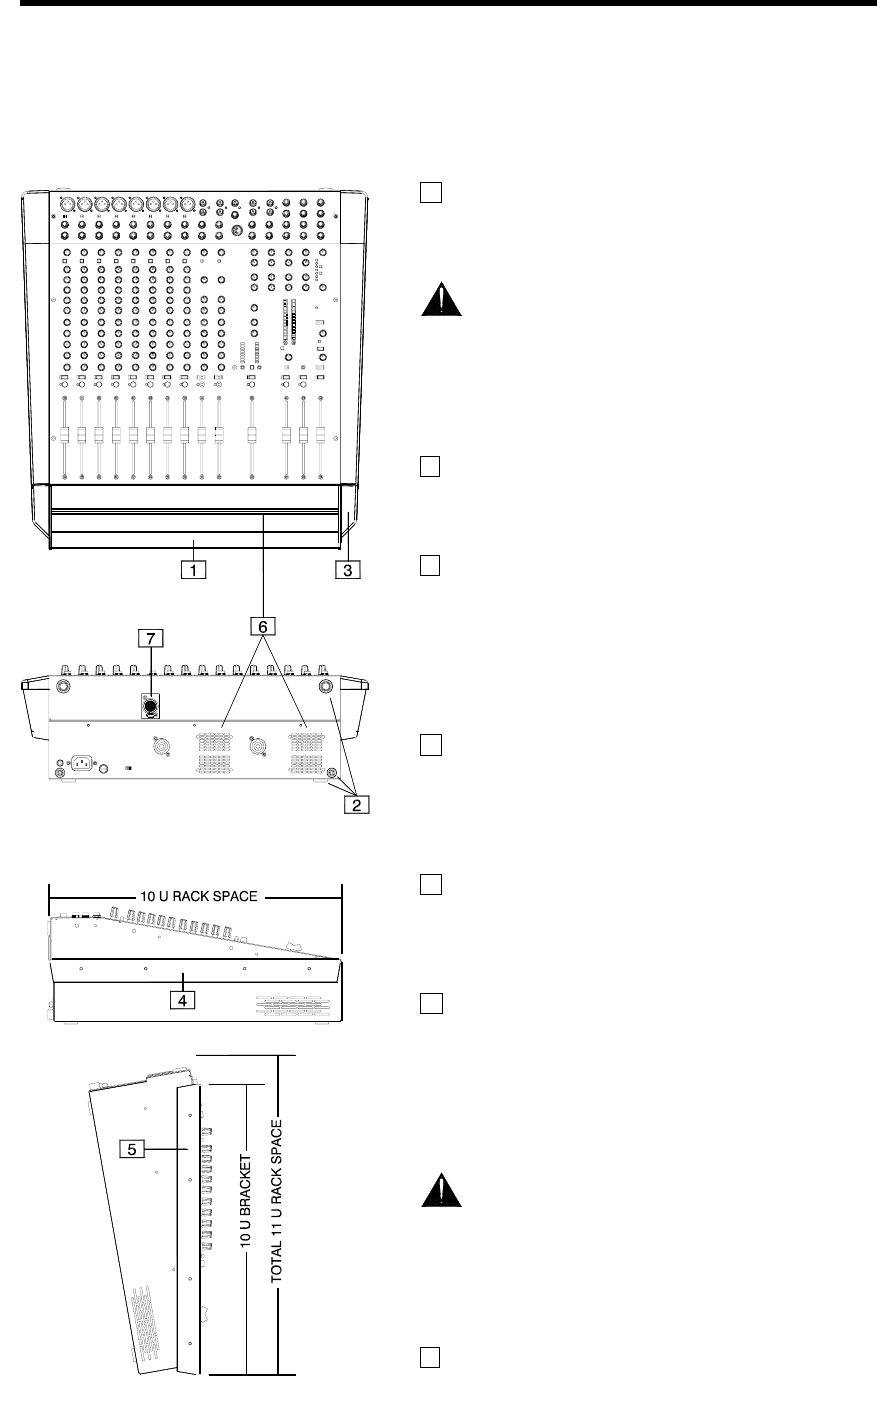
1 Carry Handle Metal handle for lifting and carrying the
console. The weight is centrally distributed. Lift the console by
holding the handle securely in the middle. To prevent damage
to the controls, carry it with the control surface away from you.
The console is necessarily heavy due to the high
power amplifiers built in. To avoid injury to yourself or
damage to the equipment always ensure you are correctly
positioned and grip securely when lifting, moving or
transporting the unit.
2 Feet Protective rubber feet are fitted to both the base and
the rear of the console so that it can be positioned for stand
alone operation or on the floor while it is being carried. This
avoids damage to the mounting surface and console parts.
3 Front and Side Trims The front armrest, carry handle and
side trims offer both protection and style to the console. They
can be easily removed for fitting the metal ears provided when
you want to permanently mount the console in a 19” rack or
plinth. This option only applies to the smaller PA12-CP model.
Instructions for fitting the rack ears is provided later in this user
guide. The console can be rack mounted in either of two
positions as described below.
4 Rack Position 1 Shows the ears fitted for top of rack
mounting. The controls are angled upwards above the rack for
easier access during operation. This position may also be
preferred when the console is mounted in a desk or other
furniture. 10U rack space is required. Allow additional space
for access to the rear panel connectors.
5 Rack Position 2 Shows the ears fitted for front of rack
mounting. The controls are flush with the rack and connectors
angled slightly back. 11U rack space is required. This allows
space for cables to be routed into the rack, and for the console
lamp to be accessed.
6 Ventilation and Cooling The console uses a twin fan
thermal management system to control the operating
temperature of the built-in 1kW power amplifiers. Air is drawn
in from the front and expelled from the rear. The fans run at
low speed when cool, medium speed on reaching 35 degrees
C, and fast speed at 50 degrees C. The unit shuts down safely
in thermal protect mode in the unlikely event that excessive
temperature is reached.
Do not obstruct the front or rear ventilation slots or
position the console where air flow required for ventilation
is impeded. The console must not be operated in any carry
or flight case that obstructs these slots. Ensure adequate
air flow when rack or plinth mounting the console.
7 Console Lamp Plug in a 4-pin XLR 12V gooseneck lamp
designed for this purpose. The right angled type is
recommended. A low or high intensity bulb up to 400mA
maximum can be used. Only one lamp may be connected.