
Installation Guide


Continued
Step 2 Prepare Wall & Corner Wall Cabinets
It is recommended that you install wall-mounted cabinets
first so the base cabinets won’t be in your way as you work. To
begin, most people find it helpful to lay out the cabinets on the
floor in position, level and plumb, and join them before hanging.
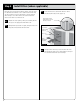
2.1
Remove all shelves and doors. You might want to mark (or
carefully stack them in position) for reinstalling later. This
will make the cabinets lighter and easier to handle.
(Figure 5)
2.2
Refer to the layout provided by your designer and start with
the corner cabinet (if there is one) and place it on the floor
below where it is to be mounted.
NOTE: WHEN INSTALLING A BLIND WALL CABINET, MAKE
SURE THE CABINET IS PULLED OUT FROM THE CORNER THE
APPROPRIATE DISTANCE CALLED FOR IN YOUR KITCHEN
PLAN. ALWAYS BE SURE TO USE A FILLER TO ALLOW FOR
HINGE CLEARANCE.
2.3
One by one, align the remainder of the cabinets and fillers
in position on the floor using the plan provided by the
designer. (Figure 6)
NOTE: A BLIND WALL CABINET FILLS THE VOID OF THE
CORNER WITH USABLE STORAGE. THE DOOR COMES PRE-
MOUNTED ON THE LEFT SIDE, BUT CAN BE MOVED TO THE
RIGHT DEPENDING ON YOUR DESIGN (SEE DIAGRAM A).
2.4
Using a level, make sure each cabinet is level and each
face frame (front of the cabinet) is flush with the adjacent
cabinet. A pry bar and shims can be used temporarily to get
everything level and plumb. (Figure 7)
NOTE: IT IS PARTICULARLY IMPORTANT TO INSTALL THE FIRST
CABINET LEVEL AND PLUMB, BOTH FROM SIDE-TO-SIDE AND
FROM FRONT-TO-BACK BECAUSE EACH ADDITIONAL CABINET
WILL BE ALIGNED WITH THE FIRST ONE.
NOTE: PLACE TALL CABINETS FOR SPACING, BUT DO NOT
ASSEMBLE.
Continued
Figure 6
Corner wall cabinet
Adjacent wall cabinet
Arrange cabinets
according to plan
Temporary
support rails
Wall stud
locations
Figure 5
Remove screw
Cabinet face frame
Door hinge
Remove doors and shelves
DIAGRAM A
Adjacent
wall cabinet
Blind wall cabinet
Filler –refer to your layout
for the appropriate filler
width and distance to
pull the cabinet from
the wall.
Figure 7
Shim as required
Level
Shim as required
Shim as required
Temporary
support rails
Wall stud locations
5