
Installation Guide


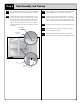

Door Hinge Adjustment
All hinges come pre-set from the factory. Occasionally, other
adjustments are needed to straighten misaligned doors or doors
that don’t seem to sit flush. This is easily accomplished with a
Phillips head screwdriver. The hinges on the back of the door have
adjustment screws. With a little experimentation, you will see which
screw moves the door the way you need it to go.
To adjust the higher door, simply open it and loosen the mounting
screws that hold the hinges to the inside edge of the cabinet frame.
There is a slot in the bracket so the door will slide down slightly.
Retighten the hinges to the frame so that the door aligns with the
other, checking with the level. (Figure 23)
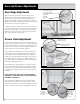
Drawer Head Adjustment
Square up drawer front (if necessary). Check it visually and use a
ruler to size up the differences. Then loosen one side by unscrewing
the drawer front slightly. Use the ruler to help you determine how
high to raise the lower side. Then, while holding the drawer front
in place, tighten down the screws again. (Figure 24)
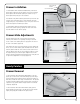
If your cabinets were ordered with one of two undermount glide
options (Figure 25), the mounting brackets at the bottom front
of the drawer box allows for additional drawer front adjustment.
Identify the correct glide by matching the image to the clip. If your
clip resembles Option A, use the roller to adjust the drawer front
up or down. If your clips match Option B, pull the lever forward or
backwards to adjust the drawer front.
Attach hardware after careful measuring. Use your drill to make
pilot holes and install hardware with screws supplied. To prevent
screw heads used for door hardware from scratching face frames,
you may want to countersink screw heads so they can’t strike the
face frame.
NOTE: JIG/TEMPLATES ARE USUALLY AVAILABLE WHERE
HARDWARE IS SOLD, AND MAY BE USEFUL FOR ACCURATE
HARDWARE INSTALLATION.
Once all assembly and adjustments are done, carefully examine
your cabinets for any scratches or nicks that may have occurred
during the installation process. Follow the handy guide for touching
up and cleaning your cabinets found in the Appendix on page 16.
Figure 23
Check door alignment
with straight edge
or level
Door height
adjustment
Loosen screw to adjust
door height (your hinge
may be slightly different
than shown)
Figure 24
Measure drawer front
against drawer body
Adjust drawer
front position until
measurement is equal
on both sides
Loosen screws to adjust
drawer front position
Door and Drawer Adjustments
Figure 25
Make additional
adjustments
to the drawer
front using
the mounting
brackets
Option A
Use the roller
to adjust the
drawer front
up or down.
Pull the lever
forward or
backward
to adjust
the drawer
front.
Option B
14