
Installation Guide


3.2
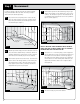
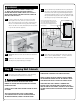
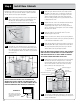
Start with the corner cabinet. With someone else’s help, lift
it into position on the support rail and use a 2 x 4 or T-Brace
at the front to prop the cabinet into place. Keep in mind,
blind corner cabinets may need to be pulled out from the
corner as shown in your kitchen plan. (Figure 10)
3.3
Fasten the cabinet to the wall with #10 x 2
1
⁄2” wall attachment
(pan head) screws. Do not fully tighten the screws until all
cabinets have been shimmed and properly positioned.
3.4
Next, using your level against the front of the cabinet, shim
wherever necessary to make sure the cabinets are perfectly
plumb (even though the walls may not be). Keep in mind,
you may have to loosen the wall attachment screws slightly
to shim properly.
3.5
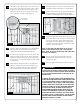
Lift the adjacent cabinet into position on the support rail
and brace. Using the pilot holes you created on the floor,
attach the two cabinets at the face frames, making sure
they are still flush when screwed together. (Figure 11)
3.6
Once again, fasten the cabinet to the wall with #10 x 2
1
⁄2”
wall attachment (pan head) screws. Do not fully tighten.
3.7
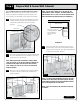
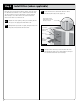
If there is a blind corner cabinet, the opening should be sealed
at this point with the
1
⁄8” panel packed inside the cabinet.
Pre-drill for small finishing nails or use a pin nailer. (Figure 12)
3.8
Continue along the walls until all cabinets are in place. If a
tall or utility cabinet is part of your plan, it should be added
at this point. Once again, shim for proper height and to
align so that it is perfectly plumb with the adjacent wall
cabinet. Once face frames are flush, clamp, drill and screw
together as previously described.
NOTE: AT THIS POINT, YOU MAY WANT TO SET THE TALL
CABINET INTO POSITION TO BE SURE IT FITS PROPERLY.
NOTE: REFER TO SPECIFIC INSTRUCTIONS THAT COME WITH
SPECIALTY TALL CABINETS.
3.9
Once all cabinets are properly shimmed and properly
positioned, finish tightening the screws to secure the
cabinets to the walls.
3.10
Remove the support rails and spackle screw holes if needed.
WARNING
TO AVOID RISK OF DRIVING SCREWS BEYOND THE CABINET
FACE, CARE MUST BE TAKEN TO PREVENT OVER TIGHTENING
OF THE SCREWS AND DESTROYING THE INTEGRITY OF THE
HANGING STRIP.
TO REDUCE THE RISK OF SERIOUS INJURY OR DAMAGE FROM
A LOOSE OR FALLING CABINET, WALL CABINETS GREATER THAN
12” IN DEPTH OR LARGER THAN 24” IN WIDTH MUST NOT BE
INSTALLED AND/OR USED AS SINGLE, STAND-ALONE CABINETS
WITHOUT TAKING EXTRA PRECAUTIONS TO FULLY AND SAFELY
SECURE THE CABINET TO THE WALL. ADDITIONAL MOUNTING
SUPPORT INTO A CEILING, BULKHEAD, OR SIDE WALL(S) IS
ALSO RECOMMENDED WHEN POSSIBLE. WHEN THIS IS NOT
POSSIBLE, THEN ADDITIONAL SUPPORT MUST BE PROVIDED
EITHER ABOVE OR BELOW THE CABINET TO SUPPORT WEIGHT
AT A POINT AT LEAST 12” FROM THE WALL. THIS CAN BE DONE
THROUGH ANGLE BRACKETS/BRACING, SHELVING, AND/OR
ADDITIONAL CABINETS AS A STAND.
Figure 12
T-Brace
Temporary
support rails
Blind wall cabinet
Provided
1
⁄8" panel
Wall stud locations
Figure 10
T-Brace
Temporary
support rails
Start with
corner cabinet first
Soffit or ceiling
T-Brace supports
front of cabinet
Back of cabinet
supported by support rails
Wall stud locations
Figure 11
T-Brace
Temporary
support rails
Corner wall cabinet
Mount adjacent cabinets,
shim as required
Wall stud locations
7