ITEM # 2694674 LED FRAMELESS FOG-FREE ROUND MIRROR ALLEN + ROTH and logo design are trademarks or registered trademarks of LF, LLC. All rights reserved. MODEL 2694674 Español p. 7 ATTACH YOUR RECEIPT HERE Serial Number________________ Purchase Date_______________ Questions, problems, missing parts? Before returning to the store, call our customer service department at 1-866-439-9800, 8 a.m. - 8 p.m., EST, Monday - Sunday. You could also contact us at partsplus@lowes.com or visit www.lowespartsplus.com.
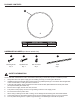
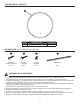
PACKAGE CONTENTS A PART A DESCRIPTION LED mirror QUANTITY 1 HARDWARE INCLUDED (not shown actual size) AA BB CC DD Mounting Screw Drywall Anchor Wire Connector Z-bar Qty. 3 Qty. 3 Qty. 3 Qty. 1 SAFETY INFORMATION Please read and understand this entire manual before attempting to assemble, operate or install the product. 1. Always disconnect the power supply prior to installing, servicing or removing the LED mirror. 2.
PREPARATION Before beginning assembly of product, make sure all parts are present. Compare parts with package and hardware contents list. If any part is missing or damaged, do not attempt to assemble the product. Contact Customer Service for replacement parts. Estimated Assembly Time: 30 minutes Tools required for assembly (not included): Tape Measure, Phillips Screwdriver, Hammer, Electric Drill, Drill Bits, Level Please follow all local electrical codes and consult an electrician when wiring this product.
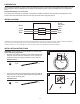
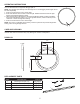
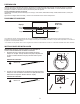
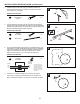
INSTALLATION INSTRUCTIONS (Continued) 3. Using a 7/32 in. drill bit (not included), drill holes in the wall where marked and insert drywall anchors (BB). 3 BB Hardware Used BB Drywall anchor x3 4. Place the Z-bar (DD) on the wall and insert the mounting screws (AA) through the Z-bar (DD) and into the drywall anchors (BB). Tighten the mounting screws (AA) until the z-bar (DD) is securely attached to the wall. 4 BB Hardware Used AA Mounting screw x1 DD Z-bar x3 5.
OPERATING INSTRUCTIONS Turn on wall switch to turn light and defogger pad on. NOTE: The defogger pad will only work when light is on. The defogger pad and light cannot be wired separately. 1. Touch the sensor button to turn ON the light. 2. Touch and hold the sensor button to dim the light. Release the button when the light reaches the desired brightness setting. 3. When the LED gets to the maximum or minimum brightness setting, it will stop.
TWO YEAR LIMITED WARRANTY If this product fails due to a defect in materials or workmanship at any time during the first TWO years of ownership, the manufacturer will replace it free of charge, postage-paid at their option. This warranty does not cover products that have been abused, altered, damaged, misused, cut or worn. This warranty does not cover use in commercial applications. Use only manufacturer-supplied genuine warranty repair replacement parts to repair this mirror.
ARTICULO # 2694674 ESPEJO LED REDONDO SIN MARCO QUE NO SE EMPAÑA ALLEN + ROTH y el diseño del logo son marcas comerciales o marcas registradas de LF, LLC. Todos los derechos reservados. MODELO 2694674 ADJUNTE SU RECIBO AQUÍ Número de serie______________ Fecha de compra_____________ Preguntas, problemas, partes faltantes? Antes de regresar a su tienda minorista, llame a nuestro Departamento de Servicio al Cliente al 1-877-888-8225, de lunes a domingo de 8:00 a.m. a 8:00 p.m., hora estándar del Este.
CONTENIDOS DEL PAQUETE A PIEZA A DESCRIPCIÓN Espejo con luz LED CANTIDAD 1 ADITAMENTOS (no se muestran el tamaño real) AA BB CC DD Anclas de expansión de pared Cant. 3 Tornillos de montaje Cant. 3 Conector de cables Cant. 3 Barra en Z Cant. 1 INFORMACIÓN DE SEGURIDAD Lea y comprenda completamente este manual antes de intentar ensamblar, usar o instalar el producto. 1. Siempre desconecte la fuente de alimentación antes de darle servicio al ventilador, motor o caja eléctrica. 2.
PREPARACIÓN Antes de comenzar el ensamblaje del producto, asegúrese de que todas las piezas estén presentes. Compare las piezas con la lista de contenido del paquete y la lista de contenido de aditamentos.. Si alguna parte falta o está dañada, no intente ensamblar el producto. Póngase en contacto con Servicio al Cliente para obtener piezas de repuesto.
INSTRUCCIONES DE INSTALACIÓN (continuación) 3. Usando una broca de 7/32 pulg. (no incluida), taladre los orificios donde se marcó en el paso 2 e inserte los anclajes para paneles de yeso (BB). 3 BB Aditamentos utilizados BB Anclas de expansión de pared x3 4. Coloque la barra en Z (DD) en la pared e inserte los tornillos de montaje (AA) a través de la barra en Z (DD) y en los anclajes para panel de yeso (BB).
INSTRUCCIONES DE OPERACIÓN Encienda el interruptor de pared para encender la luz y el desempañador. NOTA: el desempañador solo funcionará cuando la luz esté encendida. El desempañador y la luz no se pueden conectar por separado. 1. Toque el botón del sensor para encender la luz. 2. Mantenga presionado el botón del sensor para atenuar la luz. Suelte el botón cuando la luz alcance el brillo deseado. 3. Cuando el LED llegue al ajuste de brillo máximo o mínimo, se detendrá.
GARANTÍA LIMITADA DE DOS AÑOS Si este producto falla debido a un defecto en los materiales o la mano de obra en cualquier momento durante los primeros dos años de propiedad, el fabricante lo reemplazará de forma gratuita, con franqueo pagado a su elección. Esta garantía no cubre productos que han sido maltratados, alterados, dañados, mal utilizados, cortados o desgastados. Esta garantía no cubre el uso en aplicaciones comerciales.