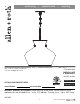
welcoming • sophisticated allen + roth® is a registered trademark of LF, LLC. All Rights Reserved. • inspiring ITEM #0615985 PENDANT MODEL #34705 Français p. 10 ATTACH YOUR RECEIPT HERE Serial Number Español p. 19 Purchase Date Questions, problems, missing parts? Before returning to your retailer, call our customer service department at 1-866-439-9800, 8 a.m. – 6 p.m., EST, Monday - Thursday, 8 a.m. – 5 p.m., EST, Friday. AB14752 1 Lowes.
PACKAGE CONTENTS B A D C H I K L N M F G J E PART A B C D E F G H I J K L M N DESCRIPTION Canopy Mounting Bracket Threaded Nipple Hex Nut (preassembled to Threaded Nipple (C)) Socket (preassembled to Arm Assembly (F)) Arm Assembly Shade Screw Collar Ring (preassembled to Threaded Nipple (C)) Screw Collar Loop (preassembled to Threaded Nipple (C)) Bulb Chain Fixture Loop Coupling (preassembled to Arm Assembly (F)) 12 in. Pipe 2 Lowes.
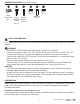
HARDWARE CONTENTS (shown actual size) AA BB CC DD EE FF Knob Qty: 3 Washer Qty: 3 Wire Connector Qty: 3 Short Shade Machine Screw Screw Qty: 3 Qty: 2 Bushing Qty: 3 SAFETY INFORMATION Please read and understand this entire manual before attempting to assemble, operate or install the product. • • • • • WARNING IMPORTANT: NEVER attempt any work without shutting off the electricity.
ASSEMBLY INSTRUCTIONS 1. Screw 12 in. pipe (N) into coupling (M) of arm (F). Then, screw fixture loop (L) onto 12 in. pipe (N). 1 L N M F 2. Remove screw collar ring (H) from screw collar loop (I) on threaded nipple (C). Ensure the screw collar loop (I) is positioned 1/4 in. from the end. Then, screw middle hex nut (D) to the center of threaded nipple (C). 2 Outlet Box Orient mounting bracket (B) so the raised center portion protrudes into the outlet box (not included).
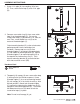
ASSEMBLY INSTRUCTIONS 4. Using the open chain links on chain (K), attach one end to screw collar loop (I) and the other end to fixture loop (L). Weave the fixture electrical and ground wires through every other chain link and pass through threaded nipple (C) into outlet box. Lower the screw collar ring (H) and canopy (A) over the chain (K). 4 Outlet Box C I K A H L 5.
ASSEMBLY INSTRUCTIONS 6. Raise shade (G) over sockets (E), lining up the holes on the arm (F) with the holes on the shade (G). Insert bushing (EE) into shade (G). Insert shade screw (CC) through shade and into arm (F). Pass washer (DD) over shade screw (CC) and secure with knob (FF). 6 G CC FF CAUTION: Do not overtighten, as this may damage the shade (G). EE DD F Hardware Used Shade Screw DD Washer CC x3 E x3 EE Bushing x3 FF Knob x3 7. Insert bulbs (J) into sockets (E). 7 J E 6 Lowes.
CARE AND MAINTENANCE • Always be certain that electric current is turned off before cleaning this item. • Use a soft, moist cloth with mild non-abrasive soap to clean fixture. Never use glass cleaner on fixture, as it will damage the metal finish. • All glass shades may be washed in a towel-lined sink with warm water and mild soap. Do not wash shades in an automatic dishwasher. • Bulb Replacement: Use 30-watt max. candelabra-base incandescent bulb or CFL equivalent.
WARRANTY (continued) This warranty does not apply to any products that have been subjected to misuse, mishandling, misapplication, connected to voltage at more than 5% above standard North American voltage, unusual use (including but not limited to use in an environment where the annual average ambient operating temperature is below 27 or above 95 degrees Fahrenheit), neglect (including but not limited to improper maintenance), accident, acts of god such as high winds, improper installation or care, failure
REPLACEMENT PARTS LIST For replacement parts, call our customer service department at 1-866-439-9800, 8 a.m. – 6 p.m., EST, Monday - Thursday, 8 a.m. – 5 p.m., EST, Friday. PART A B C D H I K L N AA BB DESCRIPTION Canopy Mounting Bracket Threaded Nipple Hex Nut Screw Collar Ring Screw Collar Loop Chain Fixture Loop 12 in.
welcoming • allen + roth ® est une marque de commerce déposée de LF, LLC. Tous droits réservés. sophisticated • inspiring ARTICLE #0615985 LUMINAIRE SUSPENDU MODÈLE #34705 JOIGNEZ VOTRE REÇU ICI Numéro de série Date d’achat Des questions, des problèmes, des pièces manquantes? Avant de retourner l’article au détaillant, appelez notre service à la clientèle au 1 866 439-9800, entre 8 h et 18 h (HNE), du lundi au jeudi, ou entre 8 h et 17 h (HNE) le vendredi. Lowes.
CONTENU DE L’EMBALLAGE B A D C H I K L N M F G J E PIÈCE A B C D E F G H I J K L M N DESCRIPTION Couvercle Support de fixation Tige filetée Écrou hexagonal (préassemblé à la tige filetée [C]) Douille (préassemblée à l’ensemble de bras [F]) Ensemble de bras Abat-jour Bague de collier à anneau (préassemblée à la tige filetée [C]) Collier à anneau de suspension (préassemblé à la tige filetée [C]) Ampoule Chaîne Anneau de suspension Raccord (préassemblé à l’ensemble de bras [F]) Tige de 30,48 cm 11
QUINCAILLERIE INCLUSE (grandeur réelle) AA BB CC Capuchon de connexion Vis à Qté : 3 métaux Vis pour courte abat-jour Qté : 2 Qté : 3 DD EE FF Rondelle Qté : 3 Bouton Qté : 3 Bague Qté : 3 CONSIGNES DE SÉCURITÉ Veuillez vous assurer de lire et de comprendre l’intégralité du présent guide avant d’assembler, d’utiliser ou d’installer ce produit. AVERTISSEMENT • IMPORTANT : Coupez l’électricité avant TOUTE manipulation.
INSTRUCTIONS POUR L'ASSEMBLAGE 1. Vissez la tige de 30,48 cm (N) au raccord (M) préassemblé à l’ensemble de bras (F). Puis, vissez l’anneau de suspension (L) à la tige de 30,48 cm (N). 1 L N M F 2. Retirez la bague de collier à anneau (H) du collier à anneau de suspension (I) situé sur la tige filetée (C). Assurez-vous que le collier à anneau de suspension (I) est positionné à 0,64 cm (0,25 po) de l’extrémité de la tige filetée.
INSTRUCTIONS POUR L'ASSEMBLAGE 4. À l’aide des maillons ouverts, fixez une extrémité de la chaîne (K) au collier à anneau de suspension (I) et l’autre extrémité à l’anneau de suspension (L). Faites passer les fils électriques et les fils de mise à la terre du luminaire dans un maillon de la chaîne sur deux et à travers la tige filetée (C), puis dans la boîte de sortie. Placez la bague du collier à anneau (H) et le couvercle (A) sur la chaîne (K). 4 Boîte de sortie C I K A H L 5.
INSTRUCTIONS POUR L'ASSEMBLAGE 6. Placez l’abat-jour (G) sur les douilles (E), en alignant les trous du bras (F) sur ceux de l’abat-jour (G). Insérez bague (EE) puis à travers l’abat-jour (G). Insérez les vis pour abat-jour (CC) par l’abat-jour (G) et en bras (F). Passer rondelle (DD) sur vis pour abat-jour (CC) et le fixer avec bouton (FF). 6 G CC EE DD FF F ATTENTION : Évitez de serrer excessivement les vis, car vous risqueriez d’endommager l’abat-jour (G).
ENTRETIEN • Vérifiez toujours que le courant est coupé avant de nettoyer le luminaire. • Utilisez un linge doux et humide ainsi qu’un savon non abrasif. N’utilisez jamais de nettoyants pour vitres; vous risqueriez d’endommager le fini métallique du luminaire. • Les abat-jour en verre peuvent être nettoyés dans un évier couvert de serviettes, à l’aide d’eau tiède et de savon doux. Ne nettoyez pas les abat-jour dans un lave-vaisselle.
GARANTIE (suite) Cette garantie ne couvre pas les produits qui ont été soumis à un usage inapproprié, à une manipulation inadéquate, à un emploi sur un circuit électrique caractérisé par une tension supérieure de plus de 5 % à la tension nominale nord-américaine standard, à un usage inhabituel (y compris, sans toutefois s’y limiter, l’utilisation dans un environnement où la température annuelle moyenne de fonctionnement est inférieure à -3 °C [27 °F] ou supérieure à 35 °C [95 °F]), à une négligence (y compr
LISTE DES PIÈCES DE RECHANGE Pour obtenir des pièces de rechange, appelez notre service à la clientèle au 1 866 439-9800, entre 8 h et 18 h (HNE), du lundi au jeudi, ou entre 8 h et 17 h (HNE) le vendredi.
welcoming • sophisticated allen + roth® es una marca registrada de LF, LLC. Todos los derechos reservados. • inspiring ARTÍCULO #0615985 LÁMPARA COLGANTE MODELO #34705 ADJUNTE SU RECIBO AQUÍ Número de serie Fecha de compra ¿Preguntas, problemas, piezas faltantes? Antes de volver a la tienda, llame a nuestro Departamento de Servicio al Cliente al 1-866-439-9800, de lunes a jueves de 8 a.m. a 6 p.m., y los viernes de 8 a.m. a 5 p.m., hora estándar del Este. Lowes.
CONTENIDO DEL PAQUETE B A D C H I K L N M F G J E PIEZA A B C D E F G H I J K L M N DESCRIPCIÓN Base Abrazadera de montaje Manguito roscado Tuerca hexagonal (preensamblada al manguito roscado (C)) Portalámpara (preensamblado en el ensamble del brazo(F)) Ensamble del brazo Pantalla Aro de la anilla de enganche (preensamblado al manguito roscado (C)) Bucle de la anilla de enganche (preensamblado en el manguito roscado (C)) Bombilla Cadena Enganche de la lámpara Acoplador (preensamblado en el ensam
ADITAMENTOS (tamaño real) AA BB CC DD EE Perilla Cant.: 3 Lavadora Cant.: 3 Conectores de cables Tornillos para Tornillo para Cant.: 3 metales pantalla cortos Cant.: 3 Cant.: 2 FF Buje Cant.: 3 INFORMACIÓN DE SEGURIDAD Lea y comprenda completamente este manual antes de intentar ensamblar, usar o instalar el producto. • • • • • ADVERTENCIA IMPORTANTE: NUNCA intente hacer trabajos sin desconectar el suministro eléctrico.
INSTRUCCIONES DE ENSAMBLAJE 1. Enrosque el tubo de 12 pulg (30,48 cm) (N) en el acoplador (M) del brazo (F). Luego, enrosque el enganche de la lámpara (L) en el tubo de 12 pulg (30,48 cm) (N). 1 L N 2. Retire el aro de la anilla de enganche (H) del bucle de la anilla de enganche (I) en el manguito roscado (C). Asegúrese de que el bucle de la anilla de enganche (I) esté a ¼ pulg (6,35 mm) del extremo. Luego, enrosque la tuerca hexagonal del medio (D) al centro del manguito roscado (C).
INSTRUCCIONES DE ENSAMBLAJE 4. Use los eslabones abiertos en la cadena (K), fije un extremo al bucle de la anilla de enganche (I) y el otro extremo al enganche de la lámpara (L). Entrelace los conductores de puesta a tierra y los de corriente eléctrica de la lámpara con los eslabones de la cadena intercalados y páselos por el manguito roscado (C) en la caja de salida. Descienda el aro de la anilla de enganche (H) y la base (A) sobre la cadena (K). 4 Caja de salida C I K A H L 5.
INSTRUCCIONES DE ENSAMBLAJE 6. Eleve la pantalla (G) sobre los portalámparas (E), alinee los orificios del brazo (F) con los orificios de la pantalla (G). Inserte tornillo para pantalla (CC) y en brazo (F). Pasar lavadora (DD) sobre tornillo para pantalla (CC) y asegurar con perilla (FF). 6 G CC FF PRECAUCIÓN: No apriete demasiado, ya que podría dañar la pantalla (G). EE DD F Aditamentos utilizados CC Tornillo para pantalla E x3 DD Lavadora x3 EE Buje x3 FF Perilla x3 7.
CUIDADO Y MANTENIMIENTO • Siempre asegúrese de que la corriente eléctrica esté desconectada antes de limpiar. • Utilice un paño húmedo suave y jabón suave no abrasivo para limpiar la lámpara. Nunca utilice un limpiador para vidrio en la lámpara, porque este dañará el acabado metálico. • Las pantallas de vidrio se pueden lavar dentro de un lavabo recubierto con toallas usando agua tibia y jabón suave. No lave las pantallas en un lavaplatos automático.
GARANTÍA (continuación) Esta garantía no se aplica a ningún producto que haya sido sometido a uso inadecuado, maltrato, aplicación inapropiada, conexión a un voltaje superior en un 5 % al voltaje estándar estadounidense, uso no convencional (incluido, entre otros, el uso en un entorno con temperatura de funcionamiento ambiente promedio anual inferior a 27 o superior a 95 grados Fahrenheit [inferior a -2,77 o superior a 35 grados centígrados]), negligencia (incluido, entre otros, el mantenimiento inadecuado)
LISTA DE PIEZAS DE REPUESTO Para obtener piezas de repuesto, llame al Servicio al Cliente al 1-866-439-9800, de lunes a jueves de 8 a.m. a 6 p.m., y los viernes de 8 a.m. a 5 p.m., hora estándar del Este.