
Installation Guide


Lowes.com/allenandroth
ASSEMBLY INSTRUCTIONS
5
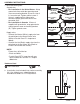
5. Temporarily lift canopy (A) over screw collar loop
(I) leaving half of the threads exposed. Screw
threaded nipple (C) in or out of mounting bracket
(B) until canopy (A) is flush with the ceiling. After
desired position is found, lock threaded nipple
(C) in place by tightening the middle hex nut (D)
up against the mounting bracket (B). Then lower
the bottommost hex nut (D) down to lock the
screw collar loop (I) in place.
Note: Do not install canopy (A) yet.
4. Remove screw collar ring (H) from screw collar
loop (I) on threaded nipple (C). Ensure the
screw collar loop (I) is positioned 1/4 in. from the
end. Then, screw middle hex nut (D) to the
center of threaded nipple (C).
Orient mounting bracket (B) so the raised center
portion protrudes into the outlet box (not
included). Remove top hex nut (D) from
threaded nipple (C) and attach threaded nipple
(C) into middle of mounting bracket (B). Secure
threaded nipple (C) to mounting bracket (B) at
the top with the removed hex nut (D). Then,
connect mounting bracket (B) to the outlet box
with short machine screws (BB).
Outlet
Box
BB
D
B
C
I
4
H
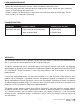
6. Using the open chain links on chain (K), attach one
end to screw collar loop (I) and the other end to
fixture loop (L). Weave the fixture electrical and
ground wires through every other chain link and
pass through threaded nipple (C) into outlet box.
Lower the screw collar ring (H) and canopy (A) over
the chain (K).
D
B
C
I
5
Outlet
Box
6
L
H
A
K
I
C