welcoming • sophisticated • inspiring ITEM #0181206 WALL LAMP MODEL #37260 Français p. 9 ATTACH YOUR RECEIPT HERE Serial Number Español p. 17 Purchase Date Questions, problems, missing parts? Before returning to your retailer, call our customer service department at 1-866-439-9800, 8 a.m. – 6 p.m., EST, Monday - Thursday, 8 a.m. – 5 p.m., EST, Friday. EB131036 1 Lowes.
PACKAGE CONTENTS H PART A B C D E F G H DESCRIPTION Wall Canopy Finial Shade Harp Saddle Threaded Pipe Cord Arm 2 QUANTITY 1 1 1 1 1 3 1 1 Lowes.
HARDWARE CONTENTS (shown actual size) AA BB DD CC EE FF GG Hex Nut Threaded Knob Qty.: 2 Qty.: 2 Pipe Cap Short Machine Screw Qty.: 1 Expansion Bolt Qty.: 2 Qty.: 2 Machine Screw Qty.: 2 Pipe Bracket Qty.: 1 HH II KK JJ Cord Plug (NOT SHOWN TO SIZE) Anchor Bolt Qty.: 1 Mounting Pan Qty.: 2 (NOT SHOWN TO SIZE) Qty.: 1 Wood Screw Qty.: 2 3 Lowes.
SAFETY INFORMATION Please read and understand this entire manual before attempting to assemble, operate or install the product. WARNING: • Do not use bulbs with wattage greater than specified on this fixture. • WARNING: California Prop 65: This lighting fixture contains chemicals known to the state of California to cause cancer, birth defects, and/or other reproductive harm. Wash hands after use.
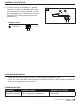
ASSEMBLY INSTRUCTIONS 1. Insert two short machine screws (GG) into the mounting pan (KK). The two short machine screws (GG) should protrude through mounting pan (KK) for securing in later steps. Position the mounting pan (KK) at the location on the wall where fixture is to be mounted. Note that the machine screws (BB) should be protruding from the wall. Mark the pan’s location. Attach the mounting pan (KK) to the wall with the winged expansion bolts (AA), or screws suitable for the mounting surface.
ASSEMBLY INSTRUCTIONS 3. Insert 100-watt max. medium-base bulb or CFL equivalent (none included). Squeeze open end of harp (D) together and fit into harp saddle (E). Place shade (C) over top of harp (D) and secure with finial (B). 3 Optional cord cover assembly: 4. Prior to attaching the plug, feed cord (G) through threaded pipe (F). 4 G 5. Screw pipe cap (DD) onto end of pipe (F). End of pipe (F) may be secured to the wall with pipe bracket (CC), wood screws (HH) and anchor bolts (II).
ASSEMBLY INSTRUCTIONS 6. To attach cord (G) to cord plug (JJ), position cord plug (JJ) with the wide blade to the right. Insert the cord (G) into the cord plug (JJ) with the ridged edge of the cord facing you. Secure the cord (G) by sliding the plug cap onto the cord plug (JJ). 6 G JJ Hardware Used JJ Cord Plug x1 CARE AND MAINTENANCE • Always be certain that electric current is turned off before cleaning this item. • Use a soft, moist cloth with mild non-abrasive soap to clean fixture.
WARRANTY Distributor warrants products manufactured by it will be free from defects in material and workmanship for one (1) year following the date of shipment. This warranty does not cover bulbs or finish on outdoor product. If any of the warranted products are found by Distributor to be defective, such products will, at Distributor’s option, be replaced or repaired at Distributor’s cost.
welcoming • sophisticated • inspiring ARTICLE #0181206 LAMPE MURALE MODÈLE #37260 JOIGNEZ VOTRE REÇU ICI Numéro de série Date d’achat Des questions, des problèmes, des pièces manquantes? Avant de retourner l’article au détaillant, appelez notre service à la clientèle au 1 866 439-9800, entre 8 h et 18 h (HNE), du lundi au jeudi, ou entre 8 h et 17 h (HNE) le vendredi. 9 Lowes.
CONTENU DE L’EMBALLAGE H PIÈCE A B C D E F G H DESCRIPTION Monture mural Faîteau Abat-jour Lyre La selle Tube fileté Cordon Bras 10 QUANTITÉ 1 1 1 1 1 3 1 1 Lowes.
QUINCAILLERIE INCLUSE (grandeur réelle) AA BB DD CC EE FF Boutons fileté Embout de tube Écrou hexagonal Qté : 2 Qté : 2 Vis à métaux courte Qté : 1 Boulon d'ancrage à oreille Qté : 2 Qté : 2 Vis à métaux Qté : 2 Patte de fixation de tube Qté : 1 HH GG II KK JJ Fiche du cordon (grandeur non réelle) Cheville d'ancrage Support de fixation Qté : 1 (grandeur non réelle) Qté : 2 Qté : 1 Vis à bois Qté : 2 11 Lowes.
CONSIGNES DE SÉCURITÉ Veuillez vous assurer de lire et de comprendre l’intégralité du présent guide avant d’assembler, d’utiliser ou d’installer ce produit. AVERTISSEMENT : • N’utilisez pas d’ampoules dont la puissance dépasse la puissance nominale indiquée sur ce luminaire.
INSTRUCTIONS POUR L'ASSEMBLAGE 1. Insérez deux vis à métaux courtes (GG) dans le support de fixation (KK). Les deux vis à métaux courtes (GG) devraient dépasser du support de fixation (KK), ce qui permettra de procéder à la fixation de la manière indiquée dans les étapes suivantes. Placez le boîtier de montage (KK) sur le mur à l’endroit où vous désirez installer le luminaire. Prenez note que les vis à métaux (BB) devraient dépasser du mur. Marquez l’emplacement du boîtier.
INSTRUCTIONS POUR L'ASSEMBLAGE 3. Insérez une ampoule à culot moyen de 100 watts maximum ou une ampoule fluocompacte équivalente (aucune fournie). Pressez l'une vers l'autre les extrémités ouvertes de la lyre (D) et insérez-les dans le support de lyre (E). Placez l'abat-jour (C) sur le haut de la lyre (D) et fixez à l'aide de la graine de lyre (B). 3 Montage optionnel du cache-fil : 4. Avant de raccorder la fiche, faites passer le cordon (G) dans le tube fileté (F). 4 G 5.
INSTRUCTIONS POUR L'ASSEMBLAGE 6. Pour fixer le cordon (G) à la fiche du cordon (JJ), placez la fiche (JJ) de telle sorte que la lame large se trouve du côté droit. Insérez le cordon (G) dans la fiche du cordon (JJ) en veillant à ce que le bord nervuré soit tourné vers vous. Fixez le cordon (G) en faisant glisser le capuchon de la fiche sur la fiche du cordon (JJ).
GARANTIE Le distributeur garantit les produits qu’il a fabriqués contre tout défaut de matériaux ou de fabrication pour une période de un (1) an à compter de la date d’expédition. Cette garantie ne couvre pas les ampoules ni le fini des produits extérieurs. Si l’un des produits garantis est déclaré défectueux par le distributeur, celui-ci choisira de remplacer ou de réparer le produit à ses frais.
welcoming • sophisticated • inspiring ARTÍCULO #0181206 LÁMPARA DE PARED MODELO #37260 ADJUNTE SU RECIBO AQUÍ Número de serie Fecha de compra ¿Preguntas, problemas, piezas faltantes? Antes de volver a la tienda, llame a nuestro Departamento de Servicio al Cliente al 1-866-439-9800, de lunes a jueves de 8 a.m. a 6 p.m., y los viernes de 8 a.m. a 5 p.m., hora estándar del Este. 17 Lowes.
CONTENIDO DEL PAQUETE H PIEZA A B C D E F G H DESCRIPCIÓN Base de pared Remate Pantalla Arco Soporte Tubo roscado Cable Brazo 18 CANTIDAD 1 1 1 1 1 3 1 1 Lowes.
ADITAMENTOS (tamaño real) AA BB DD CC EE FF Perillas roscada Tapa del tubo Tuerca hexagonal Cant.: 2 Cant.: 2 Tornillo para metal corto Cant.: 1 Perno de oreja para ampliación Cant.: 2 Tornillos para metales Cant.: 2 Cant.: 2 Abrazadera del tubo Cant.: 1 HH GG II KK JJ Enchufe del cable (no es el tamaño real) Perno de anclaje Cant.: 1 Bandeja de montaje (no es el tamaño real) Cant.: 2 Cant.: 1 Tornillos para madera Cant.: 2 19 Lowes.
INFORMACIÓN DE SEGURIDAD Lea y comprenda completamente este manual antes de intentar ensamblar, usar o instalar el producto. ADVERTENCIA: • No utilice bombillas de un vataje mayor al especificado en esta lámpara. • ADVERTENCIA: PROPUESTA 65 DE CALIFORNIA: Esta lámpara contiene sustancias químicas reconocidas por el estado de California como causantes de cáncer, defectos congénitos y/u otros daños en el aparato reproductivo. Lávese las manos después de usar.
INSTRUCCIONES DE ENSAMBLAJE 1. Inserte dos tornillos para metal cortos (GG) en la bandeja de montaje (KK). Los dos tornillos para metal cortos (GG) deben sobresalir de la bandeja de montaje (KK) para poder asegurarla en los pasos posteriores. Coloque la bandeja de montaje (KK) en el lugar en la pared donde se instalará la lámpara. Tenga en cuenta que los tornillos para metal (BB) deben sobresalir de la pared. Marque el lugar de la bandeja.
INSTRUCCIONES DE ENSAMBLAJE 3. Inserte una bombilla de base mediana de máximo 100 vatios o un bombilla CFL equivalente (ninguno se incluye). Apriete para juntar el extremo abierto del arpa (D) y encajarlo en la silla del arpa (E). Coloque la pantalla (C) sobre la parte superior del arpa (D) y asegúrela con el remate (B). 3 Ensamblaje de la cubierta del cable opcional: 4. Antes de unir el enchufe, pase el cable (G) a través del tubo roscado (F). 4 G 5.
INSTRUCCIONES DE ENSAMBLAJE 6. Para unir el cable (G) al enchufe del cable (JJ), coloque el enchufe del cable (JJ) con la clavija ancha a la derecha. Introduzca el cable (G) en el enchufe del cable (JJ) con el borde acanalado del cable hacia usted. Fije el cable (G) al deslizar la tapa del enchufe en el enchufe del cable (JJ). 6 G JJ Aditamentos utilizados JJ Enchufe del cable x1 CUIDADO Y MANTENIMIENTO • Siempre asegúrese de que la corriente eléctrica esté desconectada antes de limpiar.
GARANTÍA El distribuidor garantiza que los productos que él fabrica no presentarán defectos de fabricación ni en los materiales ni en la mano de obra durante un (1) año desde la fecha de envío original. Esta garantía no cubre las bombillas ni el acabado de un producto para exteriores. Si el distribuidor comprueba que alguno de los productos cubiertos por la garantía presenta defectos, el distribuidor reemplazará o reparará dichos productos a su sola discreción y a su cargo.