
Installation Guide


Before You Get Started…
If you’re planning to do it yourself, first ask yourself a few
questions.
1
Do you have some experience with carpentry?
2
Do you have your own tools?
3
Are you handy with a measuring tape and able to handle a
drill, saw and screwdriver?
4
Are you experienced and qualified to do basic plumbing
and electrical tasks?
5
Do you understand terms like miter cut, level and plumb?
If you passed this little quiz, you may be able to install your own
cabinetry. However, if you’re not an experienced do-it-yourselfer,
you may be better off leaving this task to the pros.
Before You Begin
1
Check your inventory to be sure you received your entire
order. If there are any missing or improper parts, contact
your designer or customer service.
2
AWC recommends that no fewer than two people work
together to install these cabinets.
3
Read and understand the entire installation guide prior to
beginning the install.
The Secret is the Preparation
Continued
Safety Precautions
DANGER
TO REDUCE THE RISK OF SERIOUS OR FATAL INJURY FROM
FIRE, EXPLOSION OR ELECTROCUTION, IF GAS LINE OR
ELECTRICAL WORK IS INVOLVED, HAVE THE WORK DONE BY
A UTILITY COMPANY OR QUALIFIED SERVICE PROFESSIONAL.
TO REDUCE THE RISK OF SHOCK, EXPLOSION OR INJURY,
TURN OFF ALL GAS, ELECTRICAL AND WATER CONNECTIONS
PRIOR TO PERFORMING ANY WORK. SHUT OFF THE POWER
TO ALL APPLIANCES AND RECEPTACLES IN THE KITCHEN,
INCLUDING LIGHTS, AT THE FUSE-BREAKER BOX. USE A
CIRCUIT TESTER TO MAKE SURE POWER IS OFF.
Once you have ensured that the gas, water and electric in the
room are turned off, that the plumbing, gas and power supplies
are properly capped, and have removed the old cabinetry and
baseboards, you need to assess the room. Take special note of the
floors and walls. Use a level or straightedge to determine high spots
and other imperfections. Mark any bumpy or bulging areas. You
may have to prep the walls and floors if things are not plumb, level
and square. (Many people prefer to repaint and replace the flooring
while the room is empty.) The time you spend preparing the room
will ensure a smoother, easier installation of the cabinetry.
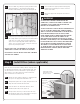
Prepare the Walls and Floors
We know that homes settle and things may not always be perfectly
flat and level. But there are ways around this when installing
cabinetry. Here are a few steps that will help you get off to a good
start.
1
Locate and mark all the studs using a stud finder. (To verify
the position of your studs, drive a small finishing nail into
the wall in an area that will be covered up by a cabinet.)
2
Recheck your measurements. Make sure the cabinet
drawings match the space.
3
Take inventory of your cabinets. Make sure you have
your entire order.
4
Gather the tools you will need.
3