
Installation Guide


Step 3 Hang the Wall Cabinets One at a Time
3.1
Recheck the pre-assembled cabinets for level and plumb,
then disassemble wall cabinets before installing.
WARNING
TO REDUCE THE RISK OF SERIOUS OR FATAL INJURY,
REMOVE ALL SCREWS AND DISASSEMBLE WALL CABINETS
BEFORE INSTALLING.
CABINETS MAY BE TOO HEAVY FOR ONE PERSON TO SAFELY
LIFT ALONE.
THIS INSTALLATION GUIDE APPLIES TO ONLY WOOD
STUD CONSTRUCTION. IF YOU ARE SECURING CABINETS
TO ANOTHER MATERIAL, CONSULT AN INSTALLATION
PROFESSIONAL TO IDENTIFY THE PROPER FASTENERS.
NEVER USE NAILS TO INSTALL CABINETS BECAUSE DOING
SO MAY DAMAGE CABINETS OR FAIL TO PROPERLY SECURE
THEM WHICH MAY RESULT IN DEATH OR SERIOUS INJURY.
TIGHTENING BACK RAILS AGAINST A CROOKED WALL
WITHOUT SHIMS CAN BREAK JOINTS BETWEEN THE RAIL
AND THE BODY OF THE CABINET, CAUSING IT TO FALL FROM
THE WALL AND POSSIBLY RESULTING IN SERIOUS PERSONAL
INJURY.
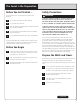
3.2
Start with the corner cabinet. With someone else’s help, lift
it into position on the support rail and use a 2 x 4 or T-brace
at the front to prop the cabinet into place. Keep in mind,
blind corner cabinets may need to be pulled out from the
corner as shown in your kitchen plan. (Figure 10)
3.3
Fasten the cabinet to the wall with #10 x 2
1
⁄2” wall attachment
(pan head) screws. Do not fully tighten the screws until all
cabinets have been shimmed and properly positioned.
3.4
Next, using your level against the front of the cabinet, shim
wherever necessary to make sure the cabinets are perfectly
plumb (even though the walls may not be). Keep in mind,
you may have to loosen the wall attachment screws slightly
to shim properly.
3.5
Lift the adjacent cabinet into position on the support rail
and brace. Using the pilot holes you created on the floor,
attach the two cabinets at the face frames, making sure
they are still flush when screwed together. (Figure 11)
3.6
Once again, fasten the cabinet to the wall with #10 x 2
1
⁄2”
wall attachment (pan head) screws. Do not fully tighten.
Figure 11
T-brace
Temporary
support rails
Corner cabinet
Mount adjacent cabinets,
shim as required
Wall stud locations
Figure 10
T-brace
Temporary
support rails
Start with
corner cabinet first
Soffit or ceiling
T-brace supports
front of cabinet
Back of cabinet
supported by support rails
Wall stud locations
Continued
7