
Installation Guide


Installation Instructions
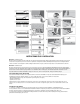
Method A: Angle-In installation method
Position the panel to be installed at an angle of 20° to 30° to the panel already installed. Move the panel gently up and down and at the same time
exert forward pressure. The panels will automatically click into place. You can either insert the tongue into the groove, or the groove on to the
tongue. The tongue in groove method is the most common and the easiest way. See diagram 1A-1B-1C.
Method B: Flat installation method
You can also tap the panels into each other without lifting. For this method you must use the special tapping block. The planks should not be joined
with a single tap and the tapping block should be sitting flat on the floor. To avoid damaging the panels you must tap them together gradually. See
diagram 2A-2B. Use this method only in cases where you are unable to use the Angle-In method (see below). The rest of your floor should be
installed using the Angle-In method.
TOOLS FOR INSTALLING THE FLOOR
For best results, it is essential that you follow the installation instructions exactly. Besides the regular tools for installing laminate floors (i.e.
hammer, saw, pencil, measure) you will also need the following accessories.
• Installation kit (pull bar, spacers 0.039 inch - 0.315 inch and tapping block)
• Maintenance products
• Underlayment system
You may also need to saw the panels. To obtain a clean cut, the pattern side should face down when you use a jigsaw, sabre saw or circular
handsaw and up when you use a handsaw, table saw or a crosscut saw.
10 FOCUS POINTS
1. The floor floats and is installed without glue. You can walk on the floor during and immediately after installation.
2. You can choose where you want to begin. Think about what will be the easiest way to install the floor. We will demonstrate the installation for
right-handed people, from left to right. You can work in the other direction if you want.
3. Make sure the panels are mixed sufficiently when you install them, so that you do not end up with too many identical, light or dark panels next to
each other.
4. Check all panels in daylight before and during installation. Defective panels must never be used.
5. The floor should preferably be installed parallel to how the light enters the room. The ideal conditions are 59°-68°F at a relative humidity of 50-
60%.
6. Let the planks acclimate for 48 hours in the unopened packaging at the normal room temperature in the middle of the room where the floor is to
be installed
7. Room humidity can vary according to the season, so it is vital that the floor is able to expand and contract. For this reason, make sure you leave
an expansion joint of minimum 5/16 inch to 3/8 inch on all sides of the floor, around pipes, thresholds, under doors and around any fixed/stationary
objects (floor vents, kitchen islands, etc..).
8. Large rooms must have expansion joints every 40 feet width-wise to the panels and every 40 feet length-wise. It is recommended to provide an
expansion joint between different rooms (e.g. under the door). Expansion joints can be finished by means of a molding that is attached to the
subfloor.
9. Ensure that the end joints of the panels in two successive rows are never in line. Always ensure that the joints are staggered by at least 6 inches.
10. We recommend you purchase a few extra cartons of flooring. This will be useful to you if you have some damaged pieces, miscalculate the size
of the room or miss cut some pieces. This also will help you if your floor needs a repair but your product is no longer manufactured.
PREPARING THE ROOM
• Allow the laminate flooring to acclimate for 48 hours in its sealed packaging in the middle of the room where it is to be installed.
Mix planks from different cartons when installing to maximize the natural look of the floor.
• Check that the doors can still open and close after the floor has been installed (minimum 3/8 inch)
• Check whether the old molding can be removed. You can also leave the wall base and finish the floor with accessory profiles.
• Make sure the subfloor is flat. Any unevenness greater than 1/16 inch over the length of 40 inches must be smoothed out. It is vital
that you use underlayment to smooth any unevenness in the base floor.
• Make sure the subfloor is clean, dry and stable
• Flooring may be installed over radiant heat systems following special installation instructions. Contact your retailer for further
details