CORDLESS CELLULAR SHADE SAFETY INFORMATION Please read and understand these instructions before attempting to assemble, install, or operate this product. INSTALLATION INSTRUCTIONS Step 1: Check Package Contents Before installing your shade, make sure all parts listed below are present. If any part is missing or damaged, please do not assemble, install, or operate. To request replacement parts, contact customer service at 1-877-804-5504, Monday through Friday from 8:30 a.m. to 5:00 p.m. EST.
Part Quantity . Mounting Bracket 2 (for 20 in. to 36 in. widths) 3 (for 37 in. to 47 in. widths) 4 (for 48 in. to 72 in. widths) . Handle 1 . Wood Screw 4 (for 20 in. to 36 in. widths) 6 (for 37 in. to 47 in. widths 8 (for 48 in. to 72 in. widths) Step 2: Gather Additional Tools Required The following tools are not included, but will be needed to complete your installation.
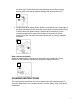
the head rail. Pre-drill the screw holes and then secure the mounting bracket (AA) to the wall or window molding with wood screws (CC). 2 3. Lift the head rail of shade (A) into position such that the inner front edge of the head rail slides into the slot at the front of each mounting bracket (AA). Push the head rail upward until the flexible tab at the bottom of each mounting bracket (AA) snaps onto the back of the head rail.
REPLACEMENT PARTS If you require replacement parts, contact customer service at 1-877-804-5504, Monday through Friday from 8:30 a.m. to 5:00 p.m. EST.
FRENCH STORE CELLULAIRE SANS FIL Questions? Appelez le service à la clientèle au 1-877-804-5504, du lundi au vendredi de 8 h 30 à 17 h 00 (heure normale de l'est) CONTENU DE L’EMBALLAGE ACCESSOIRES DE FIXATION AA BB CC AA. Support de montage 23 in. - 36 in. = x 2 37 in. - 47 in. = x 3 48 in. - 72 in.
BB. Poignée =x1 CC. Vis à bois 23 in. - 36 in. = x 4 37 in. - 47 in. = x 6 48 in. - 72 in. = x8 48 in. - 72 in. = x 4 8 58,42 cm - 91,44 cm = x 4 93,98 cm - 119,38 cm = x 6 121,92 cm - 182,88 cm = x 8 CONSIGNES DE SÉCURITÉ Lisez attentivement et comprenez ce manuel avant d'assembler, d'installer et d'utiliser ce produit. PRÉPARATION Avant de commencer l'installation, assurez-vous qu'il ne manque aucune pièce. Comparez le contenu de l'emballage avec la liste de pièces et d'accessoires de fixation.
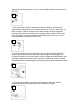
supports de montage (AA) sur le mur ou sur le cadre de fenêtre avec des vis à bois (CC). 1 2. Si le produit est installé à l'intérieur du cadre de fenêtre, accrochez les supports de montage (AA) sur le caisson du store (A). Tenez le store (A) à sa place et faites un trait au crayon sur la surface derrière chaque support de montage (AA). Retirez les supports de montage (AA) du caisson.
ENTRETIEN Le caisson supérieur en vinyle et le rail inférieur peuvent être essuyés avec une éponge humide. Si vous désirez nettoyer le tissu du store, utilisez un plumeau ou un aspirateur avec une brosse douce et une pression très légère. GARANTIE LIMITÉE DE UN AN Si ce couvre-fenêtre présente un défaut de matériaux ou de fabrication pendant la première année suivant la date d'achat, le fabricant le remplacera par un autre couvre-fenêtre de valeur égale ou supérieure.
SPANISH PERSIANA CELULAR INALÁMBRICO ¿Tiene Preguntas? Llame al servicio al cliente al 1-877-804-5504, 8:30 a.m. - 5 p.m., hora del Este, de lunes a viernes. CONTENIDO DEL PAQUETE ACCESORIOS INCLUIDOS AA BB CC AA. Soporte de montaje 23 in. - 36 in. = x 2 37 in. - 47 in. = x 3 48 in. - 72 in.
93,98 cm - 119,38 cm = x 3 121,92 cm - 182,88 cm = x 4 BB. Manija =x1 CC. Tornillo de madera 23 in. - 36 in. = x 4 37 in. - 47 in. = x 6 48 in. - 72 in. = x8 48 in. - 72 in. = x 4 8 58,42 cm - 91,44 cm = x 4 93,98 cm - 119,38 cm = x 6 121,92 cm - 182,88 cm = x 8 INFORMACIÓN DE SEGURIDAD Asegúrese de leer y comprender completamente este manual antes de intentar ensamblar, operar o instalar el producto. PREPARACIÓN Antes de comenzar a instalar el producto, asegúrese de que todas las partes estén presentes.
persiana (A). Haga los orificios previos para los tornillos y luego asegure el soporte (AA) a la pared o a la moldura de la ventana con tornillos de madera (CC). 1 2. Para montaje en el interior, fije los soportes de montaje (AA) al pasador de la persiana (A). Mantenga la persiana (A) en su lugar y haga marcas de lápiz en la parte posterior de cada soporte de montaje (AA). Retire los soportes de montaje (AA) del pasador.
CUIDADO Y MANTENIMIENTO El pasador de vinilo y el riel inferior pueden limpiarse con una esponja húmeda. Para limpiar la tela de la persiana, use un plumero o aspire con el accesorio para limpieza suave. GARANTÍA LIMITADA DE UN AÑO Por el período de un (1) año a partir de la fecha de compra, el fabricante reemplazará este cobertor de ventana por uno de valor equivalente o superior, si se comprueba que tiene defectos de materiales o fabricación.