
Installation Guide


Part Quantity
Mounting Bracket 2 (for 20 in. to 36 in. widths)
3 (for 37 in. to 47 in. widths)
4 (for 48 in. to 72 in. widths)
Handle 1
Wood Screw 4 (for 20 in. to 36 in. widths)
6 (for 37 in. to 47 in. widths
8 (for 48 in. to 72 in. widths)
Step 2: Gather Additional Tools Required
The following tools are not included, but will be needed to complete your
installation.
• Measuring tape
• Drill with 3/32-inch bit
• Pencil
• Screwdriver
• Step ladder - optional
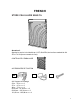
Step 3: Install the Mounting Brackets
Estimated Assembly Tim
e: 30 minutes
The shade may be installed either inside or outside the window frame. A
mounting bracket should be positioned on each end of the head rail. Wider
shades that require three or more brackets should be spaced evenly between the
two outermost brackets. Always position the brackets so there is no interference
with cords and mechanisms inside the head rail. The procedure outlined below
will assure proper bracket placement.
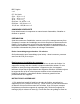
1. For outside mounting, clip the mounting (AA) onto the head rail of shade
(A). Hold shade (A) level at the height desired and center it over the
window opening. Mark the exact location of each mounting bracket (AA)
with a pencil. Remove the mounting brackets (AA) from the head rail of
shade (A). Pre-drill the screw holes and then secure bracket (AA) to the
wall or window molding with wood screws (CC).
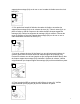
2. For inside mounting, clip the mounting brackets (AA) onto the head rail of
shade (A). Hold shade (A) in place and make pencil mark at the rear of
ea
ch mounting bracket (AA). Remove the mounting brackets (AA) from
1
2
.
.
.