
Installation Guide


ASSEMBLY INSTRUCTIONS
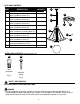
5
F
6
Adjust preassembled screws (F) to proper
length by screwing them completely into
mounting plate (E). Temporarily place fixture
(A) over mounting plate (E) to determine
amount of adjustment necessary for screws (F)
-- screws (F) should come through holes in
fixture (A) just enough so decorative nuts (H)
will fit flush against fixture (A) when mounted.
Once screws (F) are adjusted, use pliers (not
included) to tighten preassembled nuts (G) on
screws (F) until nuts (G) touch mounting plate
(E).
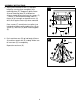
5.
Body
Push cord from arm (D) up into body of fixture
(A) and then attach arm (D) to body. Make sure
to screw arm (D) in completely.
Repeat for each arm (D).
6
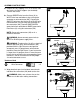
6.
A
D
D
D
E
G
H
A
H