
Installation Guide
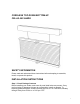
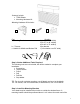
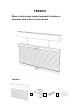
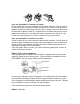

Table Of Contents

head rail. Wider shades that require three or more brackets should be spaced
evenly between the two outermost brackets. Always position the brackets so
there is no interference with the cords and/or mechanisms inside the head rail.
The procedure outlined below will assure proper bracket placement.
To Attach the Brackets:
Lift the head rail into position such that the front edge of the bracket is under the
inner front edge of the head rail, and then push the head rail upward until the
flexible tab at the bottom of each bracket snaps onto the back of the head rail.
Check carefully to assure each bracket is properly secured.
For Outside Mounting:
Clip the brackets onto the head rail as described above. Hold the shade level at
the height desired and center it over the window opening. Mark the exact location
of each bracket with a pencil. Remove the brackets from the head rail. Pre-drill
the screw holes using a 3/32” drill bit (not included). Position the top of each
bracket at the pre-drilled holes and screw each bracket into the wall or window
molding using the 1” screws.
For Inside Mounting:
Clip the brackets onto the head rail as described above. Hold the shade level in
place and make a pencil mark at the rear of each bracket where it contacts the
inside of the window frame. Remove the brackets from the head rail. Pre-drill the
screw holes using a 3/32” drill bit (not included). Align each bracket with the
holes and attach using the 1” screws.
Step 4. Attach the Handle(s)
Attach the handle to the bottom rail as illustrated below. The handle is designed
to minimize contact with the shade fabric. Always raise and lower the shade
SLOWLY to assure that the pleated fabric stacks neatly.
Bottom Rail
Middle Rail
Head Rail
3