ITEM #0339212, #0339213, #0339214, #0339215 VENTILATED WOOD TOWER MODEL #WSWS-VWU1C, #WSWS-VWU1W #WSWS-VWU1P, #WSWS-VWU1S Français p. 11 Español p. 21 ATTACH YOUR RECEIPT HERE Serial Number______________________ Purchase Date _______________________ Questions, problems, missing parts? Before returning to your retailer, call our customer service department at 1-866-439-9800, 8 a.m. - 8 p.m., EST, Monday - Friday.
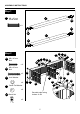
PACKAGE CONTENTS G A F D B E C D F A E H D PART DESCRIPTION QUANTITY A Wall Hanging Cleat 2 B Side Panel (Left) 1 C Side Panel (Right) 1 D Fixed Shelf 3 E Adjustable Shelf 2 F Mounting Cleat 2 G Wood Support 2 H Installation Template 1 2
HARDWARE CONTENTS DD AA BB CC M6 x 40 mm Bolt M6 x 60 mm Bolt Lock Washer Qty. 12 Qty. 4 Qty. 16 Qty. 16 ? 8x30mm Wood Pins GG FF EE Shelf Pin M3.5 x 12 mm Wood Screw Qty. 8 Qty. 8 M8 x 30 mm Wood Dowel Qty. 8 JJ II M8 x 2-1/2 in. Lag Bolt Large Flat Washer Qty. 4 Qty. 4+1 extra LL Touch-up Pen Touch Qty. 1 Up Pen(1) (not included for Item #0339214) 3 FF Small Flat Washer HH M6 Nuts Qty.4 M6 Barrel Nut GG Qty. 4 KK M4 Allen Wrench Qty. 1 Qty.
SAFETY INFORMATION Please read and understand this entire manual before attempting to assemble, operate or install the product. If you have any questions regarding the product, please call customer service at 1-866-439-9800, 8:00 a.m. - 8:00 p.m., EST, Monday - Friday. 1. Do not allow children to climb or play in or around this product. 2. Use this unit for its intended purpose only. Do not use shelves as step ladder. 3. To avoid damage, assemble the product on a sturdy, level and protective surface. 4.
ASSEMBLY INSTRUCTIONS Step 1 GG M8 x 30 mm Wood dowel F GG x8 GG GG F GG Step 2 AA BB CC DD HH AA M6 x 40 mm Bolt AA CC DD CC F HH BB DD x 6 BB M6 x 60 mm Bolt x2 CC B AA F Lock Washer D AA D CC DD x8 DD CC BB DD D F CC Small Flat Washer HH DD x8 ? 8x30mm Wood Pins FF HH Qty.8 Beveled edge facing bottom of unit Barrel Nut x2 M6 Nuts Qty.
ASSEMBLY INSTRUCTIONS Step 3 HH M6 x 40 mm AA Bolt CC DD HH CC DD x 6 AA BB BB M6 x 60 mm Bolt DD CC BB x2 CC DD Lock Washer CC AA DD CC AA C AA HH x8 DD Qty.8 DD x8 CC BB Barrel Nut x2 M6 Nuts Qty.
ASSEMBLY INSTRUCTIONS Step 5 Wood support assembly FF G G M3.5 x 12 mm Wood screw FF x8 NOTE: Attach the wood support (G) to inside of the unit as a reinforcement for attaching the expandable pole kit (sold separately) at the opposite side. Please place the pole holder at the middle of the wood support. Please disregard this step if you only serve the unit as a single tower. Expandable pole kit (sold separately) Step 6 Wooden Stud Wall Hanging installation II 16 in. (40.6 cm) M8 x 2-1/2 in.
ASSEMBLY INSTRUCTIONS Step 7 Wall Hanging installation NOTE: TWO OR MORE PERSONS MUST WORK TOGETHER TO INSTALL THE UNIT ONTO THE WALL. A A CARE AND MAINTENANCE Periodically check to make certain all components are properly positioned, free from damage and firmly connected. Use a soft, clean cloth that will not scratch the surface when dusting. Never use water to clean your furniture as it may cause damage to the finish. Wipe clean using a damp cloth and a mild cleaner.
LIMITED LIFETIME WARRANTY This product (exclusive of shelves) is warranted to the original purchaser. If there is a failure in this unit due to defects in materials or workmanship, the manufacturer will repair or replace this item at our discretion without charge. Warranty is void if product has been assembled incorrectly, misused, abused by overloading, altered in any way or damaged due to accident.
G A F D C B E D H F A E D AA BB CC DD ? 8x30mm Wood Pins EE FF GG HH FF M6 Nuts II JJ KK Qty.8 GG Qty.
ARTICLES NO 0339212, 0339213, 0339214, 0339215 TOUR EN BOIS VENTILÉE MODÈLE NO WSWS-VWU1C, WSWS-VWU1W WSWS-VWU1P, WSWS-VWU1S JOINDRE VOTRE REÇU ICI Numéro de série____________________ Date d'achat _______________________ Question, problèmes, pièces manquantes ? Avant de retourner au détaillant, communiquer avec notre service à la clientèle au 1-866-439-9800 entre 8 h 00 et 20 h 00, Heure de l'Est, du lundi au vendredi.
CONTENU DE LA BOÎTE G A F D B E C D F A E H D PIÈCE DESCRIPTION QUANTITÉ A Tasseau de suspension 2 B Panneau latéral (gauche) 1 C Panneau latéral (droit) 1 D Tablette fixe 3 E Tablette réglable 2 F Tasseau de montage 2 G Support en bois 2 H Gabarit d'installation 1 12
CONTENU DE LA QUINCAILLERIE CC AA BB Boulon M6 x 40 mm Boulon M6 x 60 mm Qté 12 Qté 4 Qté 16 GG Taquet de tablette Vis à bois M3.5 x 12 mm Goujon de bois M8 x 30 mm Qté 8 Qté 8 Qté 8 Qté 16 ? 8x30mm Wood Pins JJ M6 Nuts Qty.4 Écrou cylindrique M6 Qté 4 KK Tire-fond M8 x 2 ½ po Grande rondelle plate Clé hexagonale M4 Qté 4+1 extra Qté 4 Qté 1 LL Crayon à retouche Touch Qté 1 Up Pen(1) (non inclus pour l'article no 0339214 ) 13 Qty.
CONSIGNES DE SÉCURITÉ Lire et comprendre le présent guide avant de procéder au montage, à l'utilisation ou à l'installation du produit. Pour toute question sur le produit, appeler le service à la clientèle au 1-866-439-9800 entre 8h00 et 20h00, Heure de l'Est, du lundi au vendredi. 1. Ne pas laisser les enfants grimper ni jouer sur ou autour de ce produit. 2. Utiliser cette unité pour l'usage visé seulement. Ne pas utiliser les tablettes pour grimper. 3.
DIRECTIVES DE MONTAGE Étape 1 GG Goujon de bois M8 x 30 mm F GG x8 GG GG F GG Étape 2 CC DD B AA F Rondelle frein Petite rondelle plate CC DD D FF DD x2 M6 Nuts HH F CC Bordure biseauté face vers le bas de l'unité Qty.8 Écrou cylindrique CC DD BB x8 ? 8x30mm Wood Pins D AA D x8 HH F HH Boulon M6 x 60 mm x2 DD AA CC DD BB x 6 CC CC DD HH AA Boulon M6 x 40 mm BB AA BB Qty.
DIRECTIVES DE MONTAGE Étape 3 AA HH Boulon M6 x 40 mm CC BB Boulon M6 x 60 mm DD CC BB x2 AA CC DD x 6 BB CC DD HH DD CC Rondelle frein AA DD CC AA C AA HH x8 DD DD AA Petite rondelle plate DD x8 ? 8x30mm Wood Pins FF HH CC Qty.8 BB Écrou cylindrique x2 M6 Nuts Qty.
DIRECTIVES DE MONTAGE Étape 5 Montage du support de bois FF G G Vis à bois M3.5 x 12 mm FF x 8 NOTE : Fixer le support de bois (G) à l'intérieur de l'unité comme renforcement pour fixer la tringle extensible (vendue séparément) à l'autre extrémité. Placer le support de tringle au centre du support en bois. Ignorer cette étape si l'unité est utilisée comme tour uniquement. Tringle extensible (vendue séparément) Étape 6 Montant de bois Installation murale II 16 po.
DIRECTIVES DE MONTAGE Étape 7 Installation murale NOTE : AU MOINS DEUX PERSONNES DOIVENT TRAVAILLER ENSEMBLE POUR INSTALLER L'UNITÉ AU MUR. A A SOIN ET ENTRETIEN Vérifier régulièrement la position, l'intégrité et la solidité de tous les composants. Utiliser un linge doux et propre qui ne rayera pas la surface lors de l'époussetage. Ne jamais utiliser d'eau pour nettoyer le meuble car elle pourrait en endommager le fini. Essuyer avec un linge humide et un nettoyant doux.
GARANTIE LIMITÉE À VIE Ce produit (excluant les tablettes) est garanti à l'acheteur original. En cas de bris de cette unité dû à un défaut de fabrication ou des matériaux, le fabricant réparera ou remplacera l'article, à sa discrétion, sans frais. La garantie est nulle si le produit a été assemblé de manière incorrecte, a été mal utilisé, surchargé, modifié de quelque manière que ce soit ou endommagé suite à un accident.
G A F D C B E D H F A E D AA BB CC DD ? 8x30mm Wood Pins EE FF GG HH FF M6 Nuts II JJ KK Qty.8 GG Qty.
ARTÍCULO #0339212, #0339213, #0339214, #0339215 TORRE DE MADERA VENTILADA MODELO #WSWS-VWU1C, #WSWS-VWU1W #WSWS-VWU1P, #WSWS-VWU1S ADJUNTE SU RECIBO AQUI Número de Serie____________________ Fecha de Compra______________________ Preguntas, problemas, le faltan piezas? Antes de volver a la tienda, llame a nuestro departamento de servicio al cliente al 1-866-439-9800, de 8 am - 8 pm, Horario del Este, de Lunes - Viernes.
CONTENIDO DEL EMPAQUE G A F D B E C D F A E H D PARTE DESCRIPCIÓN CANTIDAD A Cuña para Colgar en Pared 2 B Panel Lateral (Izquierdo) 1 C Panel Lateral (Derecho) 1 D Repisa Fija 3 E Repisa Ajustable 2 F Cuña de Montaje 2 G Soporte de Madera 2 H Patrón de Instalación 1 22
CONTENIDO DE ARTÍCULOS DE FERRETERÍA BB AA Perno de 6 x 40 mm Perno de 6 x 60 mm Cant. 12 Cant. 4 Arandela de Presión Arandela Plana Pequeña Cant. 16 Cant. 16 ? 8x30mm Wood Pins GG FF EE DD CC FF Pasador de Repisa Tornillo para Madera de 3.5 x 12 mm Clavija de Madera de 8 x 30 mm Cant. 8 Cant. 8 Cant. 8 GG JJ II Tornillo de 8 mm x 2-1/2 pulg (6,35 cm) Cant. 4+1 extra Arandela Plana Grande Cant. 4 LL Plumón para Retoques Touch Up Pen(1) Cant.
INFORMACIÓN DE SEGURIDAD Por favor lea y entienda este manual completamente antes de intentar el ensamble, operar o instalar el producto. Si tiene preguntas acerca del producto, por favor llame a nuestro departamento de servicio al cliente al 1-866-439-9800, de 8 am - 8 pm, Horario del Este, de Lunes - Viernes. 1. No permita que los niños se suban o jueguen en o alrededor de este producto. 2. Utilice esta unidad para la que ha sido concebido. No utilice las repisas como escalera de mano. 3.
INSTRUCCIONES DE ENSAMBLE Paso 1 GG Clavija de madera de 8 x 30 mm F GG x8 GG GG F GG Paso 2 AA BB CC DD HH AA Perno de 6 x 40 mm CC AA CC DD F HH BB x 6 DD B BB Perno de 6 x 60 mm x2 CC AA F Arandela de Presión x8 AA D CC DD CC BB DD D DD D F CC Arandela Plana Pequeña HH DD x8 ? 8x30mm Wood Pins HH FF Qty.8 Borde biselado dando hacia el inferior de la unidad Tuerca de Barril x2 M6 Nuts Qty.
INSTRUCCIONES DE ENSAMBLE Paso 3 AA HH Perno de 6 x 40 mm x 6 BB BB Perno de 6 x 60 mm Arandela de Presión DD CC BB DD CC DD DD CC Qty.8 BB x2 Qty.
INSTRUCCIONES DE ENSAMBLE Paso 5 Instalación de Soporte del Madera FF G G Tornillo para Madera de 3.5 x 12 mm FF x 8 NOTA: Adjunte el soporte de madera (G) al interior de la unidad como un refuerzo para unir el juego del poste ampliable (se vende por separado) en el lado opuesto. Por favor coloque el soporte del Poste en el centro del soporte de Madera. Por favor descarte este paso si solamente le sirve la unidad como torre individual.
INSTRUCCIONES DE ENSAMBLE Paso 7 Instalación de Colgar en Pared NOTA: DOS A MÁS PERSONAS DEBEN DE TRABAJAR JUNTAS PARA INSTALAR LA UNIDAD A LA PARED. A A CUIDADO Y MANTENIMIENTO Revise periódicamente para asegurarse de que todos los componentes están bien posicionados, libres de daños y bien conectados. Utilice un paño suave y limpio para no rayar la superficie al desempolvar. Nunca use agua para limpiar sus muebles, ya que puede causar daño al acabado.
GARANTÍA LIMITADA DE POR VIDA Este producto (con exclusión de las repisas) está garantizado para el comprador original. Si hay una falla en esta unidad debido a defectos en materiales o mano de obra, el fabricante reparará o reemplazará este artículo a nuestra discreción, sin cargo. La garantía se anula si el producto ha sido montado de forma incorrecta, mal uso, abuso por sobrecarga, alterado en cualquier forma o dañados debido a un accidente.
G A F D C B E D H F A E D AA BB CC DD ? 8x30mm Wood Pins EE FF GG HH FF M6 Nuts II JJ KK Qty.8 GG Qty.