AF-48CPA 48”CORE PLUG AERATOR PATENT PENDING READ AND FOLLOW ALL SAFETY RULES AND OPERATING INSTRUCTIONS BEFORE USING THIS EQUIPMENT 6000705 - REV A 11/10
Safety Rules This is the safety alert symbol. It is used to alert you to potential personal injury hazards. Obey all safety messages that follow this symbol to avoid possible injury or death. Read and understand all safety rules and operating instructions before using this tractor attachment. Follow all safety rules and operating instructions provided by your tractor's manufacturer when using attachment. Never allow children or untrained persons to operate tractor or attachment.
Carton Contents 6 (x1) 5 (x1) 12 (x40) 3 (x2) 2 (x2) 1 (x1) 4 (x1) 9 (x2) 7 (x1) 10 (x5) 15 (x2) 8 (x2) 11 (x40) 13 (x10) 14 (x2) 19 (x1) 18 (x40) 17 (x40) 25 (x1) 20 (x1) 26 (x1) 23 (x4) 22 (x2) 21 (x4) 28 (x12) 24 (x4) 31 (x2) 29 (x12) TOOLS REQUIRED FOR ASSEMBLY: • 1/2" Wrench and Socket • 9/16" Wrench and Socket • 3/4" Wrench and Socket 30 (x14) • • • 2 27 (x10) Needle-Nose Pliers Grease Gun Mallet 16 (x1)
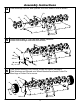
1 Assembly Instructions Attach Hitch to Top Plate and tighten hardware. 28 29 30 5 1 31 NOTE HOLE LOCATION 2 Attach Center Plates to Top Plate and tighten hardware. Insert Bushings to hold Spool in place. 10 13 3 28 29 27 3 Hold Foot Lever in place and slide Axle into position, then tighten hardware. Install Tube Plugs into Foot Lever using a mallet if necessary.
Assembly Instructions 4 Slide Bushings, Spools, and Spacers onto both ends of Axle as shown. 13 10 13 10 13 14 5 Attach Side Plates to Top Plate and tighten hardware. Install final Bushings onto both ends of Axle. 13 28 29 30 30 27 6 Slide Wheel Brackets onto Axle as shown and tighten hardware. Slide Washers and Wheels onto Wheel Brackets and install Cotter Pin. Bend legs of Cotter Pin to secure.
7 Assembly Instructions Hook the Tine Spring into the cutout as shown on the left. Push the Tine Spring towards the center of the Spool until it locks into the slot. Slide the Tine into the Tine Spring. Secure with pins as shown. 18 11 12 17 8 Rotate each Spool and verify that all 40 Tines are pointed in the same direction as shown. 9 Slide Locking Handle through hole in Top Plate and fasten to Foot Lever. Install Handle Grip and Hitch Pin as shown.
Operating Instructions Before Using Lawn Aerator: 1. Apply grease to wheels using grease gun until grease can be seen squeezing out from both sides of the wheel. 2. Check tire pressure and inflate to 24 psi if needed. 3. Read all Safety Rules found on page 2. How to Aerate Lawn: 1. Mow lawn and remove loose clippings. 2. If ground is extremely hard or dry, it should be watered for one to two hours before aerating. 3. Do not aerate if ground is too wet or muddy. 4.
Warranty If this product fails due to a defect in material or workmanship within TWO YEARS from the date of purchase, we will at our option repair or replace it free of charge. This warranty excludes tires, wheels, springs and tines, which are expendable and become worn during normal use. This warranty does not cover: • Repairs necessary because of operator abuse or negligence. • Equipment used for commercial or rental purposes. • Paint that is worn or faded due to normal use or exposure.
Repair Parts 16 6 27 31 27 1 30 29 28 3 5 24 7 23 26 25 30 29 28 15 19 29 20 28 30 2 13 4 24 8 9 10 17 11 12 14 18 23 21 21 13 8 22
DESIGNED AND TESTED IN COLUMBUS, OHIO MANUFACTURED IN THE U.S.A.