
Installation Guide

PG 9
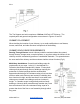
5. Cut Roof Opening: Cut an opening in the roof
directly above the opening below and at least 4
inches larger than the chimney’s outside diameter
to provide at least a 2 inch clearance all around
the chimney. The chimney must be centered
within this opening and maintain the 2 inch
clearance to combustibles.
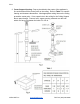
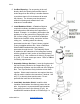
6. Install Radiation Shield: A Radiation Shield is
required in multistory installations at each floor
penetration above that where the Support Box is
located. Example: in a multistory home where the
appliance is on the ground floor (Support Box is in
the 1st floor ceiling), you would need a Radiation
Shield at the 2nd floor ceiling, and at the 3rd floor
ceiling, etc., including where the chimney
penetrates into the attic. Figure 6 shows a typical
2-story installation with an attic. Note: a Radiation
Shield is NOT installed where the chimney
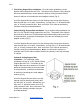
penetrates through the roof. The Radiation Shield
is installed on the underside of the ceiling/floor framing,
with the cylindrical “tube” portion of the shield pointing
upward (Fig 7). Use a minimum of either (1) 8 penny nail
or (1) #8, 1-½” wood screws per corner. Refer to Table 1
for framing requirements.
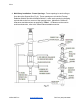
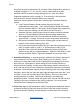
7. Assemble Chimney Sections: Lower the female end of
the first Chimney Section in the Support Box (Fig 8). It
will twist-lock clockwise onto the male end of the Support
Box. Turn Pipe Sections firmly clockwise to lock them
together. Sheet metal screws are not required, but they
may be used to reinforce the connection, if desired. Use
only ½” (or shorter) sheet metal screws. Do not
penetrate the inner liner of the chimney.
8. Install Attic Insulation Shield: Install the Attic
Insulation Shield where the chimney passes into an
attic. Its purpose is to prevent debris and insulation
from getting too close to the chimney (Fig 9). An
installed Attic Insulation Shield is 15 inches high. In
AllFuel HST Inc www.allfuelhst.com Toll Free: (833) 326-8368