
Installation Guide
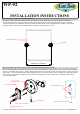

Center to Center
MIRROR(MRRT-92)
BRACKET
BACK PLATE PATTERN
DRILLED HOLES
SET SCREW
#8 x 1-1/8
PAN HEAD SCREW
#8 WALL ANCHOR
BACK PLATE
DRILLED HOLE
No portion of this document or any artwork contained herein should be reproduced in anyway without the express written consent of ALLIED BRASS INC.
WP-92
INSTALLATION INSTRUCTIONS
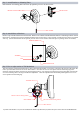
Step 1: Locating Center to Center Measurement
On a stable surface, attach the brackets to the mirror as shown. Once the brackets are securely attached measure the
distance from the center of one bracket to the center of the opposite bracket and record this measurement. Determine
your desired location for installation and make 2 marks for the location of the mounting brackets. Marks are to be made
using the center to center distance determined above. Make certain that marks are level.
Step 2: Drill holes in Wall for screw anchors and attach Mounting Plates to Wall
Remove mounting plate from brackets by loosening set screw in backplate as pictured below. Place center hole of mounting
plate over each mark made in step 1. Make 2 marks where mounting screws will be placed as shown below. Drill hole at each
of the marks. (You may substitute other style mounting anchors or screws if desired. Must be designed to support the weight
of the mirror). Place anchors into the holes made. Place mounting plate over holes and secure to mounting surface using
screws as shown below.