
Installation Guide
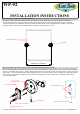

BACK PLATE
BRASS CASTING BRACKET
SET SCREW
CAP
WASHER
MIRROR (MRRT-92)
THREADED STUD
Direction for increasing tension
Direction for decreasing tension
Allen Wrench
TENSION LUG
SET SCREW
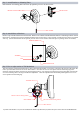
Step 3: Attach Brackets to Mounting Plates
Place brackets on mounting plates and secure by tightening set screw as shown below.
Step 4: Attach Mirror to Brackets
Remove cap from threaded stud in each bracket. Remove one washer from threaded stud and leave remaining washers on stud.
Place mirror on brackets by inserting studs through the holes in each mirror. Place washer on stud and secure mirror to bracket
with cap. (If more thread needs to be exposed you can remove some washers from stud prior to placing mirror on brackets).
Step 5: How to adjust tention of Tilt Mechanism
This step must be performed with the mirror glass removed from brackets. To increase or decrease the tension of the tilt on the
mirror you must first loosen the set screw shown below. Once the set screw is loose please turn the tensioning lug in the
direction required for either increasing or decreasing the tension. It is easiest to turn the lug by leaving the allen wrench in the
set screw and using that as leverage to make the adjustment. Once the adjustment has been made please tighten set screw to
secure position of tensioning lug.
No portion of this document or any artwork contained herein should be reproduced in anyway without the express written consent of ALLIED BRASS INC.