
User's Manual
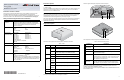

Package Contents of the AT-TQ3600 Wireless Access Point
The following items should be in the shipping container:
One AT-TQ3600 Wireless Access Point
This AT-TQ3600 Quick Install Guide
Package Contents of the AT-TQ0091 AC/DC Power Adapter
If you are not planing to use the PoE feature of the access point to power the device, you
must separately order the AT-TQ0091 AC/DC Power Adapter. The adapter comes with four
regional power connectors. (The adapter comes with one connector already installed.)
If any item is missing or damaged, contact your Allied Telesis sales representative for
assistance. You should retain the original shipping material in case you need to return the
unit to Allied Telesis.
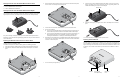
Installing the Wireless Access Point on a Table or Desk
For instructions on how to install the device on a wall or ceiling, refer to the AT-TQ3600
Wireless Access Point Installation Guide.
To install the access point on a table or desktop, perform the following procedure:
1. Place the access point upside down on the table or desk selected for the device.
2. Install the four rubber feet included with the wireless access point to the bottom
panel.
3. Route a network cable through the notch in the cover and under the bottom panel,
and connect it to the LAN port on the access point.
4. Connect the other end of the network cable to a port on an Ethernet switch.
5. Do one of the following:
If you are not using the PoE feature on the Ethernet LAN Port to power the unit,
continue with this procedure to attach the AT-TQ0091 AC/DC Power Adapter.
If you are using the PoE feature on the LAN Port to power the access point, turn
the access point right side up. The installation procedure is complete. Go to
“Installing Anti-theft Devices” or “Starting the Initial Management Session”.
6. Route the DC power cable from the AT-TQ0091 AC/DC Power Adapter through the
notch in the cover and under the bottom panel, and connect it to the DC-IN 12VDC
connector on the access point.
7. Turn the access point right side up.
8. Check the plug on the AT-TQ0091 AC/DC Power Adapter to see if it is the correct
plug for your region. If it is not the correct plug, remove it by pressing down on the
release tab and sliding it from the slot on the adapter.
9. Slide the correct plug for your region into the slot on the adapter until it clicks into
place.
10. Connect the adapter to an appropriate AC power source.
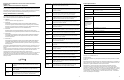
Installing Anti-theft Devices
The access point has holes for anti-theft devices. You may want to install one or more
anti-theft devices if the access point is installed in a non-secure area. Anti-theft devices
are not available from Allied Telesis. The holes for anti-theft devices are identified in this
figure. A Kensington lock should be used when the device is installed on a table or desk.
A padlock or Torx or similar screw works only when the device is installed on a wall or
ceiling.
3126
3123
3116
3117
3124
Release Tab
3125
PWR SYS 10M
100M
2.4GHz 5GHz
AT-TQ3600
3118
Padlock Torx or similar
screw (M3 x 4mm)
Kensington
Lock
4 5 6