How To | Configure the WLAN with QoS Introduction This How to Note explains how to configure Quality of Service (QoS) in a wireless Local Area Network to prioritize traffic under busy conditions. There is an example scenario provided at the end of this document, which describes the configuration for prioritizing voice traffic. This example could be extended to cover a wider installation case.
Trademarks The following trademarks appear in this document: Ethernet™ is a trademark of Xerox Corporation. Wi-Fi®, Wi-Fi Alliance®, WMM®, Wi-Fi Protected Access® (WPA), the Wi-Fi CERTIFIED logo, the Wi-Fi logo, the Wi-Fi ZONE logo and the Wi-Fi Protected Setup logo are registered trademarks of the Wi-Fi Alliance.
Table of contents Introduction ...................................................................................................................................................... 1 Trademarks........................................................................................................................................................ 2 Which products and software version does this document apply to?................................................... 2 Table of contents............................
Overview What is Wi-Fi Multimedia (WMM) The Wi-Fi Alliance defined WMM as a subset of the IEEE 802.11e standard to support QoS on wireless networks. WMM offers a mechanism to prioritize traffic demands from different applications and grants an adequate support to multimedia applications, thereby reducing the harmful effects caused by high latency and throughput reductions.
How Wi-Fi Multimedia works In the IEEE 802.11 standard, the wireless nodes access the medium using the “listen-before-talk” algorithm CSMA/CA-based 1 Distributed Coordination Function (DCF). The wireless node transmits a frame once its checks indicate that the medium is free for a period of distributed inter-frame space (DIFS) and a random back-off time has elapsed. Otherwise, it defers the frame delivery.
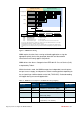
minimum wait (AIFS) random backoff (CW) CW = 0~15 slots transmission opportunity AIFS = DIFS + 7 slots background AIFS = DIFS + 3 slots CW = 0~15 slots best-effort AIFS = DIFS + 2 slots CW = 0~7 slots AIFS = DIFS + 2 slots CW = 0~3 slots video voice slot time EIFS (optional) DIFS contention window PIFS busy medium SIFS backoff slots Interframe spaces: SIFS: short interframe space PIFS: PCF interframe space DIFS: DCF interframe space AISF: arbitration interframe space EIFS: extended interfram
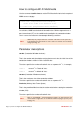
How to configure Wi-Fi Multimedia Use the command: traffic-class to set the EDCA back off criteria for the required WMM access category: traffic-class [background|best-effort|video|voice] cw-min <0-10> cw-max <0-10> fixed-slot <2-20> no traffic-class [background|best-effort|video |voice] On collisions, WMM sets the back off time within the CWmin range and uses a persistence factor (PF) as the coefficient that multiplies the contention window size in successive retransmission attempts following a collision.
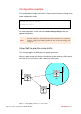
Connecting AT-WR4600 products There are two options for accessing the Command Line Interface of the devices: SSH remote shell, using any text-mode SSH client software. RS-232 Line Driver/Receiver that provides a standard DTE console interface; note, this is optional and is not always available. Accessing the device via SSH The Secure Shell (SSH) is an encrypted networking protocol, allowing the user to configure the device through an Ethernet network. Microsoft does not supply SSH tool.
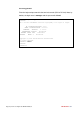
Accessing the CLI Enter the login and password via the terminal console (SSH or RS-232). Note, by default, the login name is manager and the password is friend. AT-WR4600 login: manager Password: Feb 9 10:35:07 AT-WR4600 auth.info login[6898]: root login on 'ttyS0' AA TTTTTTTTTTTTTTTTTT ooooo AAAAA TTTTTTTTTTTTTTT oooooooo AAAAAAAA TTTTTTTT I oooooo AAAAAAAAAAA TTTTTTT IIIIIIIIII AAAAAAA AAAAA TTTT IIIIIIIIII AAAAAAA AAAAA T IIIIIIIIII Copyright (C) 2012 Allied Telesis International All rights reserved.
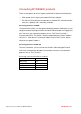
Configuration example This configuration example starts with the Command Line Interface already set to Global configuration mode: AT-WR4600#configure terminal AT-WR4600(config)# On setup completion, run the command show running-config to verify the applied configuration. Note: All of the examples in this document provide the minimum set of commands useful for configuring the WMM, regardless of other services like bridging, and security etc.
Common setup To restore the factory configuration on any device, enter the following commands: AT-WR4600#copy nvram:/factory-config-bridged startup-config AT-WR4600#reload Configure the common SSID for open authentication: AT-WR4600(config)#dot11 ssid ATIopen AT-WR4600(config-ssid)#authentication open AT-WR4600(config-ssid)#guest-mode AT-WR4600(config-ssid)#exit Page 11 | How To: Configure the WLAN with QoS alliedtelesis.
[Bridge0] station role: root bridge Assign the static IP address: AT-WR4600(config)#interface vlan1.1 AT-WR4600(config-if)#no ip address dhcp AT-WR4600(config-if)#ip address 10.0.0.
[Bridge1] station role: non-root bridge [AP1] station role: root access-point Assign the static IP address: AT-WR4600(config)#interface vlan1.1 AT-WR4600(config-if)#no ip address dhcp AT-WR4600(config-if)#ip address 10.0.0.
[Bridge2] station role: non-root bridge Assign the static IP address: AT-WR4600(config)#interface vlan1.1 AT-WR4600(config-if)#no ip address dhcp AT-WR4600(config-if)#ip address 10.0.0.