
User's Manual

Chapter 5: Powering On the Switch
96
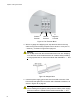
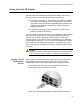
2. Connect the other end of the cable to an RS-232 port on a terminal or
PC with a terminal emulator program.
3. Configure the terminal or terminal emulator program as follows:
Baud rate: 9600 bps (The baud rate of the Console Port is
adjustable from 1200 to 115200 bps. The default is 9600 bps.)
Data bits: 8
Parity: None
Stop bits: 1
Flow control: None
Note
The port settings are for a DEC VT100 or ANSI terminal, or an
equivalent terminal emulator program.
4. Press Enter.
You are prompted for a user name and password.
5. When prompted for a user name, go to “Changing the Stack ID
Number” on page 97.
Starting a Telnet
Management
Session
To perform this procedure, you must have Telnet client software on your
computer. This procedure assumes that you will be connecting your
computer to a twisted pair port on the switch. But you may use a fiber optic
port. To start a Telnet management session on the switch using the
factory IP address, perform the following procedure:
1. Assign your computer the IP address 169.254.n.n with the subnet
mask 255.255.0.0. The variable n can be from 1 to 255. You may not
use the switch’s IP address 169.254.1.1. Refer to your computer’s
documentation for instructions on how to set the address.
Note
If your computer is running a DHCP client, it automatically defaults
to an 169.254.n.n address if it does not receive a response from a
DHCP server. To have the DHCP client assign the address,
disconnect your computer from your network, power it on, wait for
the DHCP client to generate the IP address 169.254.n.n, and then
connect the computer to your new 8100L or 8100S Series switch.
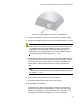
2. Connect a twisted pair cable to one of the networking ports on the
switch. You may connect the cable to any of the ports, except the
Console port.