
User's Manual


Stack Installation Guide for 8100S Series Switches
125
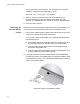
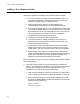
Figure 57. Removing the Stacking Cables
9. Remove the switch from the equipment rack.
10. Go to the next procedure.
Configuring the
New Master
Switch
With the master switch removed from the equipment rack, you are ready to
install the new master switch by configuring its stack ID number and
downloading the configuration file. These steps must be performed before
the switch is connected to the stack. To configure the new master switch,
perform the following procedure:
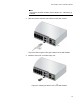
1. Install the new master switch in the equipment rack. For instructions,
refer to Chapter 4, “Installing and Labeling the Switches in an
Equipment Rack” on page 71.
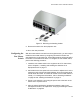
2. Add a label to the front panel of the new switch or adjacent to it on the
equipment rack, with the unit’s MAC address, found on the back panel,
and its stack ID number. The stack ID number for the master switch is
usually 1. For background information, refer to “Stacking Guidelines”
on page 52 and “Labeling the Switches” on page 77.
3. Power on the switch by connecting the power cord to the back of the
switch and to a power source.
4. After the switch initializes its management software, start a local
management session, as explained in “Verifying and Setting the Stack
ID Numbers” on page 82.