
Operation Manual
Chapter 9: Virtual LANs and GVRP
124 Section I: Using the Menus Interface
a. Type S to select Select Port Number.
The following prompt is displayed:
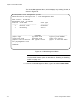
Enter port number >
b. Enter the ports of the VLAN.
You can specify the ports individually separated by commas, for
example, 2,7,15, as a range of ports separated by a hyphen, for
example, 2-4, or both, for example, 2-7,15,17.
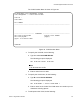
7. When the VLAN is complete, type A to select Apply and apply the
VLAN settings.
The VLAN Management Menu is displayed again with information
about the VLAN you just created. The VLAN is now active on the
switch.
8. If you intend to define a port as an untagged member of a VLAN, you
will need to change the PVID of the port to match the VLAN’s VID.
Refer to “Configuring the Port PVID” on page 124.
Configuring the
Port PVID
This procedure adjusts a port’s VID value. The PVID value determines if a
port is a tagged or untagged member of a VLAN. A port is an untagged
member of a VLAN whose VID value matches its PVID. A port is a tagged
member of a VLAN whose VID does not match the PVID. (The PVID must
equal on of the port’s VIDs.) A port can be a tagged member of a VLAN
only if the port is a member of more than one VLAN at the same time.
When you create a new VLAN, the ports of the new VLAN are initially
designated as tagged members of the new VLAN. The PVIDs of the ports
retain the previous settings after the ports become members of a new
VLAN. If you want the ports to function as untagged members of a new
VLAN, you must change the PVID values to match the VID of the VLAN,
as shown in the following procedure.
To adjust the PVID value of a port, perform the following procedure:
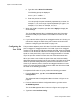
1. From the Main Menu, type A to select Advanced Switch
Configuration.
The Advanced Switch Configuration Menu is shown in Figure 21 on
page 87.
2. From the Advanced Switch Configuration Menu, type V to select
VLAN Management.
The VLAN Management Menu is shown in Figure 29 on page 122.
3. Type S to select Set Port Config.