
Specifications
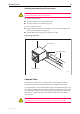
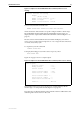

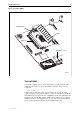
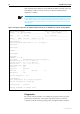
Table Of Contents
- AT-8900 Series Hardware Reference
- Contents
- Models Covered By This Reference
- Why You Should Read This Reference
- Where To Find More Information
- Hardware Description
- Online Documentation
- AT-TFTP Server
- Using Windows Terminal and Windows Hyperterminal
- Switch Start-up
- RS-232 Terminal Port (ASYN0)
- Useful Cables
- Test Facility
- Power Supply Units (PSUs)
- Port, Connector, and Cable Combinations
- Troubleshooting
- Expansion Options
- Restricted Procedures
- Contacting Us

Hardware Reference 37
C613-03075-00 REV A
totally dedicated to their use. A detailed knowledge of the way the switch
hardware functions is necessary if diagnostics are to be used effectively.
The switch will not perform switching operations if diagnostics are running.
This section is not intended as a guide to the diagnostics software. Diagnostics
are designed to be run by service personnel only. For more information, contact
your Authorised Allied Telesyn distributor or reseller.
To enable diagnostics mode:
1. Connect a terminal to the RS-232 Terminal Port (ASYN0).
Using a terminal cable, connect a terminal to the RS-232 Port (ASYN0) on
the switch. See “Useful Cables” on page 16 for more information on
terminal cables.
Set the terminal communication parameters to the following:
• Baud rate: 9600
• Data bits: 8
•Parity: None
•Stop bits: 1
• Flow control: Hardware
2. Restart the switch.
Restart the switch, using an unbent paper clip, or something of similar
dimensions, to operate the recessed reset button on the switch’s front
panel, or by using the terminal to log in and enter the command:
RESTART REBOOT
See “To log In” on page 11 for more information on how to log in.
3. Enable diagnostics mode during start-up.
During the switch start-up process, at the prompt:
Force EPROM download (Y)?
press [Ctrl/D] on the terminal to enter diagnostics mode. A banner page will
be displayed on the terminal (see Figure 16 on page 38). This can be used to
check that the terminal is correctly connected.
Performing a Full flash Test or erasing flash will delete all configuration and
release files. Make sure you know how to reload these files before erasing flash
or performing a flash test.