
User Manual


Table Of Contents
- Contents
- Figures
- Tables
- Preface
- Section I
- Basic Operations
- Chapter 1
- Basic Switch Parameters
- Chapter 2
- Port Parameters
- Chapter 3
- SNMPv1 and SNMPv2c
- Chapter 4
- MAC Address Table
- Chapter 5
- Static Port Trunks
- Chapter 6
- Port Mirroring
- Section II
- Advanced Operations
- Chapter 7
- File System
- Chapter 8
- File Downloads and Uploads
- Chapter 9
- Event Logs and the Syslog Client
- Chapter 10
- IGMP Snooping
- Section III
- SNMPv3
- Chapter 11
- SNMPv3
- Configuring the SNMPv3 Protocol
- Enabling or Disabling SNMP Management
- Configuring the SNMPv3 User Table
- Configuring the SNMPv3 View Table
- Configuring the SNMPv3 Access Table
- Configuring the SNMPv3 SecurityToGroup Table
- Configuring the SNMPv3 Notify Table
- Configuring the SNMPv3 Target Address Table
- Configuring the SNMPv3 Target Parameters Table
- Configuring the SNMPv3 Community Table
- Displaying the SNMPv3 Tables
- Displaying the User Table Entries
- Displaying the View Table Entries
- Displaying the Access Table Entries
- Displaying the SecurityToGroup Table Entries
- Displaying the Notify Table Entries
- Displaying the Target Address Table Entries
- Displaying the Target Parameters Table Entries
- Displaying the SNMPv3 Community Table Entries
- Section IV
- Spanning Tree Protocols
- Chapter 12
- Spanning Tree and Rapid Spanning Tree Protocols
- Section V
- Virtual LANs
- Chapter 13
- Port-based and Tagged VLANs
- Section VI
- Port Security
- Chapter 14
- 802.1x Port-based Network Access Control
- Index
AT-S63 Management Software Web Browser User’s Guide
Section VI: Port Security 225
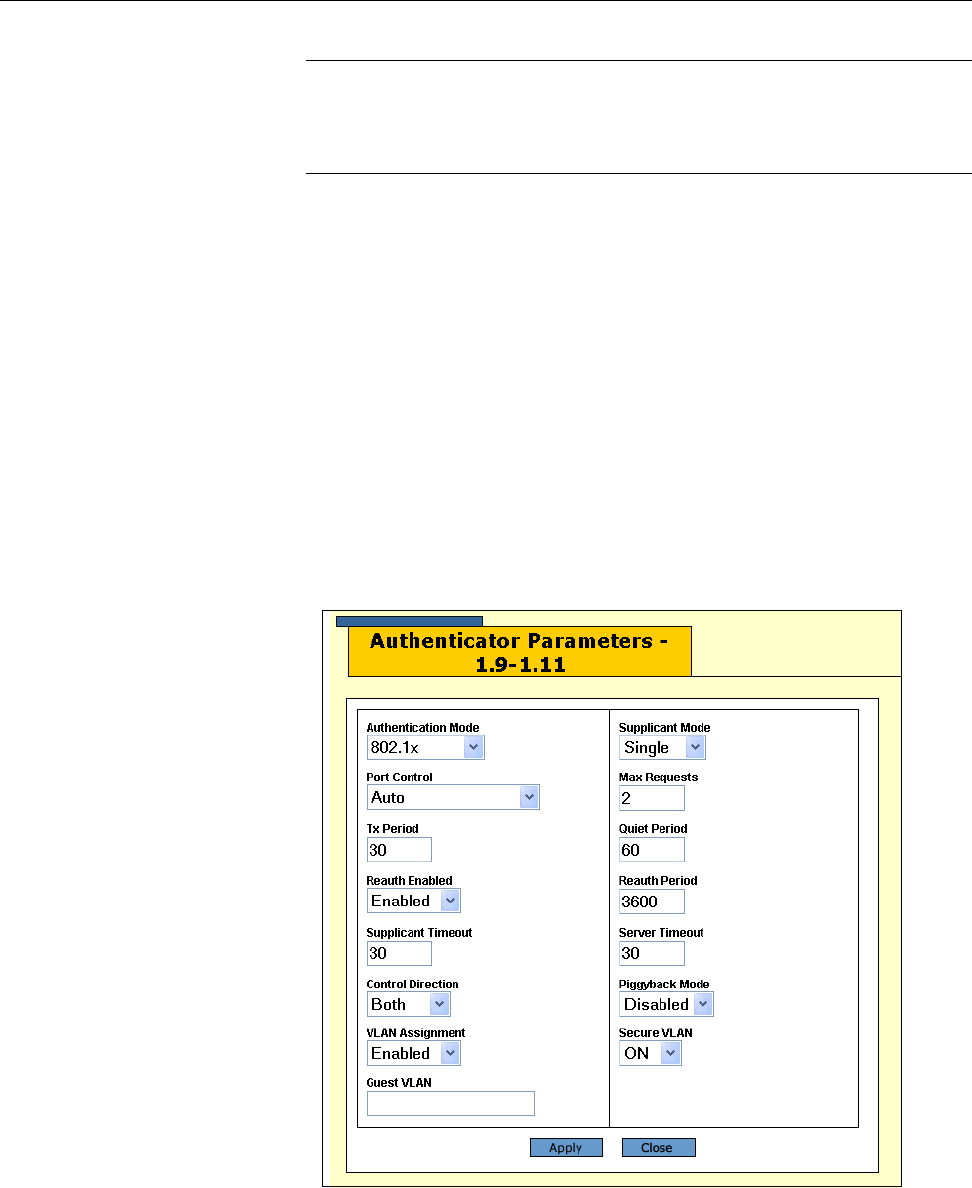
Configuring the Authenticator Port Parameters
Note
A port must be set to the authenticator role before you can configure
its parameters. For instructions, refer to “Setting the Port Roles” on
page 222.
To configure the 802.1x parameters on authenticator ports:
1. From the Home page, click the Configuration button.
2. From the Configuration menu, click the Network Security button to
display the 802.1x Port Access tab in Figure 85 on page 222.
3. In the switch image, use the Stack ID pull-down menu to choose the
switch that has the authenticator ports you want to configure. If the
switch is already displayed, skip this step.
4. In the switch image, click the authenticator ports you want to configure.
Selected ports turns white.
5. Click the Settings button to display the window in Figure 87.
Figure 87. Authenticator Parameters Page